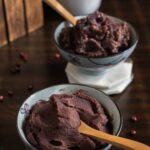
Instant Pot Sweet Azuki Bean Paste
This Instant Pot Sweet Azuki Bean Paste recipe is a total time saver when you're in a pinch! Enjoy the time reduction from 12+ hours to less than 1 hour and still as tasty as the traditional method.
Ingredients
- 1 cup dry azuki bean (about 7 oz. or 200g)
- 4 cup water
- ¾ cup granulated sugar
- Pinch of salt
Instructions
- Wash the azuki beans by rinsing them a couple of times in a bowl. Pick out any debris or beans that look black or undesirable. Drain the beans and place them in the pot insert of your Instant Pot along with the 4 cups of water.
- Place the lid on the Instant Pot, put it into the lock position, and make sure the vent is switched to "sealing". Select the normal "Pressure Cook" setting and change the time to "25 minutes" on high pressure.
- Once the Instant Pot has completed the 25 minutes of cooking time, let it naturally release for 10 minutes. Then, using a spoon or chopsticks to carefully switch the vent to "venting." Once the all of the steam has been released, open the Instant Pot Lid.
- At this point, the beans should be able to be easily mashed between your fingers. Carefully, remove the Instant Pot insert and drain the beans into a fine mesh strainer. Let the beans drain naturally.Reserve about ½ cup of the bean liquid if you are making the fine azuki bean paste!*To check the doneness of the azuki beans, check the post for picture reference.*
For the coarse azuki bean paste (aka tsubuan):
- Transfer the drained azuki beans into a large, nonstick pan. Add the sugar and pinch of salt to the beans, and cook the mixture over medium high heat. Make sure to stir constantly and scrape the bean paste off the side of the pan to prevent the bean paste from scorching. Once the bean paste starts to look thick, turn the heat to medium and continue to cook the bean paste until a line drawn through the bean paste doesn't disappear. The entire process will take about 5 to 10 minutes.*For some picture reference, check out the post above!*
- Remove the azuki bean paste from the heat once it's reached the right consistency. Transfer the paste to a heatproof container and cover the paste with a plastic wrap, making sure the plastic is touching the paste. Let the bean paste cool at room temperature or in the fridge. Once cooled, use the bean paste immediately, or keep it refrigerated and store it in an airtight container.
For the fine azuki bean paste (aka anko):
- Once the beans are drained, transfer the beans to a blender. Blend the beans until smooth, or as smooth as possible. If the bean paste seems too thick and is difficult to blend, add about ¼ to ½ cup of the reserved bean liquid to the paste and blend until smooth.
- Transfer the blended bean paste to a large, nonstick pan and add the sugar and the salt. Cook the bean paste mixture over medium high heat until the bean paste starts to look thick, then reduce the heat to medium and continue to cook the bean paste until a line drawn through the paste doesn't disappear. Make sure to continuously stir the mixture and scrape down the sides of the pan to prevent scorching and clumps of bean paste becoming overly dry.The process will take about 5 to 10 minutes.*For some picture reference, check out the post above!*
- Remove the azuki bean paste from the heat once it's reached the right consistency. Transfer the paste to a heatproof container and cover the paste with a plastic wrap, making sure the plastic is touching the paste. Let the bean paste cool at room temperature or in the fridge. Once cooled, use the bean paste immediately, or keep it refrigerated and store it in an airtight container.
Notes
Because our azuki bean paste recipe is made with less sugar than the bean paste you can find at the grocery store, the shelf life is dramatically decreased. It is best to enjoy the bean paste as soon as possible, or up to 4 days refrigerated, up to 1 month frozen.
As mentioned, we tried to make this azuki bean paste recipe as low on sugar as possible, so if you wish to make the bean paste sweeter, feel free to increase the amount of sugar used. The best time to adjust the sweetness level is when the bean paste is almost to the perfect consistency.
Nutrition
Calories: 614kcal | Carbohydrates: 137g | Protein: 20g | Fat: 1g | Sodium: 6mg | Potassium: 1237mg | Fiber: 13g | Sugar: 75g | Vitamin A: 17IU | Calcium: 66mg | Iron: 5mg
Keywords: anko, red bean paste, tsubuan, 红豆沙
Tried this recipe?Mention @two_plaid_aprons or tag #twoplaidaprons!