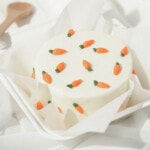
Lunch Box Cake (Mini Carrot Cake)
This mini carrot cake is an inspiration based on Korean lunch box cake. It's cute, personal size, and perfect for Easter! These mini lunch box carrot cakes are soft and fluffy and frosted with a lightly sweetened, fluffy cream cheese frosting.
Ingredients
For the carrot cake:
- 180 grams all-purpose flour
- 1 teaspoon ground cinnamon
- ½ teaspoon baking soda
- ½ teaspoon baking powder
- 150 grams brown sugar light or dark (if using cups, packed)
- 120 milliliters oil any neutral oil will do
- 57 grams unsalted butter softened
- 2 large egg
- 135 grams carrot finely shredded (about 1 cup packed)
For the cream cheese icing:
- 340 grams cream cheese softened
- 150 grams granulated sugar
- 356 milliliters heavy cream kept cold
- Green and orange food colorings (optional for decorating)
Instructions
- Make the carrot cake:Preheat the oven to 350°F and prepare a half sheet pan or jelly roll pan lined with parchment paper.
- In a small mixing bowl, combine the flour, cinnamon, baking soda, and baking powder. Mix until well combined and set aside.
- In a large mixing bowl, add the brown sugar, oil , and unsalted butter. Using a hand mixer, blend on medium low speed until the sugar and fats are somewhat combined. Increase the speed to medium high and blend for about a minute, or until everything is well combined. Scrape down the sides of the bowl as needed.*At this point, the sugar and fat will look a little separated, but don't worry! It'll come together in the next step.*
- Add the eggs and mix on medium speed until well combined. Make sure to scrape down the bowl! Add the finely shredded carrots and mix it in with a rubber spatula.
- Lastly, add the dry ingredient (flour mixture) and mix with the rubber spatula until just combined and no more dry flour is visible. DON'T over mix! Over mixing will result in a dry, tough cake!
- Pour the carrot cake batter onto the prepared sheet pan/ jelly roll pan, and evenly spread the batter into about ¼ inch thick layer. Bake the carrot cake for about 12 to 15 minutes, or until a toothpick inserted in the center comes out clean.*If you're using a half sheet pan, there won't be enough batter to spread from corner to corner. As long the batter is about ¼ inch thick, it'll be good.*
- Remove the cake from the oven and let it cool completely before using.
- Make the cream cheese icing:In a cold mixing bowl, add the heavy cream. Using a hand mixer, blend the heavy cream on medium speed until medium peak (where the whipped cream kind of holds its shape but is still soft). Place it in the fridge until needed.*Please refer to the post for photo reference. When you first start mixing the heavy cream, it will splatter a lot. So start on low speed if needed then increase the speed once the cream thickens a little.*
- In another mixing bowl, add the softened cream cheese. Using the same hand mixer, blend on medium speed until the cream cheese is smooth. Add the sugar and continue mixing on medium speed until the cream cheese is smooth and the sugar is well combined.*You should not be able to feel any granules of sugar in the cream cheese.*
- Take the whipped cream out of the fridge and add a third of it to the sweetned cream cheese. Mix on medium low speed until everything is well combined. Repeat this step until all of the whipped cream has been added. Finally, mix the cream cheese icing on medium high speed until stiff peak, about a minute or two. Refrigerate until needed.*Make sure to also scrape down the sides and bottom of the bowl in between each addition!*
- (Optional) Coloring the icing:Save about 2 to 3 tablespoons of icing for the carrot pipping and 1 to 2 tablespoons for the carrot stems.Add some orange and green gel food color to the reserved icing to get your desired shade of orange and green. Start with a grain size dollop. Transfer the icings each to a pipping bag. The orange one fitted with a small round tip for the carrot pipping. The green one fitted with a small leaf tip for the carrot stem pipping. Keep the icings refrigerated until needed.*Please refer to the post for more details on the pipping tips, food coloring we used, and alternative to using a leaf tip!*
- Ice the lunch box cakes:Once the carrot sheet cake has cooled, peel the parchment off the cake and cut nine 3½ inch circles out of the cake.*We used a 3½ inch circle cookie cutter, but you can cut it by hand as well. You can save the leftover carrot cakes for snacks, cake pops or parfaits!*
- On the cake turntable, tape down an 8 by 8 inch square sheet of parchment paper. Take the cream cheese icing out of the fridge and smear a small dollop of the icing at the center of the parchment paper.*You can also ice the cake directly your turntable is you prefer, but we like using parchment paper to keep the cake sanitary and the turntable clean. Prepare 3 squares of parchment paper if using this method.*
- Place a circle of carrot cake on the icing, at the center of the parchment. Gently press down on the cake to help it adhere. Place a small amount of icing on the cake and evenly spread it to the edge of the cake. Place the second circle of cake on the icing with a gently press and repeat.
- Place the third layer of carrot cake on the icing and press down gently. Add a dollop of icing to the cake and thinly ice the cake to collect and adhere all the crumbs.
- Next, add a generous dollop of icing to the cake and evenly spread it all around the cake into about ¼ inch thick layer. Smooth out the cake and clean the off the parchment paper. Remove the tape and transfer the cake to the fridge to chill as you ice the remaining two cakes.*You can move the cake around by lifting up both sides of the parchment paper. But do be gently and move carefully.*
- Once all of the cakes have been iced, bring the first cake back onto the turntable to add the carrot pippings. Pipe the carrot using the round tip with a squeeze and pull motion. Then use the leaf tip and pipe upwards with a squeeze and pull motion. Pipe small carrots on top of the cake (and the sides if you wish). Repeat with the other two cakes as well.
- Once the cakes are done decorating, carefully lift the cakes up by using the parchment paper. Gently place each cake into a 6 by 6 inch takeout lunch box. You can serve the cake on a plate as well. Enjoy immediately or keep chilled until ready to serve!
Notes
Please refer to the post for step by step photo, tips, and FAQs!
- Every oven is different. So make sure to adjust the carrot cake baking time as needed!
- If you prefer, you can make the carrot cake a day ahead of time. Carrot cake actually tastes better the next day. So if you want, you can bake the carrot cake the day before and frost it the next day.
- Grate the carrot with a fine grater. Finely grated carrots will give the carrot cake better texture compared to coarsely grate carrots. And please do not use pre-shredded carrots for carrot cake! The extra elbow grease is worth it!
Nutrition
Calories: 1327kcal | Carbohydrates: 162g | Protein: 32g | Fat: 63g | Saturated Fat: 39g | Polyunsaturated Fat: 3g | Monounsaturated Fat: 16g | Trans Fat: 1g | Cholesterol: 313mg | Sodium: 924mg | Potassium: 757mg | Fiber: 3g | Sugar: 111g | Vitamin A: 9979IU | Vitamin C: 3mg | Calcium: 572mg | Iron: 4mg
Keywords: Easter recipe, Korean lunch box cake, mini cakes
Tried this recipe?Mention @two_plaid_aprons or tag #twoplaidaprons!