What are better than those classic, shiny, blue package Rice Krispie Treats? Homemade Rice Krispie Treats!
About a couple of months ago, we stopped by Walmart to pick up sugar, and for some odd reason, there was an endless supply of Rice Krispie Treats stacked up all along the way down the produce aisle (which is the route we take to the baking aisle...I think this was planned...). Maybe people stock up Rice Krispies for Thanksgiving? (Do you guys have Rice Krispie secrets I don't know about??🧐)
I don't even remember the last time Rice Krispies were in my pantry. Maybe in middle school? Or when I used to go trick-or-treating? Well, the point is, that was like a lifetime ago, and I just learned that Kyong looooves them. Yeah, he was drooling over there...so it was time for Mei to perform her civil duty and drag Kyong away from the temptation.
My hard work was rewarded with half an hour of "Why are you so mean?! How can you turn away from THE Rice Krispie Treats?? What's the meaning of life when I can't even have Rice Krispie Treats??"
Do those package Rice Krispies really taste that good? You already know what Kyong thinks. I just thought they were too sweet and meh. It'd be so much better if the Rice Krispies are chewier and more marshmallowy. After all, they're another reason to have more marshmallows in our diet besides S'mores and hot chocolate. I mean that's why we eat Rice Krispies right? Because we need more marshmallows in our life? Yes! So for better Rice Krispies and more marshmallows, I decided to make some better-than-the-package Rice Krispies.
...partially also to quiet Kyong's exclamations of persecution and life injustice. 😓
So here's to Rice Krispies that I actually enjoy eating (and bonus, no baking!):
Ingredients that makes it good:
- Marshmallows: I used marshmallow spread because I was curious about it. Otherwise, I'd use mini marshmallows because they're way less messy, and you can throw in a few extra at the end for extra marshmallow chew! Avoid large marshmallows cuz those take too long to melt (and who's got time for that??). However, if you are stuck with large marshmallows, you can cut them smaller.
- Rice Krispy cereal: I have seen other people use cereals like Cheerios, Lucky Charms, Cocoa Pebbles (maybe I should make a chocolate version?!), etc. I prefer the texture of Rice Krispies...they're light, crisp, and doesn't hurt my gums (lol I sound like an old lady, haha).
- Unsalted butter: Yes. Butter. Because butter makes everything better! But unsalted because it's more versatile for recipes and you won't have to worry about over-salting because of butter.
- Salt: Salt brings balance to sweets, and balance is everything.
- Vanilla: This is my go-to magic in a bottle. It brings some homemade-ness into everything. Besides, who doesn't like vanilla?
Bringing it all together:
- Melt the butter and marshmallow. In a large pot (my 5.75 quart dutch oven was the perfect size for me), melt the butter and marshmallow over medium heat while stirring occasionally. Once everything is nicely melted, turn the heat down to low.
- Add the Rice Krispie cereal. Add the cereal and mix thoroughly.
If you want some extra chewiness throw in some extra marshmallows now. If you want colors, add some sprinkles. ***Do be warned that sprinkles will melt so your Rice Krispies will change color, and the larger sprinkles will also give it some crunch if you are into that. - Transfer. Spread the Rice Krispie mix into a 9x9 square pan lined with lightly greased parchment. Spread it evenly, but do not, again, DO NOT pack it down! You will get crunchy Rice Krispies.
- To avoid having marshmallow stuck to you, slightly grease your hand/ utensil.
- Let it cool. The Rice Krispies will take about 30 minutes to an hour to become dry enough for you to cut. However, if you wish to decorate it, you may do so once it cools to room temperature.
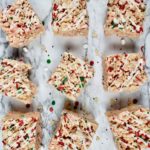
- Optional: Drizzle with powdered sugar icing and add more sprinkles.
- Powdered sugar icing: stir together 3 tablespoon of powdered sugar and 2-3 teaspoon of milk or heavy cream, until smooth. You can also adjust the thickness with more/less liquid. Use immediately. Icing will dry in 15-30 minutes.
- Cut and enjoy! Now you'll never want those packaged Rice Krispies ever again!
Storing:
I thought that I might have to wrap these babies up for later, but they disappeared faster than the time it took for it to dry lol.
But if you want to be good and store them for later, simply wrap them individually with plastic wrap or layer them with a sheet of parchment in between and store them in an air tight container, up to 3 days.
📖 Recipe
Rice Krispie Treats
Ingredients
- 8 Tablespoon unsalted butter (or 1 stick)
- 14 ounce mini marshmallows (or marshmallow spread)
- Dash of vanilla extract
- Pinch of salt
- 6½ cups Rice Krispie cereal
Optional:
- ¼ cup mini marshmallows
- 3 Tablespoon your favorite Christmas sprinkles
- 3 Tablespoon powdered sugar
- 2-3 teaspoon milk or heavy cream
Instructions
- Melt marshmallows with butter. In a large pot, over med-high heat, add butter, marshmallows, salt, and vanilla. Stir constantly. Once everything is nicely melted and mixed, turn the heat to low.
- Add Rice Krispie cereal. Add the Rice Krispie cereal and mix thoroughly. Optional: Add more mini marshmallows for additional chew, or add your favorite Christmas sprinkles for some holiday spirit! ***Be warned: smaller sprinkles will melt and turn your Rice Krispies to the sprinkle colors you used. The larger sprinkles will add some sprinkle crunch.
- Transfer to 9x9 square pan. Line a 9x9 square pan with greased parchment. Transfer the Rice Krispie mixture to the square pan and loosely spread it evenly. Don't pack tightly! You will end up with crunchy, hard Rice Krispies. ***Grease your hands or spatula to avoid sticking.
- Let cool. Let the Rice Krispies cool for 30 minutes to 1 hour before cutting.Optional: Once the Rice Krispies feel cool, you can drizzle it with a simple powdered sugar icing and sprinkles for decor.Powdered sugar icing: Mix 2-3 teaspoons of milk or heavy cream with 3 tablespoon of powdered sugar. Keep stirring until the mixture is smooth. Use immediately. Icing will dry in 15-30 minutes.
- Cut and serve. Cut Rice Krispies into 9 equal pieces. Enjoy!
Notes
- Rice Krispie Treats are best eaten ASAP. However, you can either wrap them individually in plastic wrap or layer each with a sheet of parchment and store them in air tight containers at room temperature for up to 3 days.






Comments
No Comments