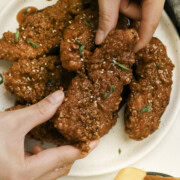


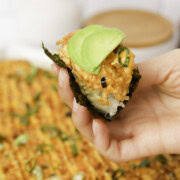
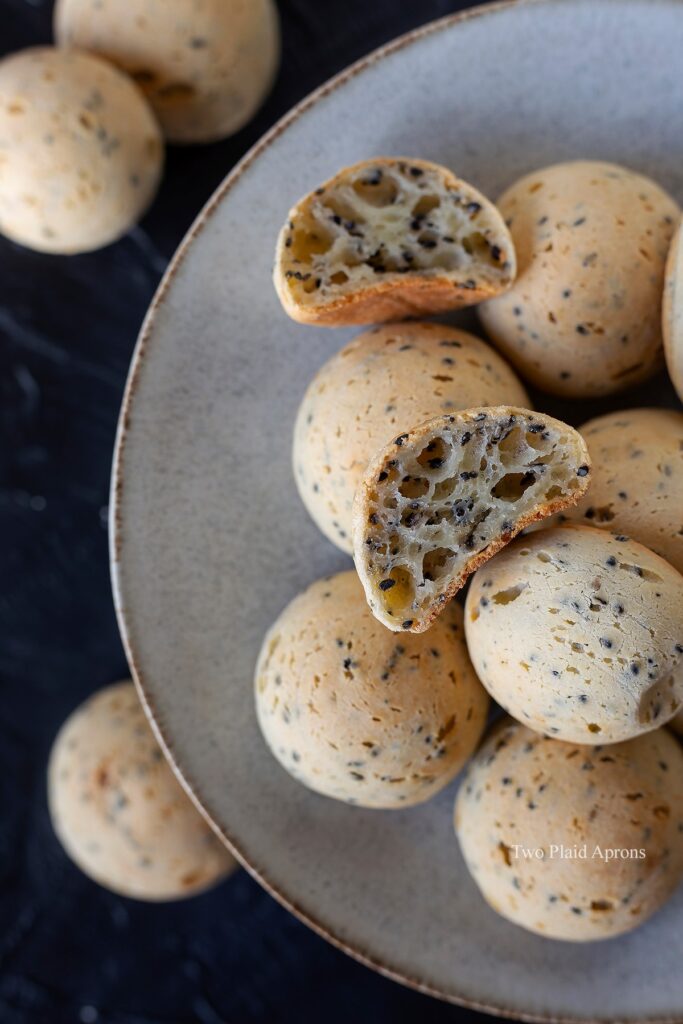
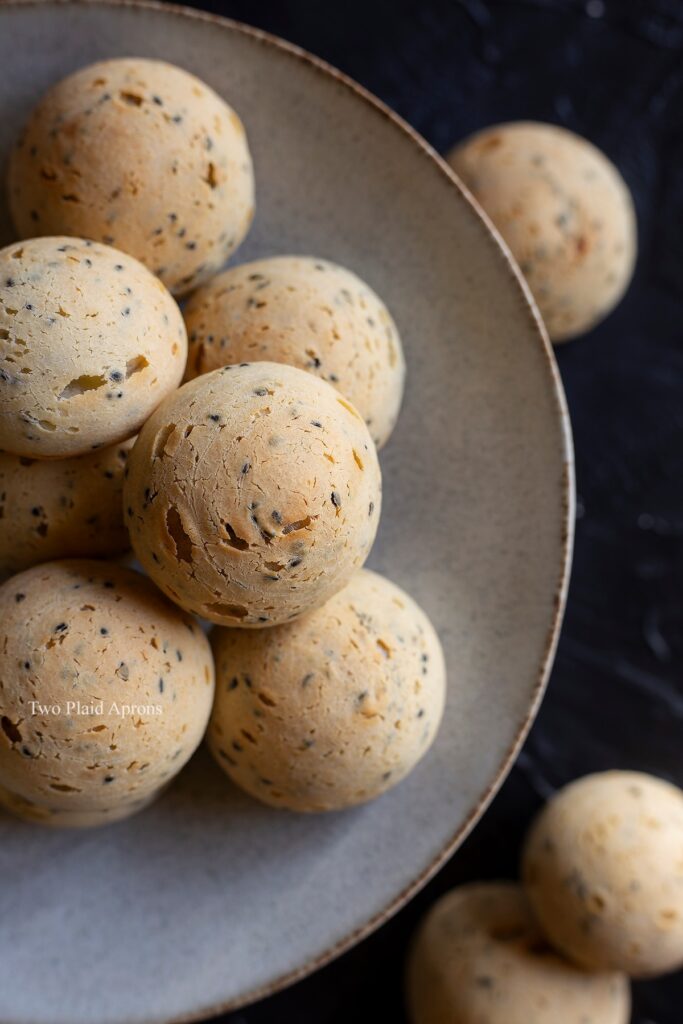
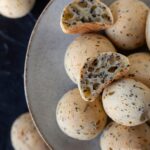
Korean mochi bread is crispy on the outside and chewy on the inside. Speckled with black sesame seeds throughout, it has a mild flavor and laced with nutty-ness in each bite.
I recently came upon Korean mochi bread when scrolling through Instagram trying to find inspiration on Korean treats to make. One of the goodies I came across were the Korean mochi breads! I have never heard of them until now, but apparently they are a very popular and common pastry in Korean bakeries.
These Korean mochi breads are crispy on the outside and chewy on the inside. They're speckled with black sesame seeds throughout, which gave them a very nice, mellow, nutty flavor. And the cutest part?! They are sometimes called dino eggs because of the slightly flaky texture on the crust, along with the black specks of black sesame. Isn't that just adorable!
Using the pâte à choux method
We've tested different ways to recreate this Korean mochi snack and the pâte à choux method is by far the easiest, if making the Korean mochi bread from scratch.

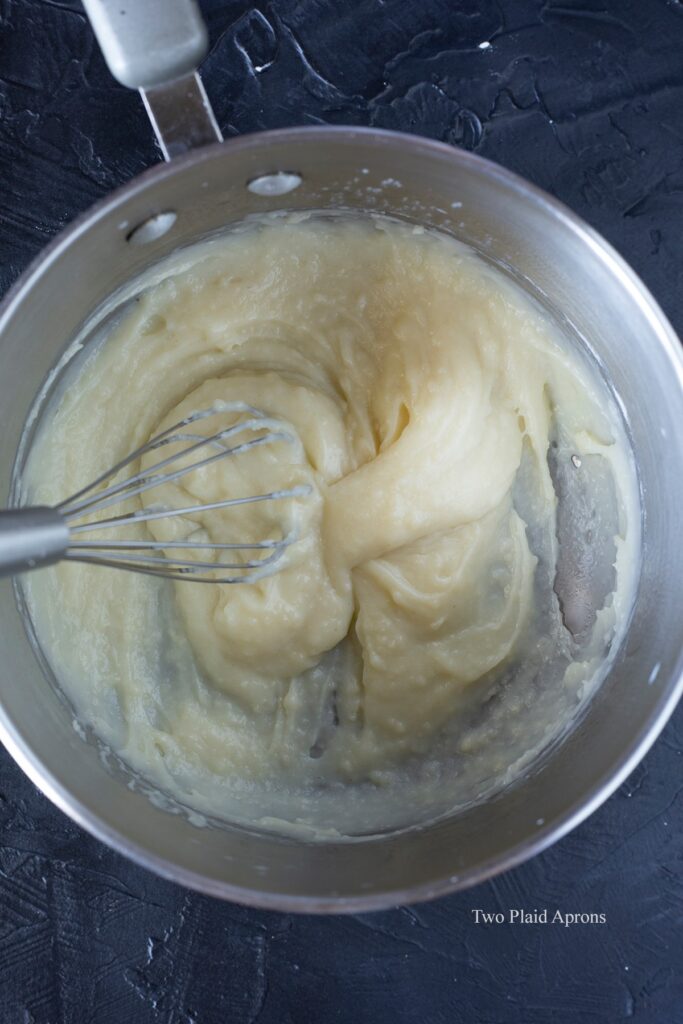
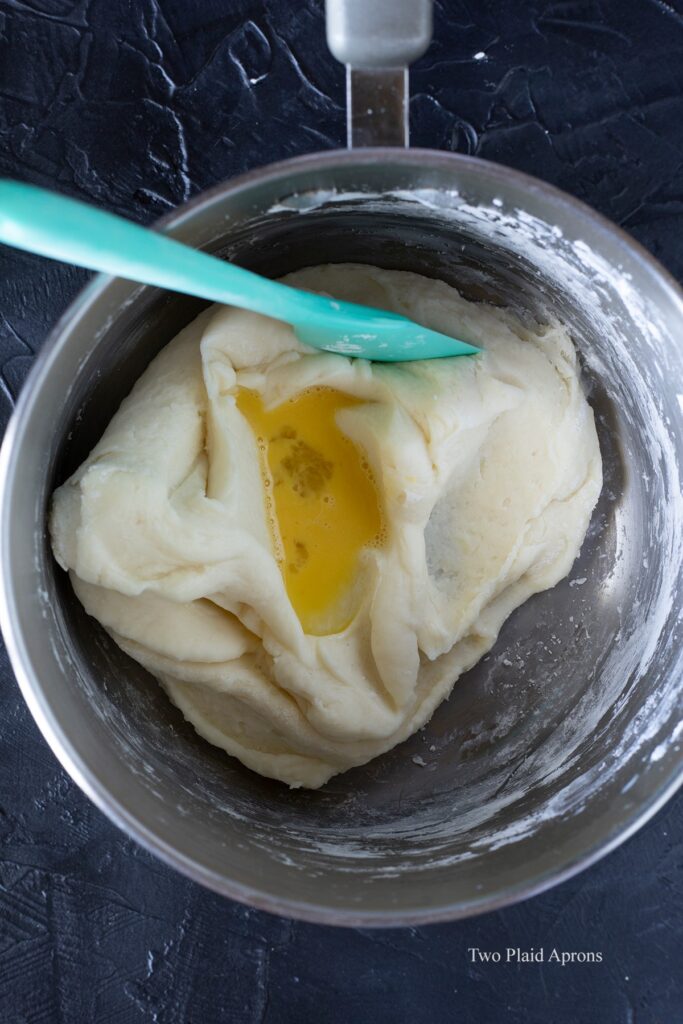
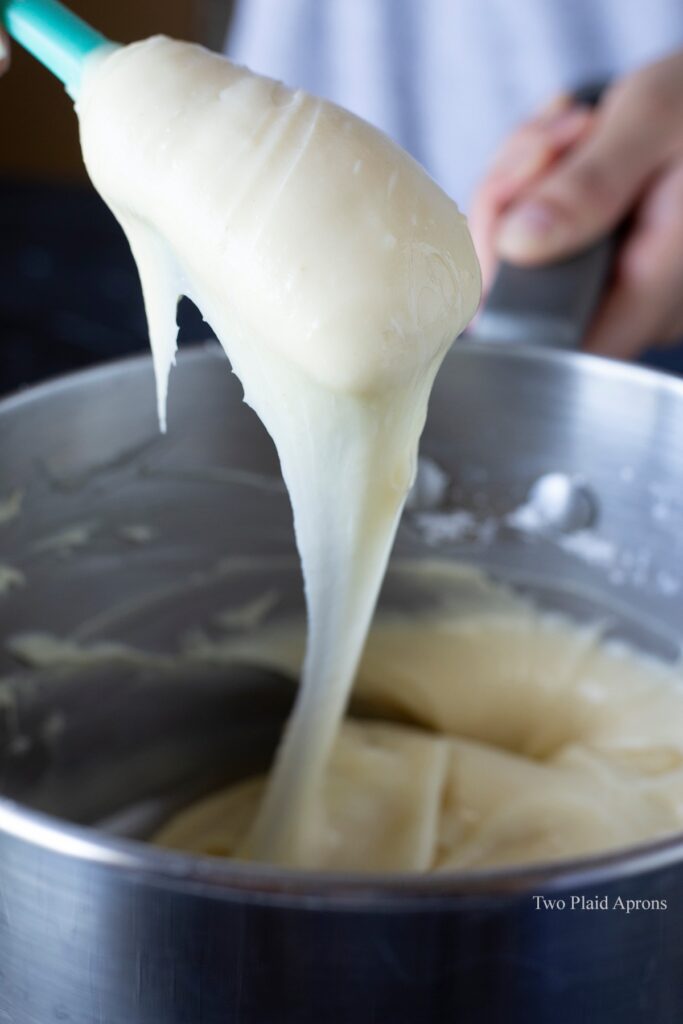
Dough consistency after adding all-purpose flour. Adding egg to thin out the dough. Proper dough consistency after adding enough egg.
- Heat the milk, butter, sugar, and salt over medium heat, stirring occasionally until all melted.
- Take it off the heat, add the flavoring, and sift in the all purpose flour. Whisk vigorously until the mixture thickens and is as smooth as possible. Some small lumps are okay.
- Add the tapioca flour and fold everything together until no more dry flour is visible. The dough will be much stiffer by now. Let the dough cool till it's warm to the touch.
- Add the beaten egg is small additions and incorporate thoroughly before adding more. The entire egg may or may not be needed depending on the brand of ingredient you're using and your environment's humidity. Sometimes you may even need more than 1 large egg.
- The dough is ready when it flows slowly, looks slightly translucent, and forms a triangular shape when it breaks off. Having the dough a little thicker or thinner will not affect the texture of the Korean mochi bread too much. However, it will determine how tall and round the mochi breads will turn out.
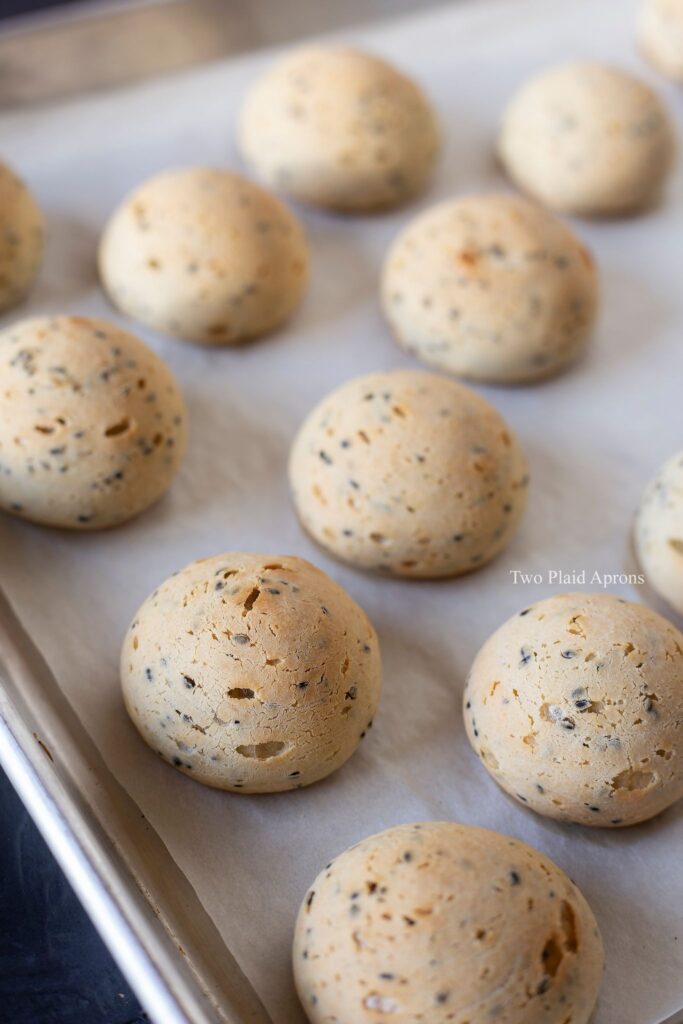
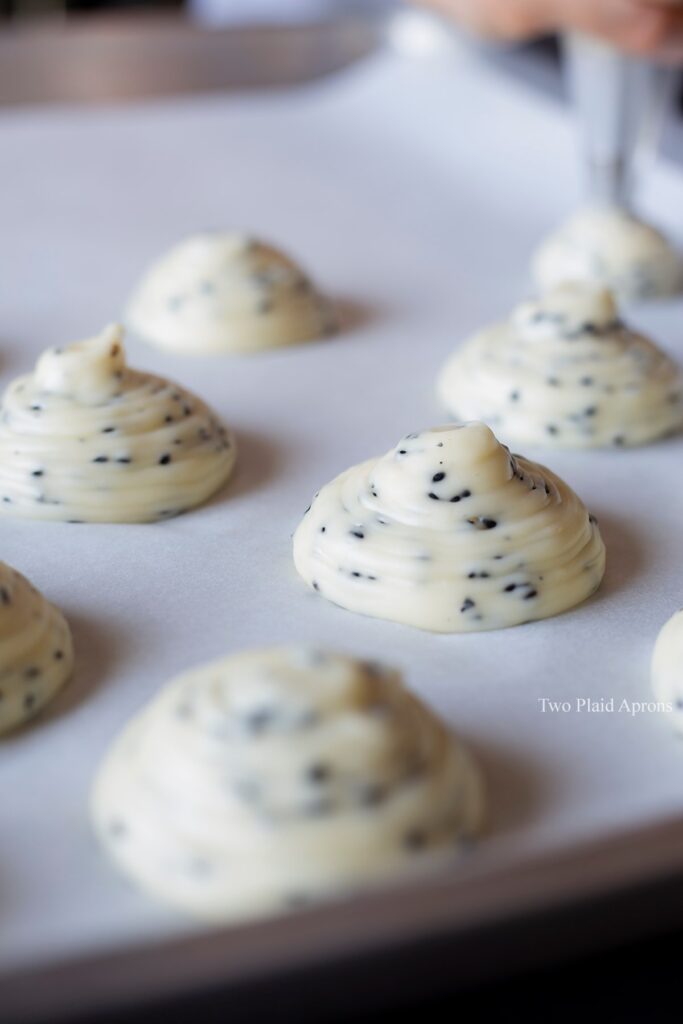
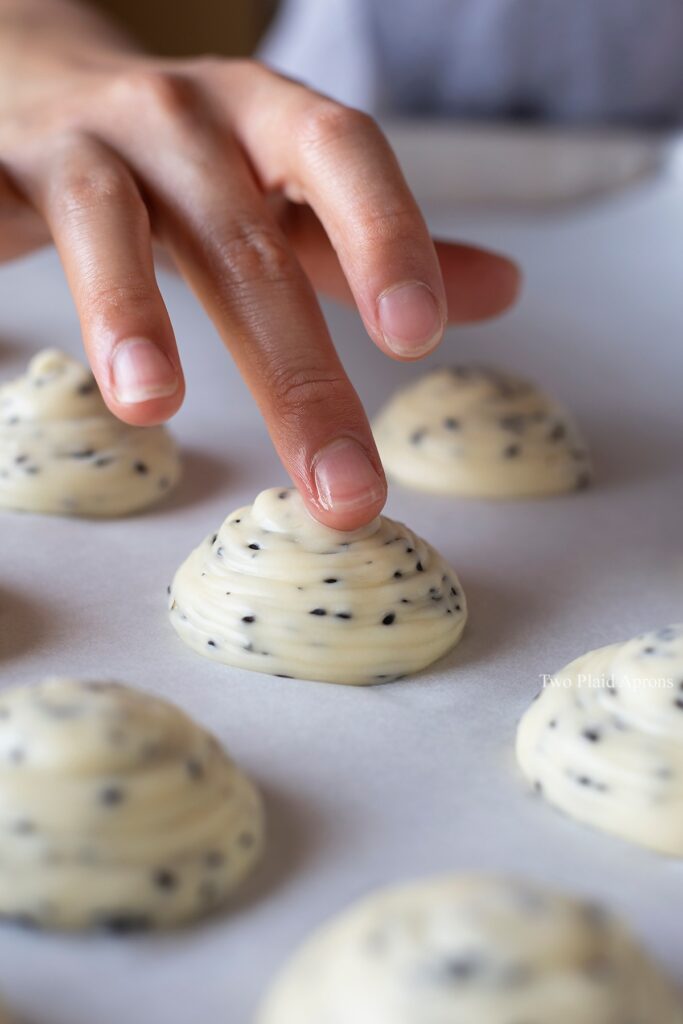
Dab the tips of each dough with cold water
Like making pâte à choux pastries, it is highly recommended that you dab the tips of each piped dough mount with some cold water. This will flatten the hook that's usually created when piping and prevent the tips from burning while baking.
Mochi by texture
Although this black sesame Korean mochi bread is called "mochi" bread, it's not actually made of glutinous rice flour. Rather, it's made of mostly tapioca flour, which produces a similar chewy texture as mochi.
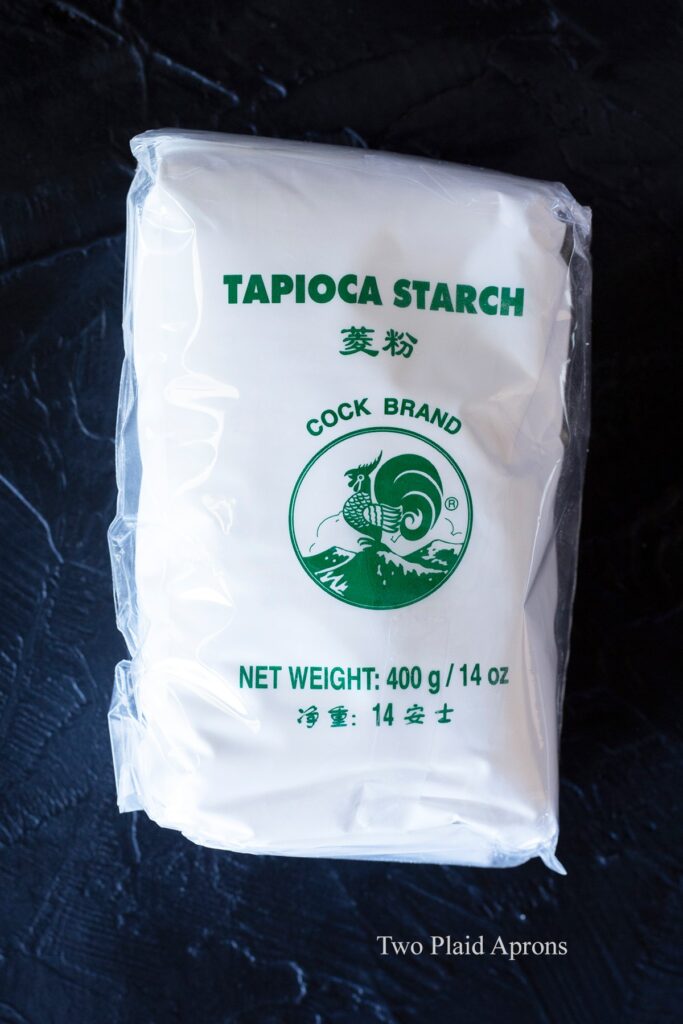
Since the Korean mochi breads are made of mostly tapioca, it is important that you use a good quality tapioca flour. We tried a couple of different brands, and we both decided that we prefer the Dragonfly brand and the Rooster brand. These two brands didn't have that weird tapioca flavor, which taste really prominent since these mochi breads are quite subtle in flavor.
All-purpose flour or bread flour
We've tested with both all-purpose flour and bread flour, and the result is not noticeably different. So feel free to substitute the 35 grams of all-purpose flour for bread flour if you wish.
Is Korean mochi bread dairy free?
This recipe is not dairy free, however, it is absolutely possible to make it dairy free. Simply switch the the unsalted butter for coconut oil or a neutral oil and switch the milk out for a dairy free milk, like coconut milk. But because dairy free milks tend to be a bit thicker than regular whole milk, I recommend diluting your milk alternative with some water.
If you're looking for other Korean snacks and treats, check these out:
- Sweet Potato Mochi Pancake/ Hotteok
- Korean Cream Cheese Garlic Bread
- Korean Sausage Bread
- Tteokbbokki (Korean Spicy Rice Cake)
If you’ve made this recipe or any recipes from our blog, please tag us on Instagram using #twoplaidaprons! You can also tag us in your Instagram stories using @two_plaid_aprons. We would love to see your creations! It absolutely makes our day! 🥰
📖 Recipe
Korean Mochi Bread (Black Sesame)
Ingredients
- ⅔ cup milk
- 2 Tablespoon unsalted butter
- 3 Tablespoon granulated sugar
- ¼ teaspoon Kosher salt
- ½ teaspoon vanilla extract
- 35 grams all-purpose flour (about ¼ cup, spooned & leveled)
- 130 grams tapioca flour (roughly 1 cup + 1 TBSP)
- 1 large egg , beaten
- 1½ Tablespoon black sesame seed , toasted
Instructions
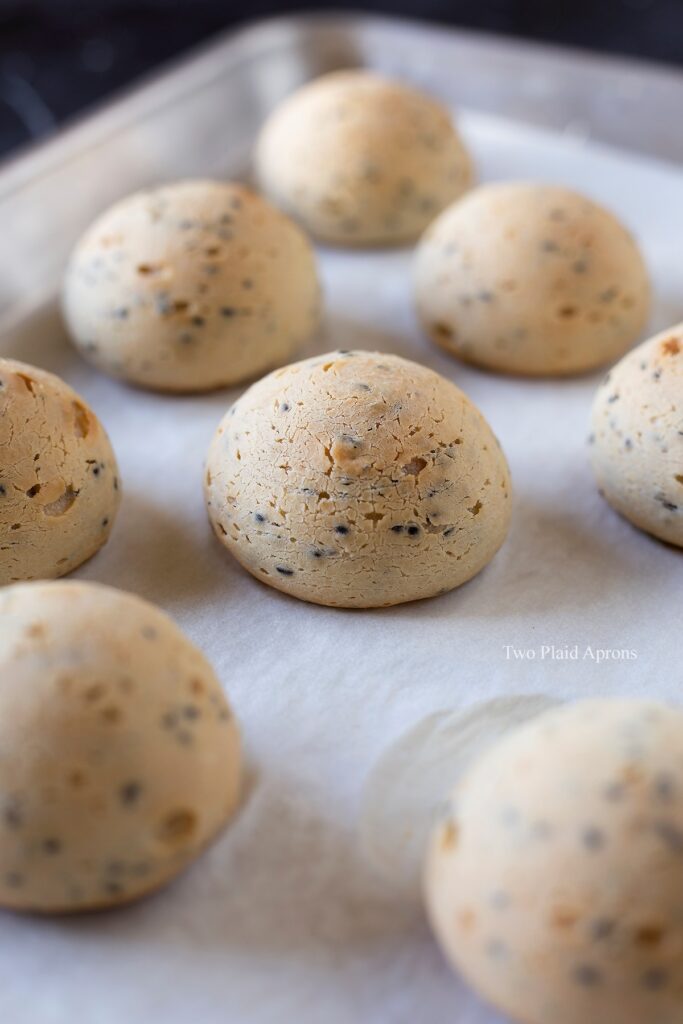
- Preheat the oven to 350°F and prepare a sheet pan lined with parchment paper.
- In a saucepan, combine the milk, butter, sugar, and salt. Bring it to a simmer over medium heat while stirring occasionally. *DO NOT scorch the milk.*
- Once the mixture comes to a simmer, take it off the heat and stir in the vanilla. Immediately sift in the 35 grams of all-purpose flour and whisk the mixture until it thickens to a baby food consistency and becomes as smooth as possible. Some small lumps are okay.*If your mixture doesn't seem to thicken, the milk mixture was probably not hot enough. Simply place the mixture over medium or medium low heat and whisk constantly until the mixture thickens.*
- After the all-purpose flour have been incorporated, add the tapioca flour and fold everything together until no more dry flour is visible. The dough will become quite stiff and thick. Let the dough cool until it's warm to the touch.
- Once the dough has cooled, add the beaten egg in 3 additions and incorporate the egg completely with a spatula before adding the next. After each addition of eggs, check the consistency of the dough. A proper dough will flow slowly like thick batter, looks slightly translucent, and forms a triangular shape when it breaks off. *Depending on your flours and humidity of your environment, you may or may not need the entire egg. Sometimes you may even need more than 1 egg. Check out the post for picture reference.*
- After the dough is at its proper consistency add the toasted black sesame seeds. Fold the mixture to evenly disperse the sesame seeds. Transfer the dough to a piping bag fitted with a round piping tip. *Piping tip is optional, but we found that it does help with keeping the mochi breads' shape more even. However, feel free to just cut the piping bag and use it as is, if you don't mind a little lopsided-ness.*
- Pipe the dough out into a 1½ inch wide dome, about 1 inch in height. Keep each piping about 1 inch apart to accommodate for some puffing up when baking. Dip your finger into some cold water and dab the tips of each dough dome to round it off.
- Bake the mochi breads for about 25 to 30 minutes or until it turns slightly golden brown. Let cool for a few minutes and enjoy!


Bruno Kim says
This is brazilian Pão de Queijo.
Mei says
Hi Bruno!
Thanks for checking out our recipe and bringing Pao de Quejo to our attention! Never heard of it before, but definitely sounds amazing! Our Korean Mochi (Sesame) Bread is an inspiration of a popular pastry found at many Korean bakeries. Hope you enjoyed this pastry just as much the Brazilian version!
Bake with love!
Mei ❤️
Bruno Kim says
Hi Mei, thank you! I believe that this Korean Mochi Bread is based on the Pão de Queijo, that was created at least in the XVIII century. Tapioca is an schrub originated from South America, mostly present in Brazil. It's nice to know that korea made an version of this recipe! It sounds interesting, it's the same recipe without cheese and with vanilla and sesame added, I'll try it soon.
Mei says
Oh yay! Do let us know how your Korean Mochi Breads turn out!
Ahh, I see. I did not know that tapioca originated in Brazil! That's good to know =) Yeah, tapioca is a very popular starch used in many pastries and drinks (boba teas of course) in almost all Asian countries. It's amazing how one ingredient can connect different countries all over!
Mei
Tiffany says
He is incorrect. This is a variation on the French Pate a Choux method, which is how cream puffs are made. Not only is the Pao de quiejo a savory-cheesy item, its cooking/baking method is entirely different. Just because tapioca starch is used, doesn't make it Brazilian.
Mei says
Hi Tiffany!
Thank you so much for checking out our recipe and sharing your thoughts! Yes, indeed. I agree with you that this Korean mochi bread is more than likely a variation or an inspiration based on the classic pastry, pate a choux. That was actually our first thought when we first started testing out this recipe. So glad you also thought the same!☺️
Bake with love!
Mei ❤️
Didi says
Hi can advice why the bread doesnt raise? is it my piping method is wrong? it came out flat haha unlike yours so round!
Mei says
Hi Didi!
Thank you for trying out our mochi bread recipe! We also encountered this same issue when we did our testing. We found that the most likely reasons why the breads didn't rise is because:
a) The breads aren't piped tall enough. Try to lift your hand up with the batter as you pipe, so that the batter stays tall.
b) The oven wasn't hot enough. Like making pate a choux, oven temperature is very important for creating steam and allowing the bread to puff up. So try to preheat your oven for at least 10-15 minutes before baking in it. We love our oven thermometer; helps guarantee the oven temperature is where we want it.
c) The batter is too loose. Unfortunately we couldn't make our recipe 100% fool proof because each egg is a little different in weight and your environment can play a huge role in the batter consistency (dryer environments will require a bit more egg than humid areas). I recommend that you add the beaten egg in increments to prevent adding too much. The perfect consistency for the batter is like a super thick lava that flows and folds into a ribbon.
Hope one of these solutions will help make your mochi breads rise properly! Please let me know if you have any other questions =)
Bake with love,
Mei ❤️
Nicole says
I have tried this and failed 😭
Mine collapse immediately and turn into a ball of sticky dough. Are you able to advice me on this? Thank you.
Mei says
Hi Nicole!
We're so sorry to hear that the Korean Mochi Bread didn't work out for you. Although we've never had issue with our dough collapsing and becoming sticky, but the following may be some plausible reasons:
- The batter was too wet. If the batter is too wet, the mochi bread will not hold its shape properly.
- The initial batter (when flour is added to the hot milk & butter) was not made properly. Make sure the milk with butter and sugar mixture is hot when you're adding the flour. This way the flour gets cooked and creates a nice, stable foundation for the batter.
- Not enough egg was added. The mochi bread recipe uses the same method as the French pastry, pate a choux. This method utilizes the egg to create steam in the pastry, which allows the pastry to puff up when baked. Amount of egg needed for the recipe can change, mostly, depending on your environment and ingredient brand. For us, we only needed 1 large egg to create a ribbony consistency. You may have to play with the recipe and adjust accordingly.
This is the link to our Youtube channel, featuring our Korean Mochi Bread recipe. This will give you a bit more visual on making the mochi breads.
Hope these troubleshooting tips help! Please let us know how your mochi breads turn out and if you have any other questions!
Bake with love!
Mei❤️
Carol says
Hello! Thank you for sharing this Korean Mochi Bread recipe. Found it in YouTube. I tried a different recipe a couple of months ago and it was a disaster like a flat pita bread 🙁 I found yours today so decided to make it with my daughter. We enjoyed making it and it is quite easy to follow. The only mistake we did was add the whole beaten egg (added it in increments, used 1 extra-large egg) as it turns out to be more liquidy than thicker texture like in your video. We ended up adding a bit more tapioca flour (about 1/4 -1/3 cup extra). It didn't turn out as round as we want it to be but in any event, it puffed up. So we got excited and very happy! The taste was excellent!!! This recipe is a keeper. We will definitely make it again. Thank you from Canada.
Mei says
Hi Carol!
Thank you so much for trying out our Korean Mochi Bread recipe! We love that you saved the mochi breads and altered it as you saw fit, and so glad to hear that our recipe didn't disappoint y'all! 🥰 Your comment totally made our day. Thank you so much for sharing your experience!
Bake with love!
Mei ❤️
Carmen says
Ok to substitute all-purpose flour with almond flour?
Mei says
Hi Carmen!
The all-purpose flour in the recipe is to thicken the initial base and to give the dough structure (from the gluten). As almond flour does not contain gluten, I'm afraid it won't be a suitable substitution. If you try it, we would love to know how it turns out!
Mei ❤️
Emy says
Hi there!
I'm about to try this recipe, but I wanted to make this for breakfast for the next day and just read your point about how it will be stale and hard the next day. Is there any way I can keep them fresh (i.e. storing them in an airtight container, etc?). I used to buy this at a local bakery, and it still tasted really good the next day (it was a bit chewier and harder in texture though). Will this be similar?
Thank you so much!
Mei says
Hi Emy!
Thank you so much for trying out our recipe! Yes, similar to those mochi breads from bakeries, these Korean mochi breads gets quite chewy and lose most of its crisp the second day. We've tried storing them in air-tight containers, and the mochi breads turned out to still taste as good as day 1 but the texture wasn't the best on day 2. Unfortunately, as of now, we haven't found a way to keep them from becoming harder. But, if you want, you could freeze the batter after piping it out on your sheet pan. Just bake it the next morning for an additional 5 to 10 minutes until slightly golden brown.
Hope this helps a bit. Please let us know if there's any other questions we can help you with!
Bake with love!
Mei ❤️
Salina says
Hi, should I turn off the fan in oven during baking? Thank you.
Mei says
Hi Salina!
Our oven temperature and baking time is based on conventional ovens (no fan). If you are using a convection oven/ fan function, decrease the oven temperature by 25°F.
Hope this helps!
Mei
Areta says
Thanks for explaining what is Korean Mochi Bread!
Mei says
Hi Areta!
Thank you so much for checking out our post, and so glad were able to help!
Bake with love!
Mei ❤️
Karla says
Hello, can this be made using airfryer as the oven? Maybe you have some idea for the adjustment needed?
Mei says
Hi Karla! We have not tried making these in the air fryer, but it shouldn't be an issue. You'll have to bake in smaller batches and reduce the baking temperature by about 25F. However, every air fryer is a little different, so you may need to adjust the temperature more or even the bake time as you see fit. Look forward to hearing how they turned out!
Mei ❤️
Emmma says
What size round piping tip do we need for this?
Mei says
Hi Emmma!
You can use any round pipping tips you'd like. I typically use a Wilton 12 tip for my Korean Mochi Breads.
Hope this helps!
Happy baking!
Mei ❤️
Emmma says
Thank you for the quick response!
Mei says
Hi Emmma,
Absolutely! If you have any other questions, just let us know! Would love to know how they turned out!
Mei ❤️
Diana says
Hello, I was wondering is there difference of texture if we substitute the type of flour? Is it possible to change tapioca flour to glutinous rice flour?
Mei says
Hi Diana!
We have tried substituting tapioca flour for glutinous rice flour before without any success. The shape was much flatter and without any of the iconic crinkles and crack. Although the bread itself was chewy, it had no crunch on the exterior. If I had to guess, I think glutinous rice flour doesn't have the same strength as tapioca flour, that's why our mochi bread didn't rise when we tried it with glutinous rice flour.
Hope this helps!
Happy baking!
Mei ❤️
Lurata says
Hi!
We made these today. They look like yours, and they taste great. However, ours turned out more dense. When cutting it in half ours don't have as many holes as yours and don't look as airy. Any advice?
Mei says
Hi Lurata!
Thank you all for trying out our mochi bread recipe! Usually, the airiness of mochi breads can be affected by the temperature of your oven and the consistency of the batter.
These mochi breads require proper oven temperature for them to rise and puff up. I recommend getting an oven thermometer for your future bakes. The other likely cause of dense mochi breads is the batter consistency. Like pate a choux, these mochi breads' "leavener" is the egg. Depending on your environment and size of your egg, you may have to use more or less than what the recipe calls for. The consistency to look for is similar to a thick, tacky batter. The batter should flow slowly and breaks off with a triangular tip.
Hope this helps!
Bake with love!
Mei ❤️
Angela says
Hi, tried your recipe. It rise and cooked perfectly. However, I have problems mixing the tapioca flour into the mixture. It is very dry and powdery. The mixture doesn’t seem to be moist enough to blend the tapioca. Any tips for this? I also noticed that there’s a slight starchy taste in the finished products, wonder if this is because the tapioca is not blend in.. thank you
Mei says
Hi Angela!
When you're adding the tapioca flour into the mixture, it'll be on the drier, stiff side, kind of like Play-Doh. It might take a minute or two, but you should be able to incorporate the tapioca starch until no more dry starch is visible. Do make sure to not simmer the milk and butter mixture for too long or it'll evaporate too much. The purpose is to heat it up and melt the butter. If you're interested, we also have a YouTube video of this recipe. Just search "Two Plaid Aprons."
As for the starchy taste, it's mostly likely because the tapioca starch wasn't evenly mixed in.
Hope this helps! Please let us know if you have any more questions!
Mei ❤️
Daisy says
Can you freeze the buns after you bake them?
Mei says
Hi Daisy!
We do not recommend freezing the Korean mochi breads after baking, as they start to become harder the longer they sit. They are best enjoyed soon after baking and within 2 to 3 days.
Mei ❤️
Amy says
Can I use potato starch instead of tapioca flour? Thank you!
Mei says
Hi Amy!
We have not tried making the mochi breads with potato starch, so we cannot say whether it will work. However, potato starch creates a different texture compared to tapioca starch, so most likely it will not be a good substitution. Hope this helps!
Mei ❤️
Agnes says
I tried it. Nice, round and tasty. The only thing I want to improve is to make it more golden next time. I put it in the ovens for 28mins. Do you have any tips? Thank you so much!
Mei says
Hi Agnes!
Thank you for trying our recipe and so glad you enjoyed it! My only suggestion is to bake the mochi breads a little longer. However, unless you are using a convection oven, the mochi breads will not be equally golden all around. Hope this helps!
Mei ❤️
Sophia says
Do you think it'll be ok to bake it in an airfryer?
Mei says
Hi Sophia!
We have not tried baking these mochi breads in the air fryer, but it's definitely doable. However, you may need to reduce the temperature and maybe even the bake time since the air fryer is a smaller space and hotter than an oven. Hope this helps =)
Mei ❤️
Hope L says
This recipe is great. I didn't change a thing and it turned out great! I've made it twice. The second time, the mixture didn't thicken. I'm very thankful for your notes. I put the mixture back on medium heat like you said and it thickened up real quick. I'll be looking for more of your recipes. Thanks!
Mei says
Hi Hope! Thank you so much for your kind words! We're so glad to hear that our recipe was helpful and you enjoyed the mochi breads!
Mei ❤️
Lenora says
Ok so my attempt was a 50% failure . Choux pastry is my nemesis too.
But next one I know will work. My dough even though only added 2/3 of egg was tooo wet to hold while piping. Mine look like puffy flying saucers.
Taste is awesome and texture inside is perfect.
I TOTALLY fell in love with Mochi buns on a visit to Taiwan and want to do this. Next iteration will be made stiffer.
Thank you for the recipe BUT I live alone , so while doing a batch when I will have company in the house is really great , I am desperate to find a way to bake and freeze. OR can I freeze dough in small batches , defrost and make a few fresh?
Any thoughts would be helpful
Again thank you for the recipe , I will continue to work on dough.yum yum!
Mei says
Hi Lenora! Thank you for trying out our mochi bread recipe! We believe in you — just keep practicing! It actually took us a few tries in the beginning as well =)
As for storing the dough, we have no self control, so we seldom have leftovers. In your case, we recommend freezing dough after pipping them. Once frozen, store them in airtight containers. Then, when you're craving a few, bake them from frozen according to the recipe, plus a few extra minutes. Hope this helps and good luck!
Mei ❤️
Asher says
What would you serve these with?
Mei says
Hi Asher! To be honest, we don't usually serve these mochi breads with anything. We usually eat them as snacks with tea or coffee. =)
Mei ❤️
teen says
I noticed there's no sugar in this recipe, if i would like slightly sweeter, can i add some sugar?
Mei says
Hi there! We do use a little sugar in the batter but only just enough. If you wish to add more sugar, we recommend starting with a couple tablespoons =)
Mei ❤️
Jk says
Can I leave out the sugar to make this baby friendly? 🙂
Mei says
Hi JK! I have not tried making it without sugar, but it should be okay. The sugar gives the mochi bread sweetness and caramelization, so it'll affect the taste. Also, I'm not totally sure if this is baby friendly since the mochi bread is chewy. Hope this helps!
Mei ❤️
Victoria says
Comments on freezing:
I have not made these, but I bought some from a Korean bakery because they looked interesting. I ate a couple and then stuck the rest of them in the freezer in the airtight container they came in. I just took a couple of them out this morning (two weeks later) and popped them in a 350 degree oven for 5 minutes. They came out perfect. Better then when I got them at the store, because they got crunchy on the outside and softer inside. So it does work to freeze them after cooking. The issue may be just to make sure they are packed airtight.
Amelia says
Have you tried using a neutral oil for the recipe. How much should I use?
Mei says
Hi Amelia! Unfortunately, we have not tried making these mochi breads using oil, so I'm not sure if it would work. In terms of substitution, it would be the same amount as butter. We'd love to know if you tried!
Mei ❤️
Nicky says
Love this recipe! It turned out amazing for me. If I wanted to make these bigger, should I just pipe more dough for each one? How does having the dough more thin/thick with the egg affect it?
Mei says
Hi Nicky! So glad you enjoyed them! We had tried making them larger, but the mochi bread tends to flatten a bit and just become larger sideways rather than tall. As for changing the dough consistency, a thinner dough will likely cause the mochi bread to flatten and spread out. They'll also not puff up well. As for a thicker though, we did not test it as pipping it was quite difficult. If you try it out, we'd love how they turn out!
Mei ❤️
Cammila says
I had extra batter after using all the space on the baking sheet so, while they baked, I heated some oil and fried the rest up just to see what would happen. I think I was hoping for something like the fried mochi doughnuts at Paris Baguette.
I will never bake these in the oven again.
They are SO DELICIOUS fried! Crispy around the edges and chewy in the middle. Dredged in superfine granulated sugar, they taste just like the mochi doughnuts but really- the sugar isn't even necessary. They're perfect plain.
Sadly, the baked batch came out a bit chalky tasting on the outside but the fried batch was excellent, even after being microwaved to rewarm them.
Excellent recipe and I'll be making these again and again... fried, though, not baked.
Mei says
Thanks for sharing this, Cammila! We'll have to try this out—it sounds delicious!
Mei ❤️