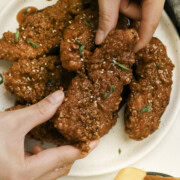


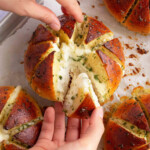
This Korean Cream Cheese Garlic Bread is so unbelievably good! The exterior is perfectly crunchy, while the interior is kind of custardy all while still chewy like good bread should. It's filled with a lightly sweetened cream cheese filling and loaded with exactly what you want in a garlic bread - garlic flavor!
We finally got to taste these Korean cream cheese garlic breads after watching so many Korean street food videos. And let me tell you, they are AMAZINGGGGG! 🤤
The bread's got everything you want. It's crispy, soft, chewy, garlicky, buttery, sweet and savory! It's so easy to eat too many. But hey, no regrets! 😆
If you liked this recipe, you may also like our other Asian bakes like Korean sausage bread, Korean mochi bread, and black sesame mochi muffins.
Jump to:
- What is Korean cream cheese garlic bread?
- What does Korean cream cheese garlic bread taste like?
- What is the difference between Korean cream cheese garlic bread and regular garlic bread?
- Ingredients
- Instruction
- Use the window pane test to check your dough
- Make the bread dough by hand
- Recipe Tips
- Storage
- Reheating
- FAQ
- 📖 Recipe
- 💬 Feedback
What is Korean cream cheese garlic bread?
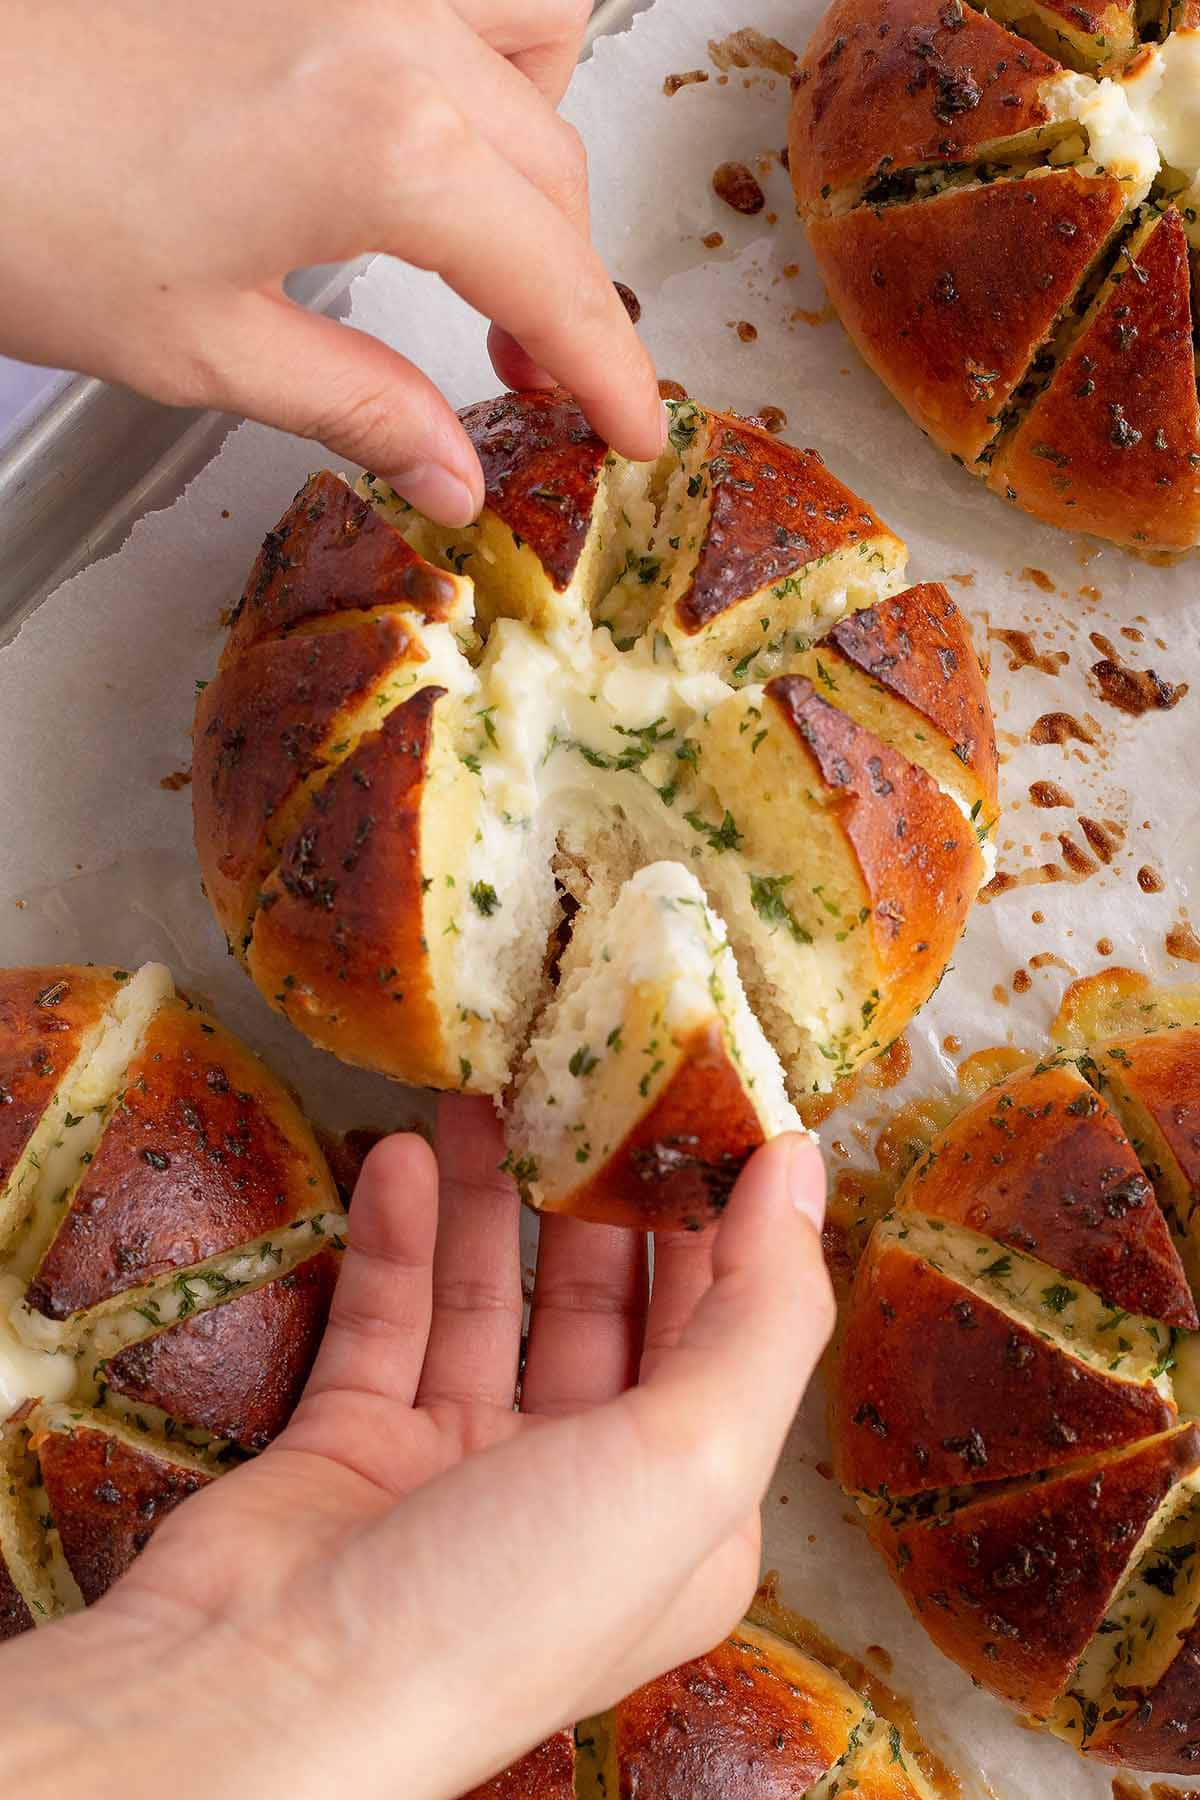
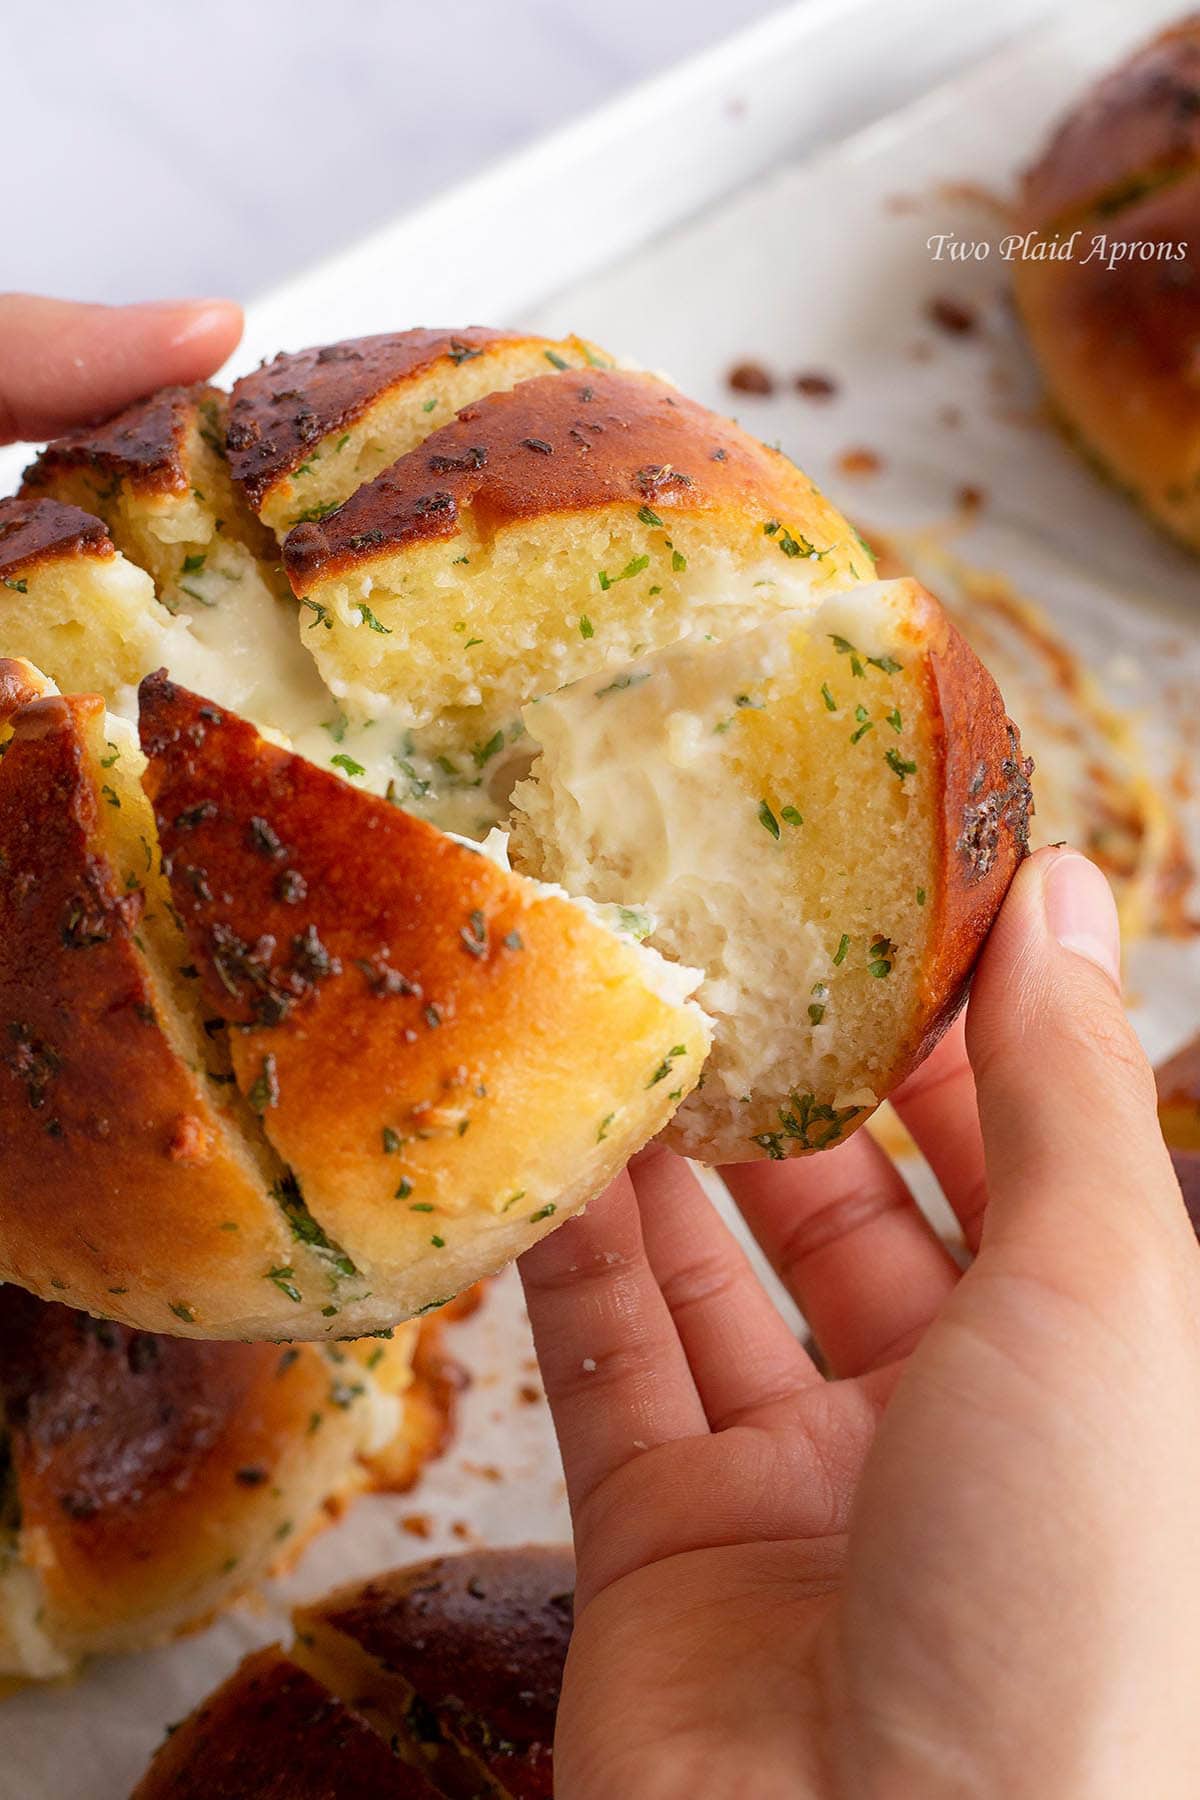
Korean cream cheese garlic bread is a popular Korean street food featuring a twist on classic garlic bread. Rather than using loaves of bread, this garlic bread uses medium size rolls, about 5 inches wide, that's been cut into wedges. The bread is filled with sweetened cream cheese and a dunked in a garlic butter "custard."
What does Korean cream cheese garlic bread taste like?
Korean cream cheese garlic breads are a combination between sweet and savory. Just imagine a really good buttery garlic bread slathered with the perfect amount of lightly sweetened cream cheese. Yup, garlicky, slightly sweet, balanced saltiness, and a nice layer of creaminess with a tang.
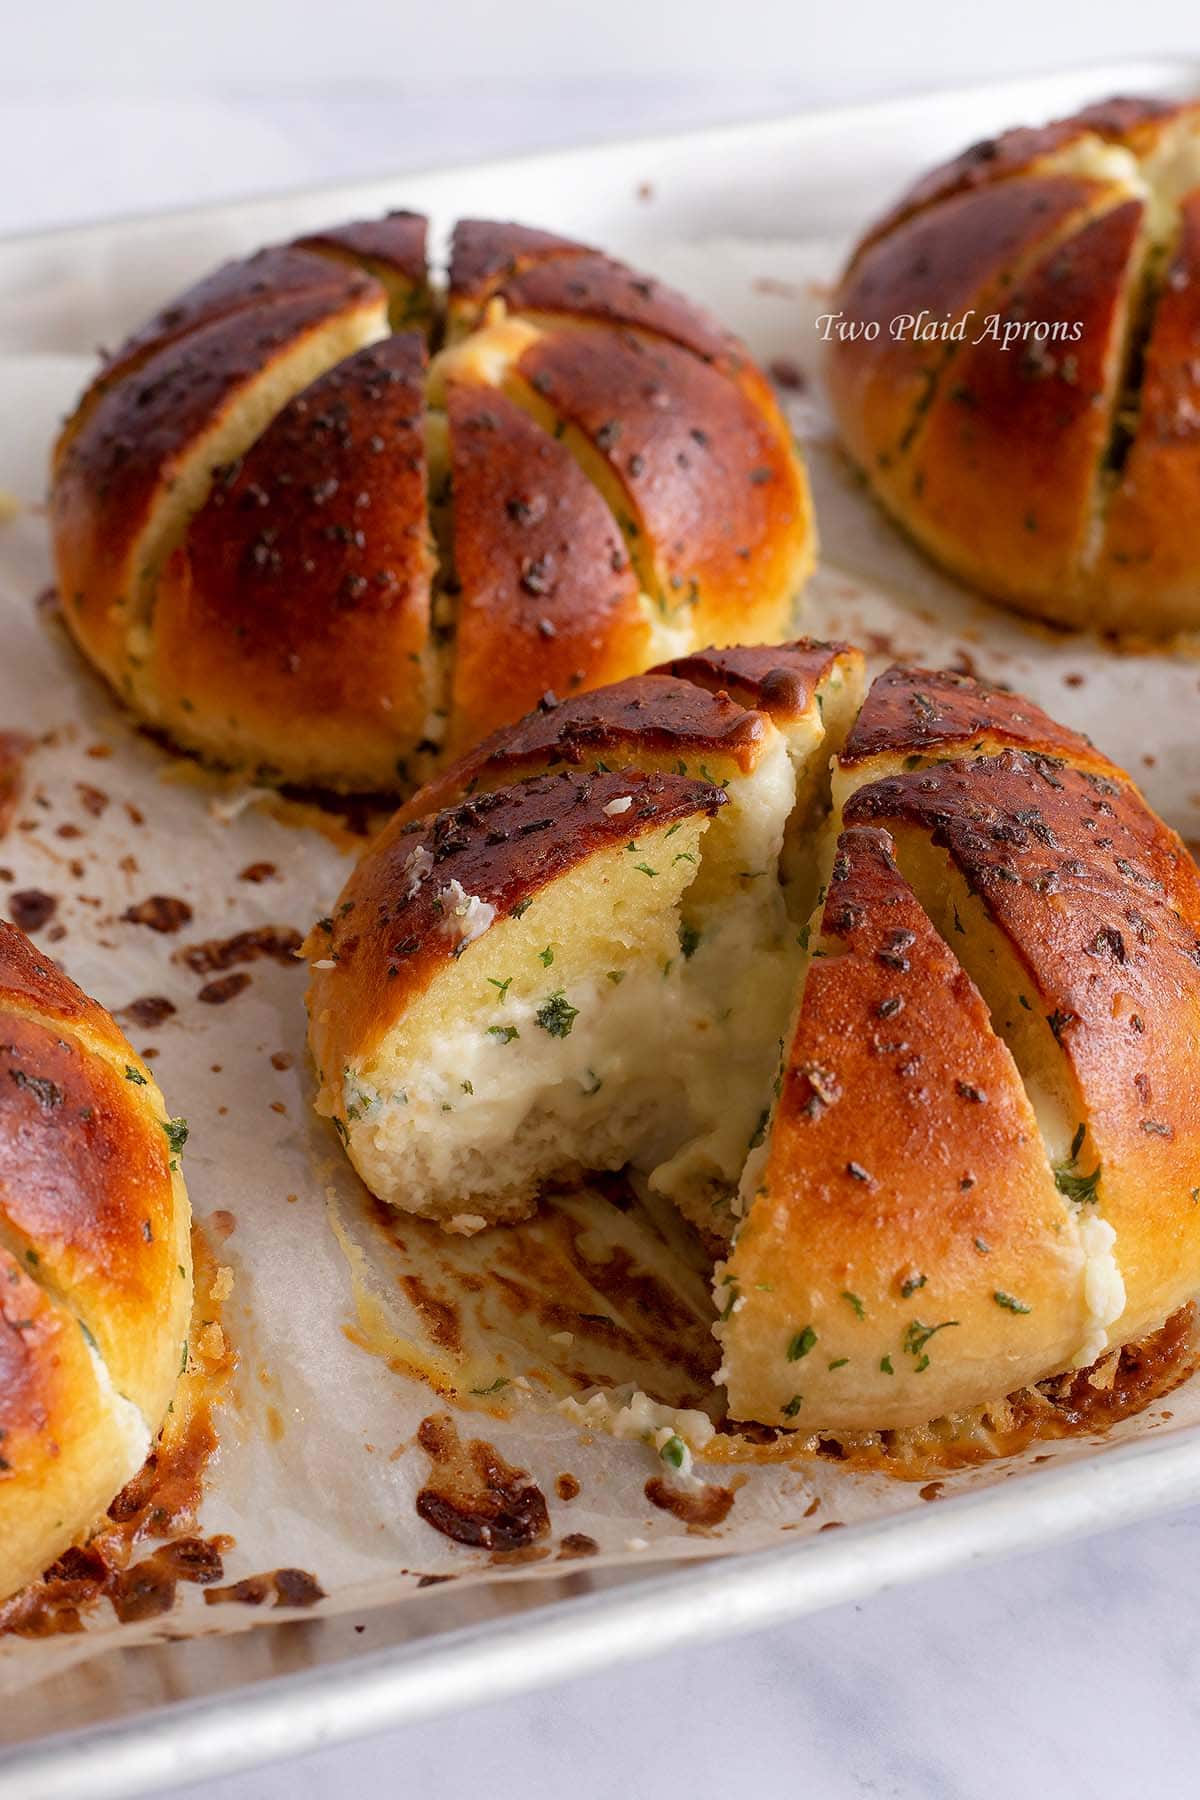
Besides the flavor, these garlic bread are also well balanced in texture. The interior of the bread is partly custardy and moist while the other parts are chewy like good bread. And because the bread is baked a second time with the garlic butter, the exterior becomes amazingly crunchy. So, yeah. You've got the soft, the chewy, and the crunch, all in one!
What is the difference between Korean cream cheese garlic bread and regular garlic bread?
The main difference between the two, besides the obvious addition of cream cheese, is that the garlic butter for making Korean cream cheese garlic breads is more like a buttery custard than butter. The garlic butter "custard" contains milk and eggs to make the Korean garlic bread moist and kind of custardy inside.
The other difference between the two is that Korean cream cheese garlic breads are a bit on the sweeter side. Both the cream cheese filling and the garlic butter "custard" have sugar added, and honestly, it tastes really good!
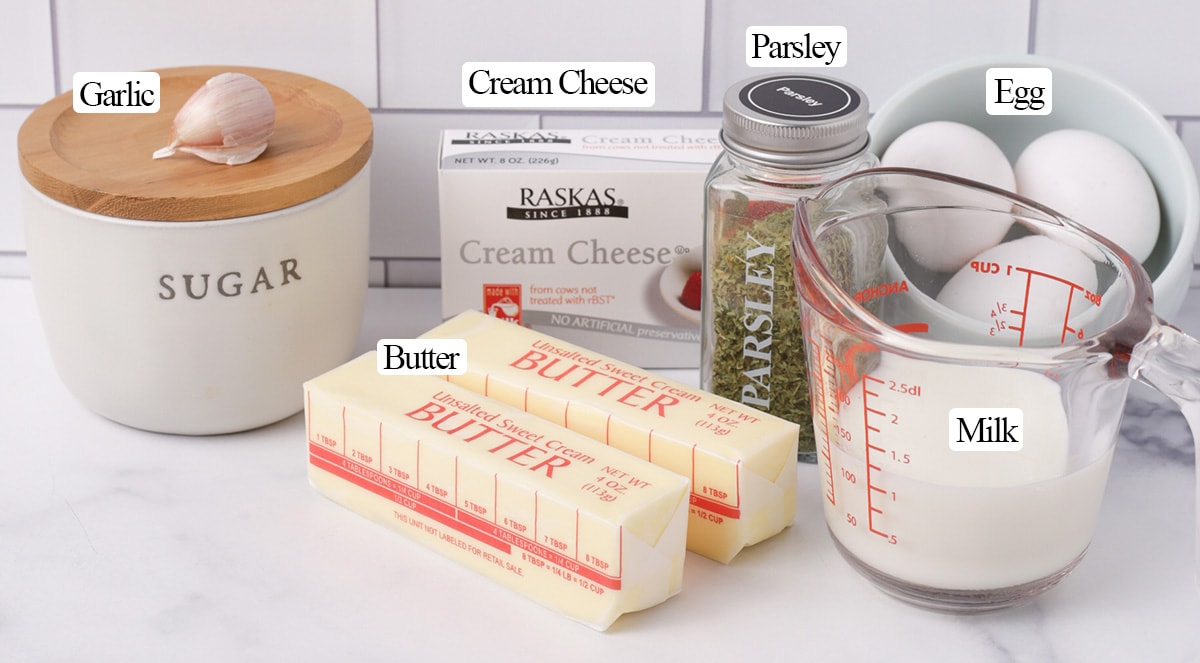
Ingredients
For the homemade bread rolls:
- All-purpose flour - Bread is commonly made with bread flour, but all-purpose flour can make bread that is just as good. Plus, A/P flour is more cheaper and more versatile than bread flour. So we decided to make this Korean cream cheese garlic bread with A/P flour instead.
- We usually use Central Milling Company's organic A/P flour.
- Warm water - This is the only liquid in this bread roll recipe. We're also using it to dissolve and activate our dry yeast.
- Active dry yeast - Active dry yeast is the most common yeast for bread making. It does require dissolving in liquid before using. If you're using rapid rise/ instant yeast, you can add it straight into the flour without dissolving.
- Granulated sugar and salt - For flavoring the buns.
- Egg (optional for egg wash)
For the cream cheese filling and garlic butter:
- Cream cheese - Make sure the cream cheese is softened to that it's easy to work with. Sweetened cream cheese will be pipped in between each wedge of the Korean garlic breads.
- Granulated sugar - Sugar will be used in both the cream cheese filling and garlic butter. This will give the bread a sweet and savory experience.
- Unsalted butter - Although you could use salted butter, it will be harder to control the saltiness of the garlic butter. So unsalted butter is recommended instead.
- Whole milk - Full fat milk or half and half is great for the garlic butter. It's essential for giving Korean cream cheese garlic bread its richness.
- Eggs - The whole egg will be used. This is added to the garlic butter to create a "custard" with the milk.
- Fresh garlic - We love garlic storage hacks, but fresh garlic tastes the best for this bread recipe.
- Dry parsley flakes - This is honestly optional, but it adds lovely specks of green on the bread!
Instruction
Make the homemade bread dough:
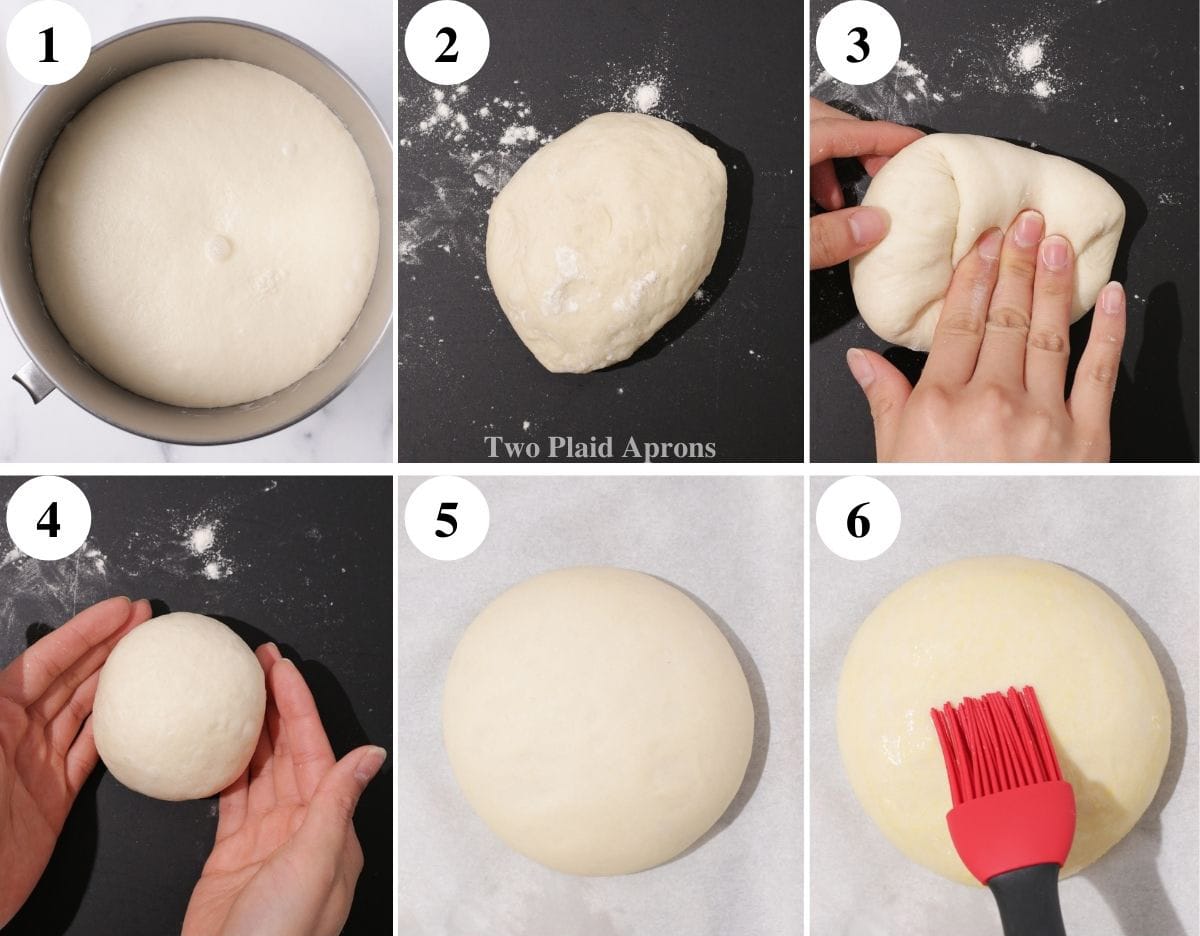
1. Dissolve and activate the dry yeast by sprinkling it over the warm water. Give the yeast a stir and set aside for a few minutes.
2. Add the all-purpose flour, sugar, and salt into the stand mixer bowl and give it a quick mix with the dough hook. Once the yeast is dissolved, add the water to the flour mixture.
*Depending on where you live, you may or may not need as much water for the dough, so adjust accordingly. You can start off with 1⅓ cup water and increase the amount as needed.*
3. Mix on low speed until the dough roughly comes together, then increase the speed to medium high. Knead the dough until it is smooth, elastic, and passes the window pane test.
🌟 Pro tip: Pinch off a piece of dough and gently stretch it between your fingers. If the dough can stretch until you can see silhouettes through it. It's passed the window pane test. If it tears, keep kneading.
4. Smooth and round the dough into a ball. Place it back into the bowl and cover. Let the dough proof in a warm area until it's doubled in size, about 45 minutes to 1 hour.
5. Punch down the dough and fold it onto itself a couple of times to deflate the gases. Portion the dough into 6 equal pieces. Do lightly flour your hands and the work surface as needed. The dough will be a bit tacky.
Shape and bake the bread rolls:
6. Tightly tuck and roll each piece of dough to form smooth balls. Place them at least 3 to 4 inches part on a parchment lined sheet pan. Cover the dough balls and let them proof in a warm area until almost doubled, about 45 minutes to 1 hour.
🌟 Pro tip: Because this dough does not contain any fat, sometimes the rolls can get stuck onto the parchment after they are baked. You can lightly grease the parchment paper to prevent the buns fro getting stuck.
7. Once the dough balls are almost doubled, preheat the oven to 350°F. Brush each dough with egg wash if you'd like. Once the oven is at 350°F, bake the rolls for 20 to 25 minutes or until the interior registers 190°F.
🌟 Pro tip: Brushing the rolls with egg wash is optional. If the rolls are brushed, they will be golden brown and glossy after baking. If not, they will still be golden, not as dark, and no gloss. But the breads will be baked again, so the breads will get a bit darker.
8. Remove the bread rolls from the oven once they're done and let them cool at room temperature until comfortable to handle.
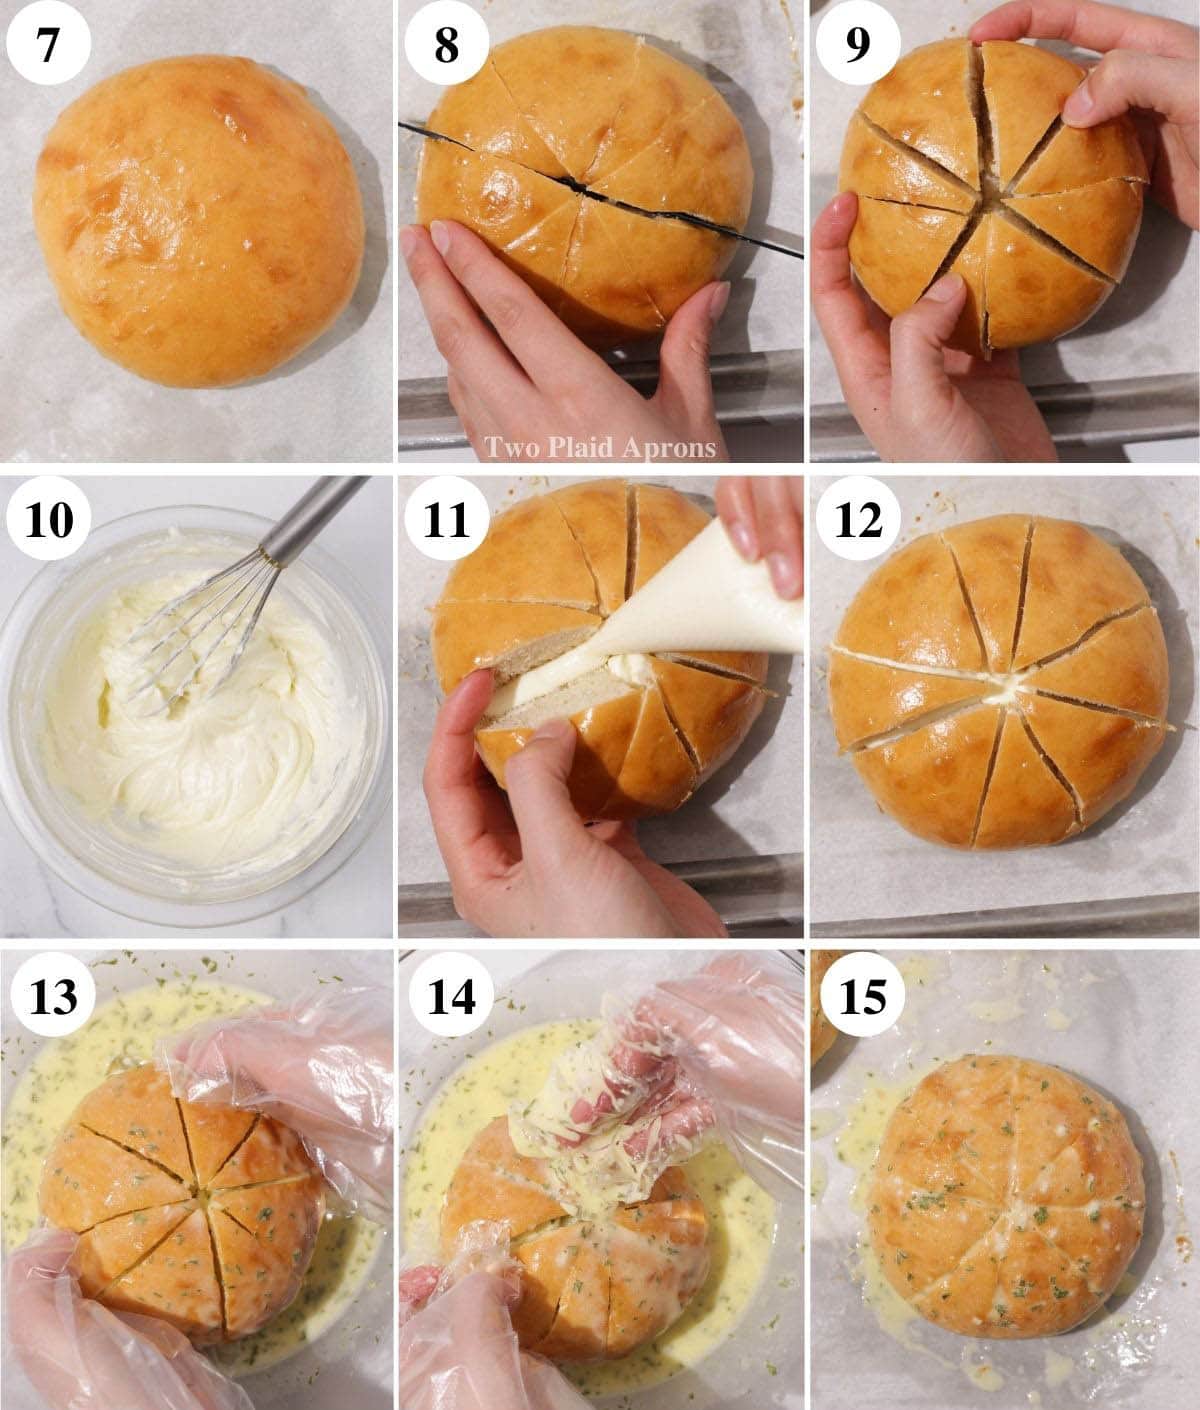
For the cream cheese filling:
Combined the softened cream cheese and sugar in a medium mixing bowl. Whisk until the everything is smooth and the sugar is well incorporated. Transfer the cream cheese filling to a pipping bag or ZipLoc bag and set aside until needed.
For the garlic butter:
1. In a large heat proof mixing bowl, add the melted butter, milk, sugar, garlic, parsley, and eggs. Whisk until everything is well combined.
2. Place the bowl over a pot of gently simmering water (aka bain marie) and mix until the sugar has dissolved and the mixture is warm and loose. Make sure to constantly mix the garlic butter to prevent scrambling the eggs. Keep the garlic butter warm and set aside until needed.
*You can also heat up the garlic butter in the microwave, but there's a highly chance of scrambling the eggs. So make sure to heat the mixture in short increments and mix between each heating!*

Assemble the Korean cream cheese garlic bread
1. Preheat the oven to 400°F.
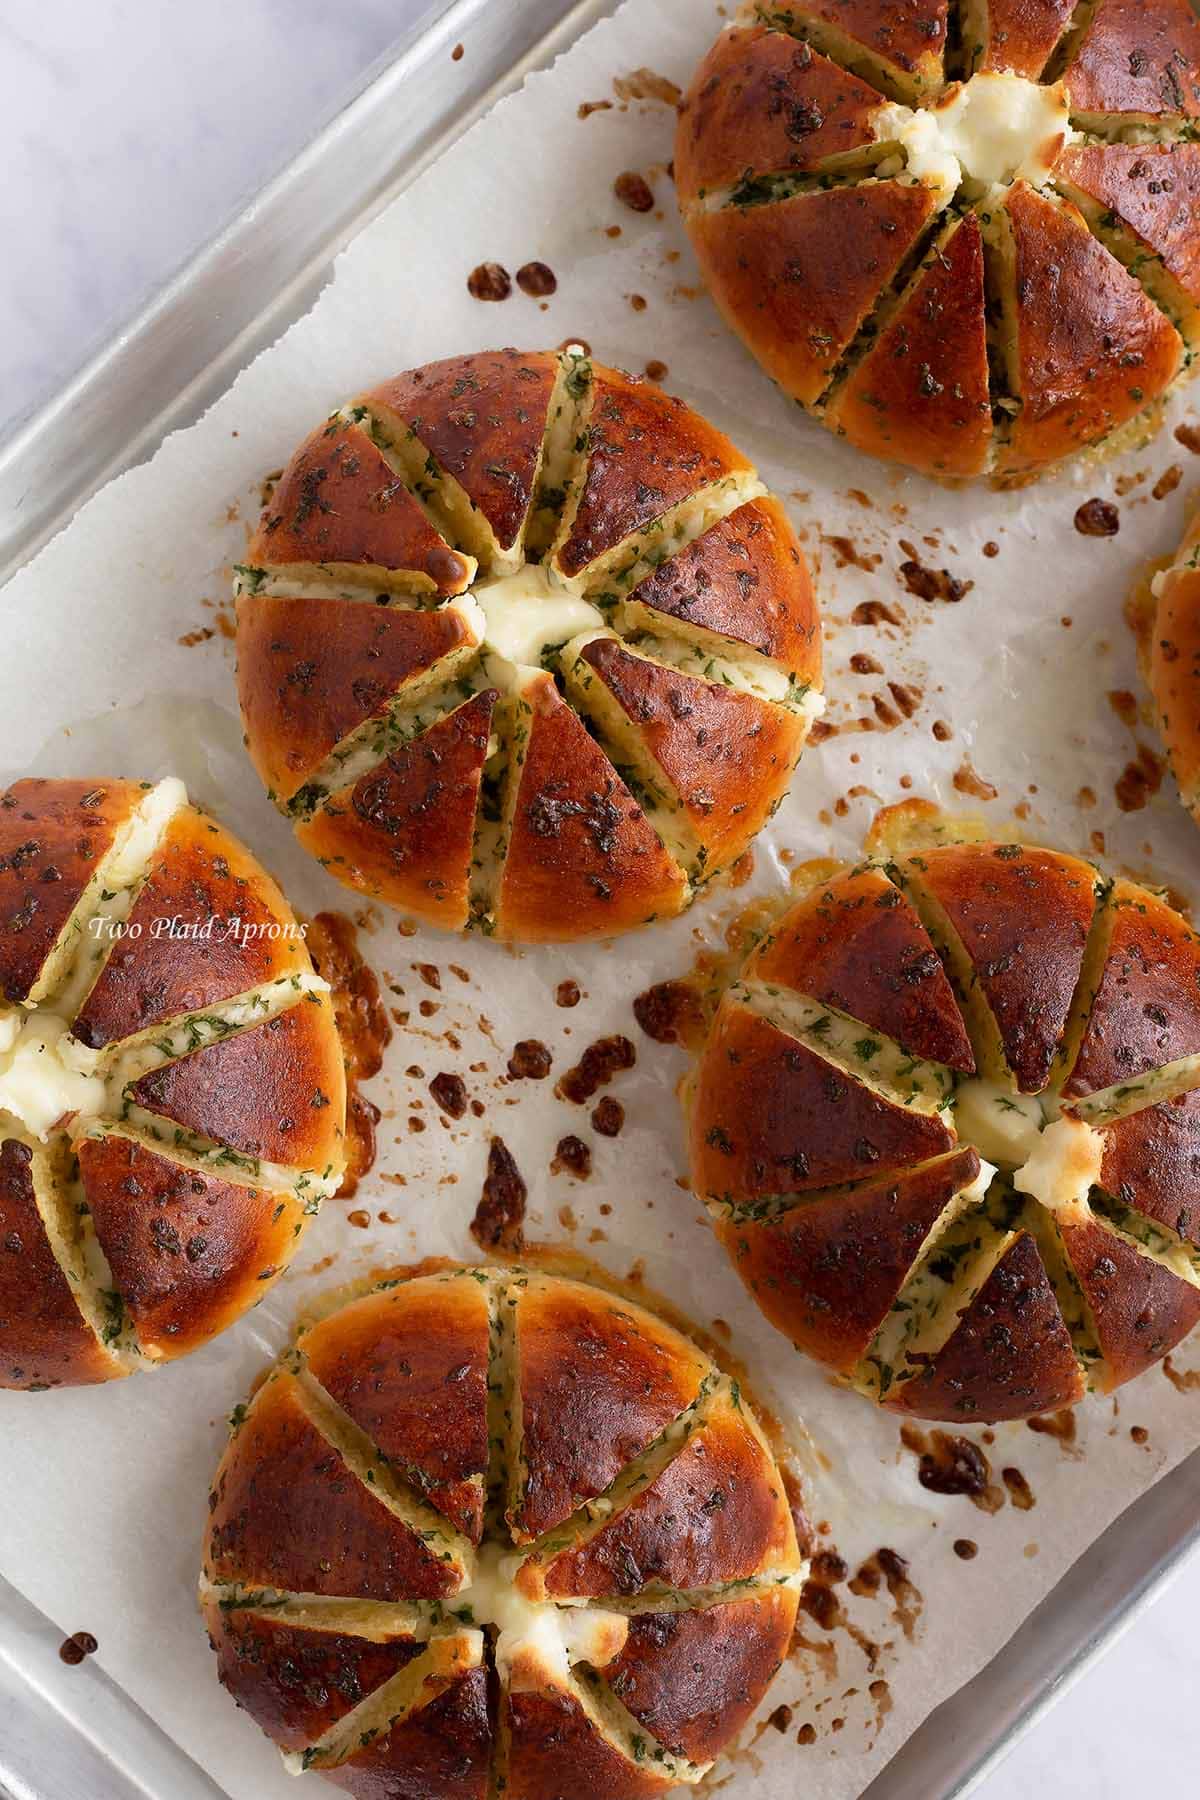
2. When the bread rolls are cool enough to hand, cut each bread into 6 or 8 equal wedges. Make sure to NOT cut through the bread completely so that the wedges stay intact.
3. Between each wedge, pipe a line of the cream cheese filling. Careful not to break the wedges.
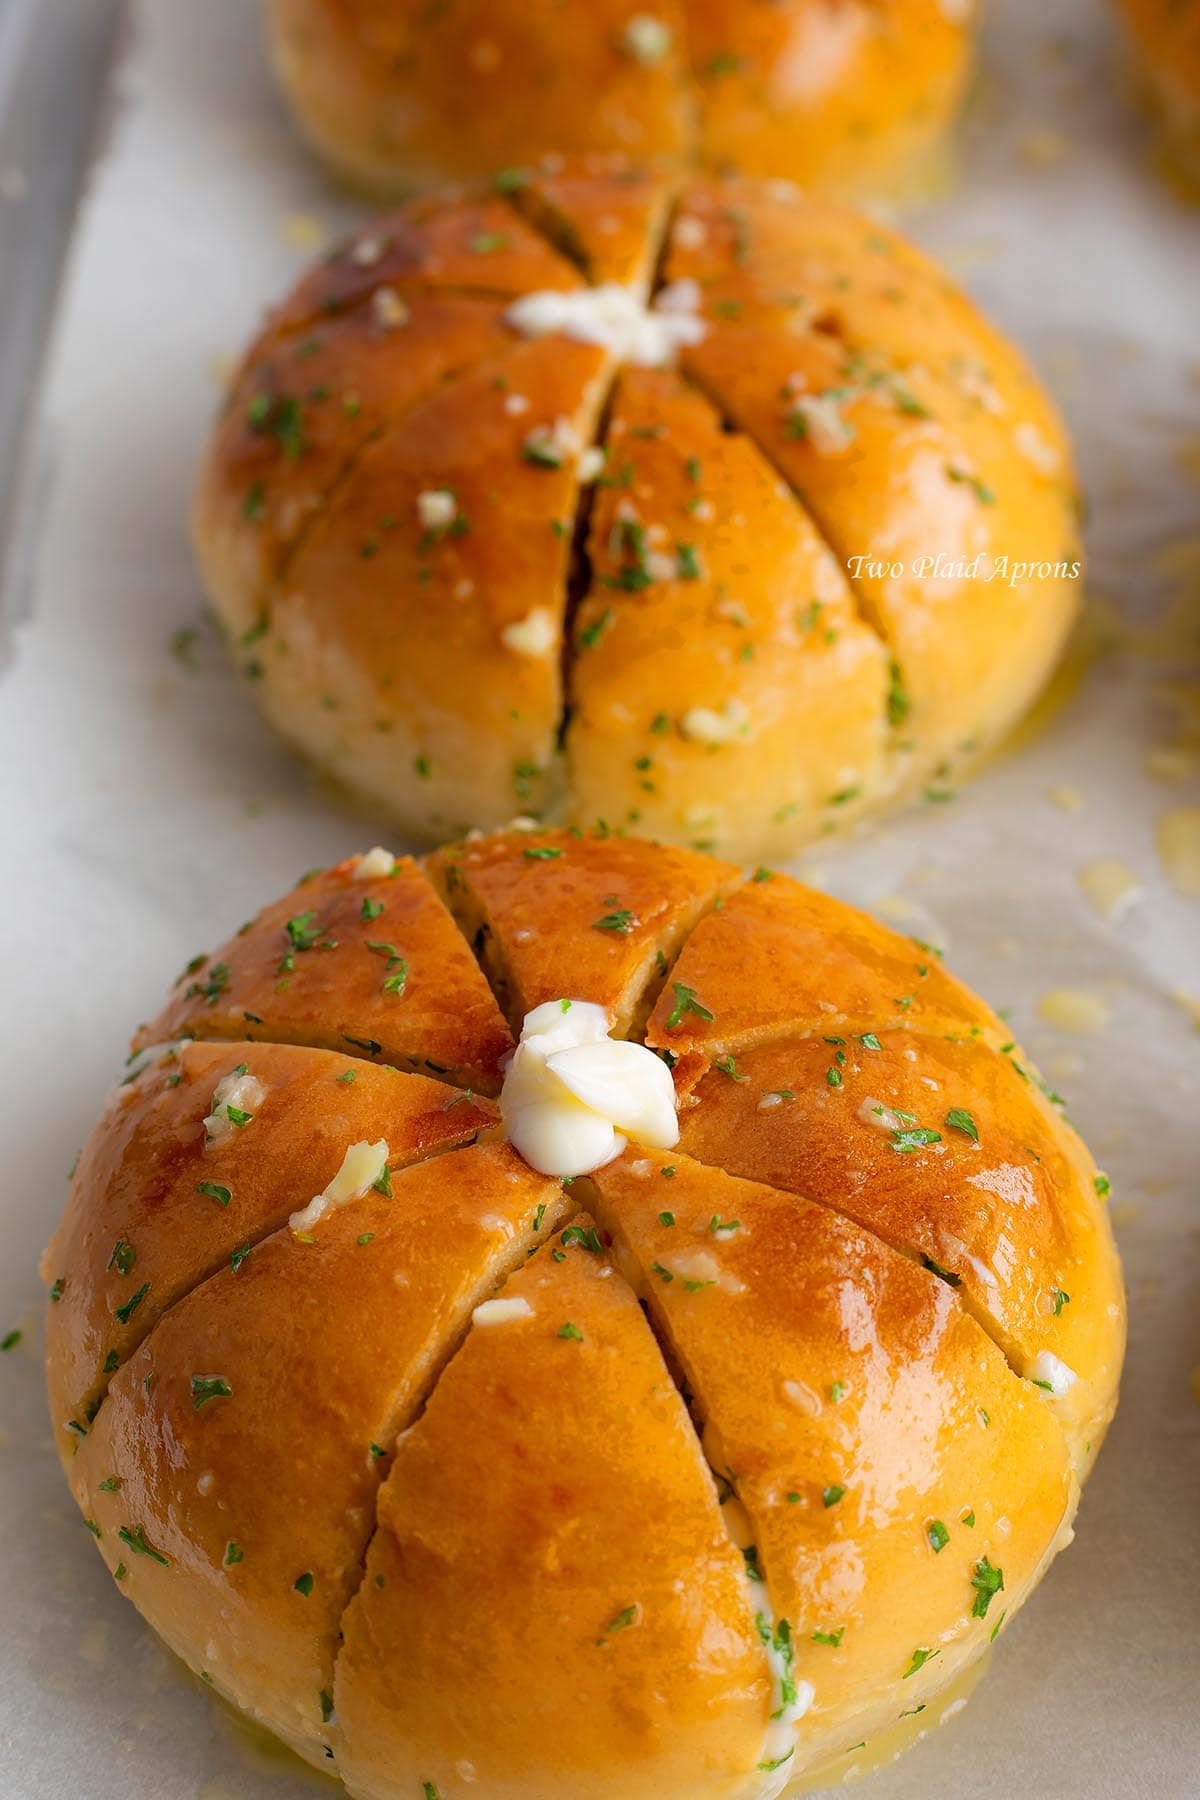
4. Once the bread rolls are filled, dunk each bread into the warm garlic butter mixture. Let the bread soak up the garlic butter for a couple seconds and make sure to not forget the areas in between the wedges. Turn the bread upside down to let excess drip off and place it back on the parchment lined sheet pan. Repeat with remaining breads.
5. Pipe the the remaining cream cheese in the center of the cream cheese garlic breads and give each a little sprinkle of kosher salt, if you'd like.
6. Bake the garlic breads for 8 to 10 minutes or until the bread is crispy on the outside. Make sure to keep an eye on the cream cheese garlic bread on the last couple minutes of baking to prevent it from getting too dark!
7. Remove the breads from the oven and let it cool for a few minutes. Enjoy!
Use the window pane test to check your dough
Like most bread doughs, gluten structure is important for keeping your bread's shape and texture. Use the window pane method to check if your dough is kneaded enough!
Once your dough becomes smooth and elastic, you can start to using the testing the dough with the window pane method. You should be able to stretch a small piece of dough between your fingers until you can see silhouettes through it without tearing.
If not, keep kneading the dough for a few minutes and test again.
Make the bread dough by hand
If you have the time to spare or don't want to pull out your heavy stand mixer, you can make the homemade bread rolls by hand!
1. Combine the flour, sugar, salt in a large mixing bowl and give it a mix with your hand. Add the water with dissolved yeast and mix until the dough roughly comes together.
2. Knead the dough until a smooth ball forms. Place the dough in the bowl, cover, and let it rest in a warm area for about 10 to 20 minutes.
3. Once the time is up, punch the dough down and knead for a few minutes. Check to see if it passes the window pane test. If it passed the test, smooth and round the dough into a ball and follow the recipe for proofing and baking.
If the dough is not ready, let the dough rest again for 10 to 20 minutes, followed by a few minutes of kneading.
*This dough will be slightly on the tacky side, so you may need to lightly flour your hands and work surface. You can also wear gloves to help with the tackiness. I also highly recommend this silicon pastry mat. It's great for keeping your work surface clean!*
Recipe Tips
- If you are under time constraint, you can use store bought rolls. Just make sure to find ones that are 5 to 6 inches wide, about the side of your palm.
- Depending on your environment, more or less water may be needed. If your area is humid, you may not use as much water as what's listed, and if you live in a dryer area, you may need all or even a little more water.
- Use a scale. For the most accurate measurement, please use a scale to measure the ingredients to make your homemade bread rolls.
- Although the dough does not require any oil or butter, you could add a tablespoon or two if you prefer. Just omit the same amount of water to compensate for the additional moisture.
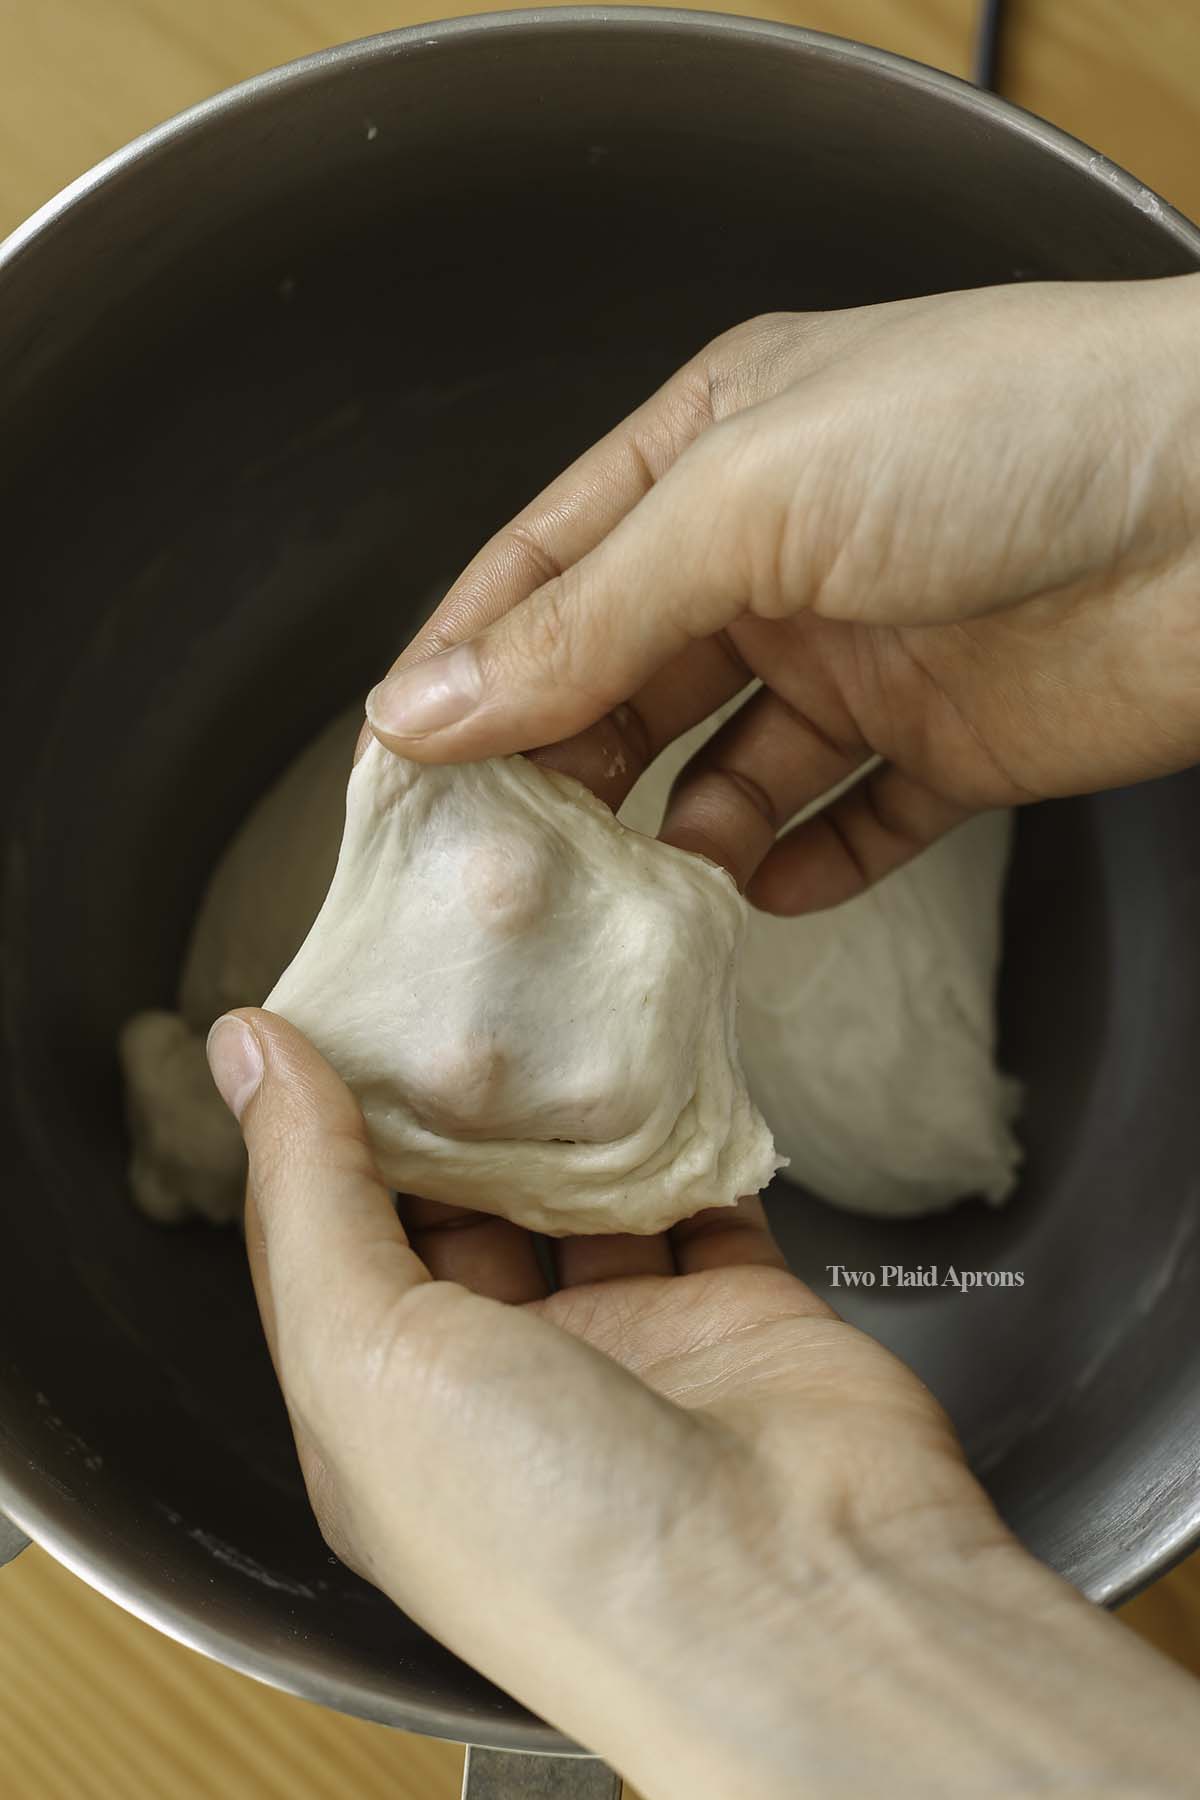
- Keep the dough balls tight when shaping, if you're making your own homemade bread rolls for these Korean cream cheese garlic breads. Keeping the dough tight will help the bread stay round and tall when they proof and bake. A loose dough ball will result in flatter, more spread out bread, with inconsistent crumbs.
- To keep your dough balls tight: Fold the edges of the dough onto itself all the way around. Next, flip the dough ball and round out the dough.
- Make sure to generously soak the breads. The best part of Korean cream cheese garlic breads is the garlic butter, so don't be shy! We also realized that older breads are better for soaking. So, feel free to make the bread rolls the day before.
Storage
These Korean cream cheese garlic breads can be kept in the fridge for up to 1 week, if properly wrapped. You can also store them in airtight containers. You could also free these garlic breads up to 1 month.
Reheating
Korean cream cheese garlic breads can be easily reheated! Simply place the garlic bread on a parchment lined sheet pan or on foil and bake at 350°F for about 5 to 10 minutes until the bread is crispy on the outside and warm on the inside.
For frozen cream cheese garlic breads, you can bake them for an extra 5 minutes longer, or until warm on the inside and crispy on the outside.
Make sure to keep an eye on the bread to prevent it from getting too dark!
FAQ
No, you are welcomed to buy rolls similar to this recipe. But we find that the texture of the garlic bread is definitely better with homemade rolls.
We recommend using white dinner rolls for this garlic bread recipe. Just make sure the rolls are around 5 to 6 inches wide, about the size of your palm. If you have time, we highly recommend making rolls with our bread recipe.
Yes! For Korean cream cheese garlic breads, the garlic butter is kind of a "custard" rather than straight garlic and butter. This will give the breads extra moistness, a slight custardy texture, and enriches the plain roll.
This is all up to your preference. But most commonly, Korean cream cheese garlic breads are sliced 3 to 4 times, yielding 6 to 8 wedges. But, of course the more cuts, the more cream cheese goodness!
More importantly, it is crucial to not cut through the bread completely. The bread needs to stay intact for both aesthetic and to hold the cream cheese filling.
Yes! You want to be generous when it comes to coating the bread in garlic butter. The garlic butter should cover every exposed surface on the bread, inside and out. However, if you prefer your bread to be less "custardy," you can dunk the breads in the garlic butter and flip them upside down to let the excess drip off.
If you’ve made this recipe or any recipe from our blog, please tag us on Instagram @two_plaid_aprons! We would love to see your creations! It absolutely makes our day! 🥰
📖 Recipe
Korean Cream Cheese Garlic Bread
Ingredients
For the bread:
- 1½ cup warm water (around 90-110°F)
- 1 teaspoon active dry yeast
- 4½ cup all-purpose flour (spooned & leveled)
- ¼ cup granulated sugar
- ½ teaspoon kosher salt
- 1 large egg , beaten (optional for egg wash)
For the cream cheese filling:
- 8 ounce cream cheese , softened
- ¼ cup granulated sugar
For the garlic butter:
- 1 cup unsalted butter , melted (or 2 sticks)
- ½ cup whole milk (or half & half)
- 2 Tablespoon granulated sugar
- 2 Tablespoon garlic , minced (or to your preference)
- 1½ Tablespoon dry parsley flakes (or to your preference)
- 2 large egg
- Kosher salt (for sprinkling)
Instructions
For the bread:
- Stir together warm water and active dry yeast. Set a side to let dissolve, about 2-3 minutes.*Depending on where you live, you may or may not need as much water for the dough, so adjust accordingly. You can start off with 1⅓ cup water and increase the amount as needed.*
- In the stand mixer bowl, stir together the flour, sugar, and salt. Pour the water with dissolved yeast into the flour mixture and stir on low speed with the dough hook until the dough turns shaggy and starts to come together.*The dough can be mix ½ by hand at this point to help the mixer out. You can also knead the dough completely by hand.*
- Increase the speed to medium high and knead until the dough is smooth and passes the window pane test, about 8-10 minutes. Shape the dough into a ball and let it proof in a covered bowl, in a warm area, until doubled in size, about 45 minutes to 1 hour.*To do the window pane test, take a small portion of the dough and stretch it between your fingers. The dough should spread thin enough to see silhouettes through it without tearing. Refer to the post for more detail and picture.*
- Once the dough has doubled, punch it down and fold it onto itself a few times to tighten the dough. Divid the dough into 6 equal pieces. Tuck and roll each piece of dough into a smooth, tight ball. Range the dough on parchment lined sheet pan, about 2-3 inches from each other. Cover the dough and let it proof in a warm area until almost doubled, about 45 minutes to 1 hour.
- Preheat the oven to 350°F.
- When the dough balls are nearly doubled, you can brush each of them with egg wash if you wish. Bake the bread for about 20-25 minutes until the exterior is golden brown (if egg washed, or golden if no egg wash), and the interior registers 190°F.
- Let the bread cool at room temperature until they're cool or at least comfortable to handle.
For the cream cheese filling:
- Combine the softened cream cheese and sugar in a mixing bowl. Whisk the cream cheese until smooth and the sugar is incorporated. Transfer the cream cheese filling to a pipping bag or ZipLoc bag and set aside until needed.
For the garlic butter:
- In a large mixing bowl, whisk together all the ingredients for the garlic butter until completely smooth. Heat the mixture over a bain-marie or a pot of water with simmering water until the sugar is completely dissolved and the mixture is warm and very fluid. Make sure to whisk the mixture constantly and DO NOT overheat, or the eggs may scramble. Keep the garlic butter warm until needed.*You can heat up the garlic butter using the microwave if you like. Just make sure to use a glass bowl and to heat the mixture in short increments.*
To assemble the Korean cream cheese garlic bread:
- Preheat the oven to 400°F.
- When the bread is cool enough to handle, cut each bread into 8 equal wedges. Make sure to NOT completely cut through the bread. You want the bread to stay intact.
- After the bread has been cut, pipe a rope of the cream cheese filling in between each wedge. Be careful not to break the wedges.
- Once the bread has been filled with cream cheese, dip the entire bread into the garlic butter. Make sure the garlic butter coats in between the wedges as well. Hold the bread upside down to let excess garlic butter drain. Repeat with all the breads and arrange them back on the parchment lined pan.
- Pipe the remaining cream cheese filling in the center each bread and sprinkle a pinch of kosher salt on each bread. Bake the bread for about 8-10 minutes, until the breads are crispy. Make sure to not let the breads get too dark!*If you're want to ensure that the bread doesn't get too dark after the 2nd bake, you can skip the egg wash.*
- Let the bread cool for a few minutes and enjoy!
Notes
- If you wish, you can just purchase bread rolls from the grocery store. However, we did find that homemade bread rolls yield better texture cream cheese garlic bread.


Michaela says
Curious how do you store the leftover ?
Mei says
Hi Michaela! For the leftover breads, we stored them in the fridge in Ziploc bags (up to 1 week). When you're ready to eat them, you can pop them in the oven at 350F for 7-10 minutes to warm up and get crispy.
Although we've never had enough leftovers to freeze, I'm sure you can freeze without any problem. I recommend singularly wrapping each bread and store them in an airtight container to freeze. Thaw them out the night before and bake them in the oven as above.
Happy baking! 😊
Mich Vnzuela says
Hi can the all purpose flour be substituted with bread flour?
Mei says
Hi Mich!
Absolutely! You are welcomed to substitute the all-purpose flour for bread flour. However, You may need 2-4 Tablespoons additional liquid to compensate for the bread flour (bread flour tends to absorb more moisture than A/P).
Happy baking!
Mei ❤️
Ai E. says
Can I use bread flour instead?
Mei says
Hi Ai!
Technically, yes. You can use bread flour. However, you may have to adjust the amount of liquid for the bread recipe. Bread flour tends to absorb a bit more liquid than regular all-purpose flour.
Rachel Ann Chua says
Hi. I tried your recipe but i'm getting hard dough, not liquidy enough to be knead and dough is rubbery.
Anything i missed? 🙁
Mei says
Hi Rachel! Thank you for trying out our recipe =)
I'm sorry to hear that the dough didn't turn out right. For dough making, there are 3 "rules" I keep in mind.
1) Proper measurement of liquid ingredients. (In this case, water.)
2. Proper measurement of flour. Unless you are measuring with a scale, flour measurements will never be exact. So if you're using cup measurements, then make sure to "spoon and level" the flour. "Spoon and level" means to loosen up the flour and individually spooning it into your measuring cup until it overflows. Then with a butter knife or something straight, scrape off the excess. Try not to tap or shake the flour when spooning because it compacts the flour, which can increase the amount of flour measured by 15 grams or more.
3. Different brands of flour will differ in amount of liquid needed. Some will need a couple tablespoons more or less of water. If you're using bread flour instead of all-purpose flour, you'll probably need to use a bit more water.
4. If your dough is dry, knead in a couple tablespoons of liquid to your dough at a time until it gets to it's proper texture.
I hope this helped. Please let us know if you have any more questions! We also have a Youtube video up for this recipe as well. Just search up "Two Plaid Aprons Korean Garlic Bread" on Youtube. Good luck!
Mi says
I got the same outcome, it's dry
Mei says
Hi Mi!
I'm sorry the cream cheese garlic bread didn't turn out properly. Can you tell me how much flour and water you used? For this recipe I only used water for the dough and an egg for the egg wash since it'll be dunked in the garlic butter.
Mei
Rupambika Das says
how many calories does one of these bun have?
Mei says
Hi Rupambika! Base on this recipe, each Korean cream cheese garlic bread is average 867kCal, if you are making the bread yourself. The recipe is not calculated to reflect calorie counts for store bought bread. Also, if you are interested in more nutrition value of any of our recipes, you can find it in the footer of each of the recipe cards.
Happy Baking!
Annie Pe says
I made this and it turned out real good. I just had some difficulty with kneading the dough by hand since my mixer broke. But other than that it was a pretty easy recipe to follow and very tasty.
Mei says
Hi Annie! Thank you so much for trying out our recipe! So glad you enjoyed it!
If you make this recipe by hand again, and you have time to spare, try this method:
1. Combine the ingredients for the dough and mix until no dry pockets of flour are left.
2. Round the dough into a ball-ish shape, then let the dough rest for 30-45 minutes to ferment and naturally produce gluten. (Do dissolve the yeast in the warm milk first.)
3.After the fermentation, the dough should be much stretchier than earlier. Punch the dough down and knead it back into a ball (around the same size as when first started).
4.Let the dough proof until doubled and follow the remaining steps as instructed.
This method is less of a workout for your arms, as long you have time to wait for the natural fermentation to happen. We use this method to make our Korean Sausage Bread, if you want to check it out.😊
Happy baking!
Ella says
Made this bread and it was awesome and yummy. Thank you for the recipe 😊
Mei says
Thank you, Ella! So glad you enjoyed it! ❤️
Happy baking!
Mei
Mephisto says
Hi! Can you provide the metric measurement for the flour? Thanks!
Mei says
Hi Mephisto!
The average weight of all-purpose flour for this recipe (4 1/2 cups) is around 540 grams.
Happy baking!
Mei
BlueSkies says
Hi! Thank you so much for the delicious looking recipe 🙂 I was wondering if you could advise me with what could be a good substitute for the 2 eggs in the Garlic Butter portion? Thank you so much 🙂
Mei says
Hi BlueSkies!
Thank you for checking out our recipe! The eggs in the garlic butter is mostly to help set the custard-based garlic butter. You can absolutely do without the eggs, however, it will compromise the texture just a touch. Unfortunately, there's currently no substitution for the eggs. 🙁
Happy baking!
Mei ❤️
Tanya says
So there's no oil or butter or margarine on the bread? And even egg?
Mei says
Hi Tanya!
Nope, there's no oil, butter, margarine, or egg needed in this bread recipe. The egg is only optional for egg washing if you want.
Bake with love!
Mei❤️
Anushree Seksaria says
Hi is the egg necessary? And why?
Mei says
Hi Anushree! Thank you for checking out our recipe!
The egg for the egg wash is not a necessity. Egg wash is optional for if you want your bread to look shinier and more golden brown.
However, the eggs in the garlic butter is necessary. Korean cream cheese garlic breads are traditionally soaked in a "custardy" garlic butter to give the bread a richer flavor and more of a custard texture, which is what both the eggs and milk is for. If you're okay with compromising a little of the texture and richness, then feel free to omit the eggs. 😊
Happy baking!
Mei
Louisa Tan says
Hi! If i am using instant yeast may i know how much i should add? Thank u 🙂
Mei says
Hi Louisa! Thank you for checking out our recipe!
Usually, to substitute instant yeast for active dry yeast, it's 1 to 1 ratio. So you shouldn't have to use any more or less. However, instant yeast can be added straight into your flour mixture without having to pre-dissolve it in any warm liquid. Sometimes, instant yeast can also decrease the amount of time needed for your dough to double, so adjust the time as needed.
Hope this helped =)
Happy baking!
Mei
Emily says
I made this for the first time this weekend and it was amazing. I didn't expect my bread to turn out so soft, although I did add a little bit more water than recommended (because metric measurement is more accurate compared to cups). The next time I make this, I'll also adjust the sugar level because I did find the bread a little bit on the sweeter side. But overall, I loved this recipe and I'm so glad I made this because this is one of my best baking creations yet! Thank you 🙂
Mei says
Hi Emily!
Thank you for trying out our recipe! So glad it turned out well! We really appreciated that you used the recipe as a guideline and adapted it to your preference =)
Happy baking!
Mei ❤️
Natasha says
Could you please help me with the metric measurements? I dont use cup measurements too.
Mei says
Hi Natasha!
We've provided both metric measurement and US customary measurement in the recipe card. In the recipe card, if you look above the ingredient section and right below "Cook Mode", there will be a button for "Metric" and "US Customary". You can click on the button to toggle between the measurements. =)
Mei ❤️
Kellie says
Would rice flour be an acceptable substitute for a gluten free alternative?
Mei says
Hi Kellie!
Thank you for checking out our recipes! Unfortunately, this bread recipe cannot use rice flour as a substitute. Gluten is needed in order for the bread to hold its shape and rise with the yeast.
Happy baking!
Mei ❤️
Andrea Bautista says
Hi! Can I use fresh milk instead of whole milk? Thank you!
Mei says
Hi Andrea!
Fresh milk shouldn't cause any issue when making this recipe.
Happy baking! Let us know how it turns out!
Mei ❤️
Vinx says
Hi! You keep mentioning the water and eggs on the bread making process, but on your recipe for the bread, it's just water and the dry yeast. The egg is optional for the egg wash. Do I still need to add eggs for the bread? I've tried without the egg though and it's still amazing 😁
Mei says
Hi Vinx!
Thank you for trying out our recipe! You are right. No eggs are necessary for the bread making process, however, eggs are necessary for the garlic butter mixture. And yes, the eggs for the egg wash is totally optional. 😊 So glad you enjoyed the bread!
Happy baking!
Mei ❤️
Joanne says
I am using instant yeast. If I don't need to add water since it's instant, how can I knead? I just have dry ingredients to work with.
Mei says
Hi Joanne!
Thank you for trying our recipe! If you are using instant yeast, simply add it to your dough when you add all of your wet ingredients (egg and water). Active dry yeasts require dissolving, but instant yeasts can be added directly to the flour. This recipe's water is meant for the flour. We are simply using that same water to also dissolve the active dry yeast.
Happy baking!
Mei <3
Faye says
Hi! Was wondering if I could make this in a bread maker put to dough setting. Will it turn exactly with a hand/mix knead one?
Mei says
Hello! We have never tried using a bread maker so we are not be certain, but we don't see an issue with using the bread maker to make your dough. When you go to shape you dough it should be elastic and passes the window pane test. You can refer to the picture in our post for a window pane reference. Thank you and keep baking!
Mei
Rose says
I made sourdough challah buns for the bread in this recipe and added horsradish to the garlic butter.
The recipe is amazing, so much gratitude for sharing.
Mei says
Hi Rose!
Thank you so much for trying our recipe! Love the twist you added to the garlic breads! We are so glad you enjoyed everything!
Bake with love!
Mei ❤️
David says
Hi! Thanks for publishing the recipe. I tried it today, the result was okay-ish. Too sweet for my taste which is why I'll ignore the sugar altogether in my next attempt. Never really understood the deal with "sweet and savory". Since this recipe is intended for a wider audience and people worldwide use the metric system, I'd like to suggest that standardized units are used for the recipe instead of American/British units. Or at least a convenience function to easily convert would be really nice.
Mei says
Hi David!
Thank you for trying our recipe! Yes, I agree. The recipe is slightly on the sweeter side, but that's just simply how Korean cream cheese garlic breads are, and it's totally up to personal preference. Feel free to adjust the recipe to your liking. =)
And thank you for your suggestion. We are in the process to incorporate measurements that will be more convenient for both our local and international readers. Thanks again for trying out this recipe and hope the breads are more enjoyable next time!
Bake with love!
Mei ❤️
Kristine says
Can I prepare the bread only at night and finish it with filling and coating the next morning?
Mei says
Hi Kristine!
Yes, you can absolutely make the bread the night before and finish the garlic butter part the next day when you're ready to eat it fresh out of the oven. One thing I did notice when I use the bread the second day is that, the bread gets a little stiffer and a little more fragile, so be very sure that you don't cut too deep into the bread, or it'll split when you dunk it into the garlic butter. But if it does break, no worries! It'll still taste amazing! 😉
Happy baking!
Mei ❤️
Denny Jane says
Hello! How many days is the shelf life of the cream cheese garlic bread? How about when it is chilled? Can I use cream cheese spread instead of cream cheese block? I really wanted to try baking the cream cheese garlic bread but I only have a toaster oven. My toaster oven is small and I wanted to try to bake only 1 piece. How can I measure the ingredients only for 1 piece cream cheese garlic bread? Thank you! 🙂
Mei says
Hi Denny!
Thank you for trying our recipe! The shelf life for the Korean cream cheese garlic bread at room temperature is max, 3 days. However, I highly recommend keeping them refrigerated after day 2. It'll last up to 7 days in the fridge, as long they are properly wrapped/ stored.
Feel free to use the cream cheese spreads. You'll just have to remove it from the tub and incorporate the sugar. We use the cream cheese blocks simply because they are less expensive and is more readily available at most grocery stores with the standard weight of 8 ounces.
I don't recommend making the breads one at a time. It's really difficult to measure all the ingredients at such a small quantity. However, you can bake off all of the breads and freeze whatever leftover breads you do not use. Simply thaw your bread out when you want to make these cream cheese garlic breads. As for the garlic butter, it freezes pretty well. After your first use, just freeze it when it cools. When you want to make more cream cheese garlic bread, heat it up over a double boiler (or a heatproof bowl over a pot of simmering water), and whisk it to re-emulsify everything.
Lastly, I have tested cutting this recipe by half, and it turned out great. So instead of making 6 breads, you can make 3 without sacrificing the quality.
Hope this helps!
Happy baking!
Mei ❤️
Denny Jane says
Hello again! I forgot to ask if I can use instant yeast? If yes, is it still 1 teaspoon for the yeast? Thank you so much! 🙂
Denny Jane says
What's the other alternative for kosher salt? Can I use iodized salt? Thank you!
Mei says
Hi Denny!
Iodized salt is perfectly fine. We simply specified the kind of salt we used because different salt has different volume. If you're using iodized (table) salt, just use a little less than what the recipe calls for. (ie. 1 tsp iodized salt is more than 1 tsp kosher salt)
Happy baking!
Mei ❤️
Jane says
For the oven toaster, I don't know what celsius and how many minutes should I set for baking the bread. I think there are ovens that makes the bread bake faster? I don't know when it comes to this. My oven toaster reaches until 240°C and the timer reaches until 15 mins only. May I know the celsius and time to set? Thank you. 🙂
Mei says
Hi Jane!
The breads need to be baked at 350°F (or about 175°C) for about 15-20 minutes. Since your toaster oven can only be set for 15 minutes max, check the internal temperature of the bread after 15 minutes of baking. It should be at 190°F (or 87-88°C). If the bread is not at that temperature yet, just pop it back in your toaster oven for another 5 minutes.
As for the the second bake (after dipping in garlic butter), increase your toaster oven temperature to 400°F (or about 205°C). Bake the breads for about 8-10 minutes or until the breads are nicely golden brown and the breads' exterior is crispy.
Happy baking!
Mei ❤️
Tanya says
4 1/2 c of flour and only 1 1/3 c of water.. no egg or butter or oil... the dough was sooooo dry and not workable at all..
Mei says
Hi Tanya!
Thank you for trying out our recipe! I'm sorry, your bread didn't turn out properly. However, I guarantee that this bread recipe is good. We actually make this recipe at least 2-3 times a month. The bread dough doesn't need any additional butter, oil, or eggs because 4½ cups flour (roughly about 540 grams) and 1⅓ cups of water (roughly 320 grams) gives the dough roughly 59% hydration, which is very common for any bread rolls. I do realized that the amount of liquid is a bit lower than some other recipes, but we are trying to make a stiffer dough, so that the buns doesn't turn out flat when you proof and bake it. Here are some troubleshooting tips that may help:
- Measure dry ingredients with dry measuring cups and spoons. Vice versa for wet ingredients like water, measure with a liquid measuring cup.
- Try measuring with a scale to prevent any weight differences, because cup measurements can vary flour weight by 5-15 grams per cup. We only provided the US customary measurement for convenience. We're working on a metric converter for our international readers and for recipes like these that work better with metric measurements.
- Spoon and level your flour. If you are measuring with US measuring cups, it is highly recommended that you use the spoon and level method so that as much of the measurement variation can be reduced. So first, fluff up your flour with a spoon. Then, spoon the flour into the measuring cup until it is overflowing. Do not shake or pack the cup. Lastly, use a flat edge, like the back of a butterknife, to scrape off any excess flour.
- This recipe is based off of all-purpose flour, so if you're using bread flour, you'll need to add more water.
- We live in Louisiana where it's almost always humid, so we would use a little less liquid in our baking. If you live in an area that's usually dry or in high altitude, you'll have to adjust the amount of liquid used as well.
Hope these troubleshooting tips help!
Bake with love!
Mei❤️
LEAH ROSAMERAN says
Hello. How long can i store the left over garlic butter mixture and thwle cream cheese filling?
Mei says
Hi Leah!
Thank you for trying our recipe! The garlic butter mix is good in in the fridge for up to 1 week and up to 3 months in the freezer. As for the cream cheese filling, it is best to use it up within 1 week. Otherwise, store the cream cheese filling in an airtight container and freeze it up to 2 months.
Bake with love!
Mei ❤️
Charisma Lukacs says
Hi there, can I make the buns 2 days ahead of time before I make the garlic cream cheese buns? How do I store the baked buns? And for how long does it stays fresh?
Mei says
Hi Charisma!
Yes! You can make the buns up to 1 week ahead if you properly wrap them and properly store them in airtight containers in the fridge. However, of course, the texture of the bread is best if eaten within 3 days. Also, the buns will usually become more crumbly the longer they sit, so be careful when you cut them into wedges and avoid cutting too deep, or they will break off. Once you make the cream cheese garlic bread, they are good for up to 1 week, if you properly wrap and store them in the fridge.
Hope this helps!
Bake with love!
Mei ❤️
Rusty says
Third time making these. So delicious. Neighbors ooh and ahh when I share with them. It's not something we can likely find in our area, so it has been an eye-opener to try this. Thank you for the delicious recipe and I'll try more of y'all's. South Texas btw.
Mei says
Hi Rusty and hello South Texas!!!
We're so happy to hear that we have readers from our neighboring state! We live in southern Louisiana =)
You totally made our day and thank you so much for trying out this recipe and sharing with your neighbors!
Bake with love!
Mei ❤️
Kristel says
My bread dough turned out to be a bit flat, why is that?
Mei says
Hi Kristel!
Thank you so much for trying our recipe! Your bread dough turning our flat could be cause by several reasons. The following are some of the most common:
1) The dough was too wet. Originally, our recipe used only 1 1/3 cup water but because many of our readers found the dough to be drier than what they were used to, we increased the amount of water used to 1 1/2 cup. We tested out the recipe and it turned our fine, with the exception that the bread turned out slightly flatter, lighter in crumbs, and airier. But, we do live in southern Louisiana where it's super humid and warm almost all the time. So I suggest that if you also live in a warm, humid area like us, adjust the amount of water used accordingly. I recommend starting out with 1 1/3 cup water and increasing it up to 1 1/2 cups as needed. This note is also included in the recipe and the post.
2) Proofing in too warm of an area. Sometimes when doughs are proofed in an area that's too warm, they lose their shape and spread out. This is especially true when the dough is already on the wetter side. The warmth relaxes the gluten in the dough which can result in a flat bread.
3) Not shaping the dough properly. I always recommend tightening the dough balls when shaping bread rolls because it helps to keep the structure tight, and it's less likely will the dough spread and become loose. So after rolling the dough into a ball, place the dough ball on the work surface and pull the dough towards you to tighten the dough ball. Turn the dough ball a few time, repeating this motion to tighten in all angles and to keep the dough circular. Also, make sure your work surface isn't too floured. We need the tacky-ness of the dough to help making the dough taut.
Hope this helps! Please let us know if you have any other questions and if these tips helped!
Bake with love!
Mei ❤️
Valerie says
Hi! How big do these bread buns turn out to be at the end?
Mei says
Hi Valerie!
Thank you for checking out our recipe! These bread buns are about 5 to 6 inches wide after baking.
Happy baking!
Mei ❤️
Jhea Bermejo says
Hi. can I assemble the bread and the filling a night before and bake it in the morning?
Mei says
Hi Jhea!
Absolutely! You can have the filling and bread all assembled the night before and bake it in the morning. Just make sure wrap the breads well to prevent drying out. Also, I do recommend soaking the breads in the garlic butter the morning of. This way, the breads won't collapse during the night from being moist.
Bake with love!
Mei ❤️
Mill says
hi. Can I use an instant yeast that is no need to activate with warm water instead of active dry yeast?. If that, do i still have to add 319 ml of water in the mixture? anyway thx for the recipe:))
Mei says
Hi Mill!
Thank you so much for checking out our recipe! Yes! You can absolutely swap out the active dry yeast for instant yeast. We simply used active dry because it's what we always keep on hand. To use instant yeast, you don't have to dissolve it at all. Just add it to your flour mix, along with salt and sugar, add warm water and knead until window pane stage.
As for the amount of water, (whether active dry or instant yeast) it will vary depend on where you live and what brand of flour you use. For us (since we live in a pretty warm and humid area), we usually use about 1 1/3 cup water (about 310 mL), but some of our readers have brought to our attention that their doughs seemed really hard when using only 1 1/3 cup of water. So you may have to use up to 1 1/2 cup (about 350mL). Granted, the more water used, the looser the crumb of the bread will be.
Hope this helps! Please let us know if you have any other questions! Would love to know how the garlic bread turns out =)
Bake with love,
Mei ❤️
Susan says
Thank you for such a delicious recipe! I decreased the sugar by a bit but otherwise followed all the measurements exactly. The rolls came out wonderful, it's the best thing I've ever baked. Everyone whose tried it are amazed with the flavour and presentation. One person even asked if she could pay me to make her a batch!
Mei says
Hi Susan!
Thank you so much for trying out our recipe! We are so happy that you guys enjoyed it! It really means a lot to us =)
Bake with love!
Mei ❤️
Memphys German says
Hi!! I made these a few times for my family when we have pasta-ish dishes and they're always a crowd pleaser :] im a beginner when it comes to baking and such but the recipe is very easy to follow and it comes out great every time! no matter how many little mistakes I make lol. thank you so much for the recipe!
Mei says
Hi Memphys!
Thank you so much for trying out our recipe! We LOVE having these cream cheese garlic breads with pasta dishes as well! So glad everyone enjoyed it and happy that we are able to provide you with some baking adventures!
Bake with love!
Mei ❤️
Marie says
Followed the recipe exactly, and these turned out AMAZING! I've never had these before, and I really do love the savory-sweet deliciousness. The photo tutorial for how to tuck and roll the buns was also super helpful.
I don't have a stand mixer, so I followed the comment below about letting it ferment naturally. It worked and really saved my arms from having to knead to infinity and beyond.
Thanks so much for sharing this recipe! I'll definitely be making these again as a special occasion treat. I'd also like to try making mini bun versions, which I think would go over really well at a potluck or dinner party.
Mei says
Hi Marie!
Thank you so much for trying out our recipe and sharing your experience! We're so happy our tips and tricks helped! Haha, the natural fermentation method is actually our favorite way to make most doughs, if we have the time. And that mini version sounds amazing! It'd be perfect for dinners and get togethers!
Happy baking!
Mei ❤️
Marie says
I've made these half a dozen times now! I've never had a bad batch. They always turn out lovely and delicious. My friends and coworkers specifically request I bring these as special treats for parties! Thank you for sharing such a consistent and perfect recipe. 🙂
Mei says
Hi Marie!
Thank you for your kind words and so happy to hear that everyone enjoyed your cream cheese garlic bread! It is so nice of you to make treats and sharing it with your co-workers. So jealous!
Mei ❤️
Lala Barasi says
Have tried your recipe 2x already. And they both turned out great! Instructions are easy to follow as well as I have learned a lot from tips to experiences of others as well.
Thank you for sharing this recipe.
👏🏼More power to you both!👍🏼
Mei says
Hi Lala!
Thank you so much for trying out our recipes! So happy that you liked the recipes and found our post helpful =)
Bake with love!
Mei ❤️
Catrina G says
I’ve always had trouble baking breads and I was super excited to try this recipe out after eating it at my local bakery. After baking, the bread didn’t brown it was more on the white side (minus where the egg wash was brushed on) is it possibly from over kneading?
Mei says
Hi Catrina!
Thank you for trying out our Korean cream cheese garlic bread recipe!
If your buns didn't brown much, it probably needed more baking time or your oven temperature isn't accurate. As long most of the bun is kind of golden, you shouldn't worry too much (a little white towards the bottom of the buns is okay). The second bake after you dunk them in the garlic butter will give the bread more color.
As for over-kneading, it's almost impossible to do, in terms of bread making. You'd have to knead for more than 30 minutes (with a machine). Kneading only enhance gluten development, which can make your bread dense and tough, if the dough wasn't proofed enough. But if you ever do "over-knead" your bread dough, you can let it rest for 10-30 minutes so that the gluten can relax and the dough will be softer and easier to work with.
Hope this answered your question!
Happy baking!
Mei ❤️
Mi says
Even though the dough is dry, and was not able to knead it. My bread turned out great. Thanks for the recipe.
Mei says
So glad you were still able to enjoy them! Please let us know if you have any other questions =)
Tan says
Hi! Noticed that there is no butter/oil in the bread recipe. Wondering what’s the reason? Thanks!
Mei says
Hi Tan!
Butter/oil is not necessary in this particular recipe since the rolls will be dunked in garlic butter later. However, if you prefer, you could use a TBSP or two softened butter to make it richer. If you do, just hold back on a couple TBSP of water and adjust as needed. 😊
Mei
Tan says
Thank you Mei!
Mei says
My pleasure =) Please let me know if you have any other questions!
Charleen Collins says
Oh my gosh!!!! Delightful…
I made these rolls with frozen large, Texas Style dinner rolls from Sams club…I let the rolls defrost in the fridge, then I combined two dough balls together for a larger roll…let them rise and they made lovely 5” buns…perfect for these …they were delicious!!!!…everyone raved about them….
Mei says
Hi Charleen!
Thank you for trying out our recipe! We are so happy that you enjoyed the bread. And that's such a genius hack! 👍 Thank you for sharing!
Mei❤️
Mizuu san says
Can I use a milk instead of water to add more flavour to the dough?
Mei says
Hi Mizuu!
Yes, absolutely. You can use milk instead of water.
Mei ❤️
Cami says
This was so easy to make and my whole family loved them
Mei says
Hi Cami!
Thank you for trying out our recipe! So glad everyone enjoyed them!
Mei ❤️
Becka says
Not an expert baker but I had free time on a snowy day and they were delicious! My whole family love them, thank you.
Mei says
Hi Becka! Thank you for giving our recipe a try! So glad to hear that everyone enjoyed it!
Mei ❤️
Christina C says
I made these with my students and they turned out amazing! The buns were nice and fluffy and the balance of sweet and savoury won the taste test of the students. This recipe is great and will definitely be regularly on my baking que. Thanks again!
Mei says
So glad everyone enjoyed it and that the buns passed the taste test! It sounds like a lot of fun!
Mei ❤️
MakiKala says
I made these last week and they turned out perfectly! So delicious! The buns were soft and did not get soggy at all with all the amazing garlic butter. They were even fantastic after a few days in the fridge! This is definitely a keeper!
Mei says
So glad you enjoyed them, MakiKala!
Mei ❤️