


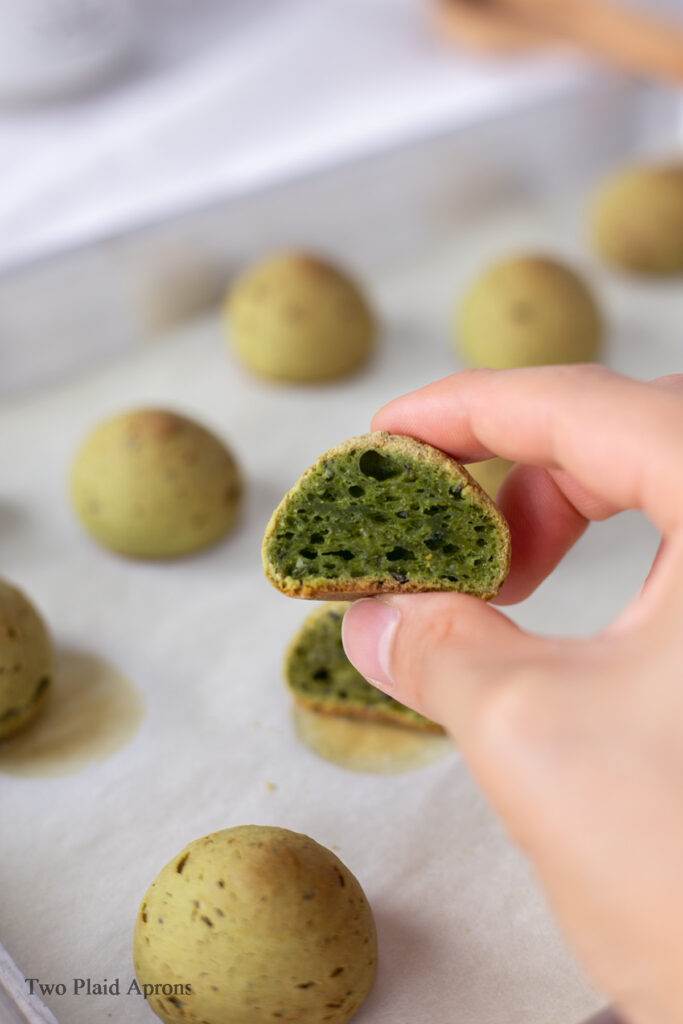
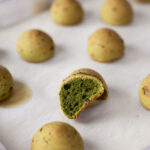
This matcha mochi breads recipe is a small-batch adaptation of our classic Korean mochi breads. Still speckled with black sesames, these green tinted "dino eggs" are perfect afternoon and/ or tea snacks! They are slightly crispy on the outside, tenderly chewy on the inside, and have the beautiful flavors of floral matcha and toasted black sesame.
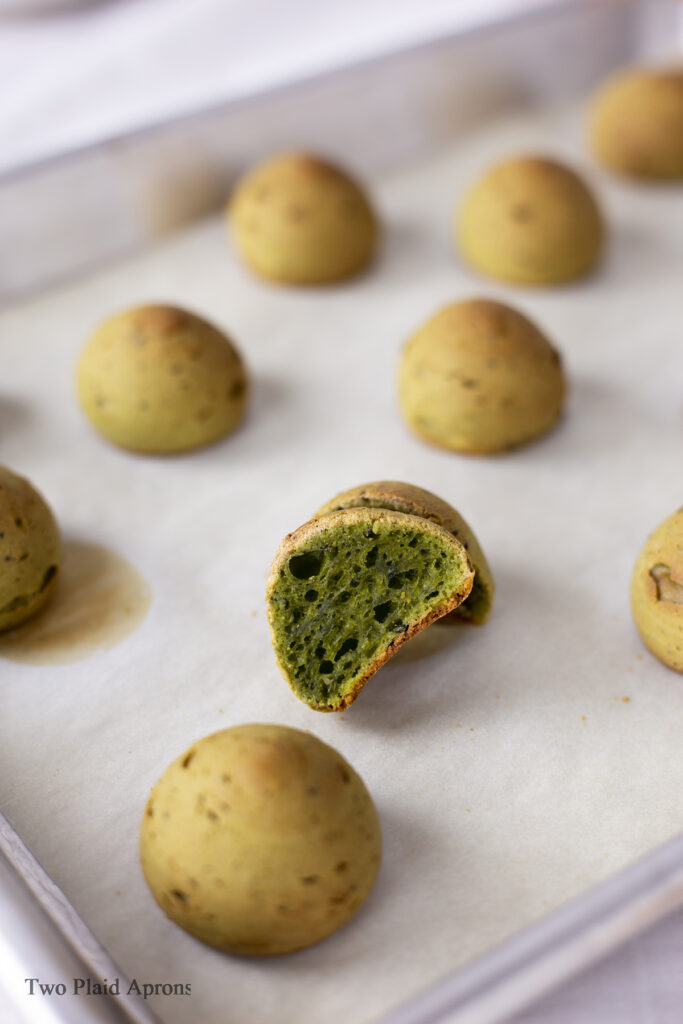
Since we shared our classic Korean mochi bread back in the fall, we've got numerous requests to make different flavors of mochi breads, particularly, matcha flavored ones. Of course, we couldn't deny it! Both Kyong and I were soooo excited for this green, floral version of these adorable "dino eggs"! We thought the green made the pastry more prehistorically appealing? Lol.
We hope you guys enjoy this matcha version of of our cute "dino eggs"!
What makes mochi bread "mochi"
Unlike regular mochi, these matcha mochi breads are not made with sweet rice flour (or glutinous rice flour). These matcha mochi breads are called "mochi" for their soft, chewy texture contributed by the tapioca flour used in the recipe.
Use at least culinary grade matcha
Like for most matcha recipes, we always recommend using good matcha. This is especially important for making these matcha mochi breads. First, the quality of matcha is important for the matcha flavor in these mochi breads. The better grade matcha used, the more floral and green tea essence you will taste. The lesser matcha powders tend to provide more bitter, astringent flavors of green tea. The second reason why we highly recommend using a good quality matcha is for the color. The better the matcha, the greener and vibrant the color will be. Especially after baking, the vibrancy of matcha usually will dull a bit. With all that said, you don't have to purchase the best ceremonial grade matcha out there. A good quality, culinary grade matcha will do just fine, but some flavors and color will be slightly compromised, of course.
Bread flour or all-purpose flour
We've tested this recipe with both bread flour and all-purpose flour, and the result is not that noticeably different. So feel free to substitute the 35 grams of all-purpose flour for bread flour if you wish. We usually use all-purpose flour because we always have a stock of it in our pantry.
Initial batter consistency
It is very important that the initial batter (after adding flour and matcha to the milk mixture) consistency is thick like baby food. If the batter doesn't thicken up, it's most likely because the milk mixture wasn't hot enough. In this case, simply place the saucepan onto the stovetop at medium heat and constantly stir it until the batter is thick like baby food.
Paté a Choux method
I am not entirely sure where the inspiration for these delicious mochi bread came from, but the cooking method is definitely a variation of the classic French pastry method: paté a choux. With this method, the liquid, usually milk, butter, sugar, salt, and flavorings, are combined and heated until hot, then the dry ingredient, the flour, is added. The mixture will be mixed and until no dry flour is left, and beaten eggs will be incorporated until the desired consistency has been reached.
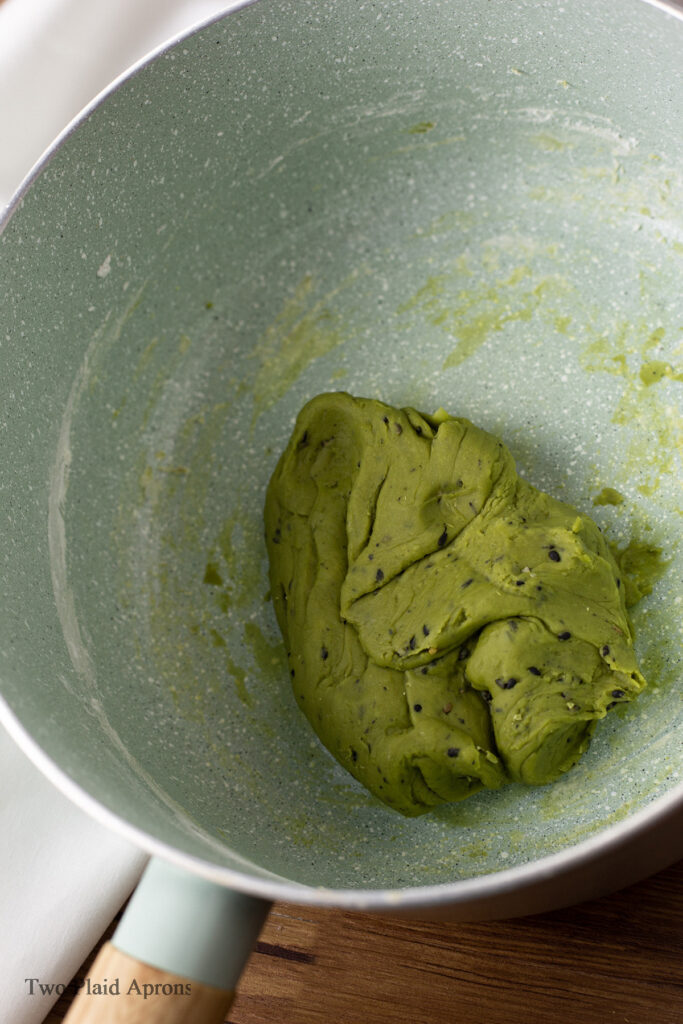
Now, the difference between the classic French method and where this matcha mochi bread method diverge, is the ingredient and the delayed addition of tapioca flour. For the matcha mochi bread, a small amount of all-purpose flour (with matcha powder) is added to the hot liquid mixture and mixed until thickened, then tapioca flour is added until entirely incorporated. By then, the batter will be more like a ball of stiff dough, until the egg is added.

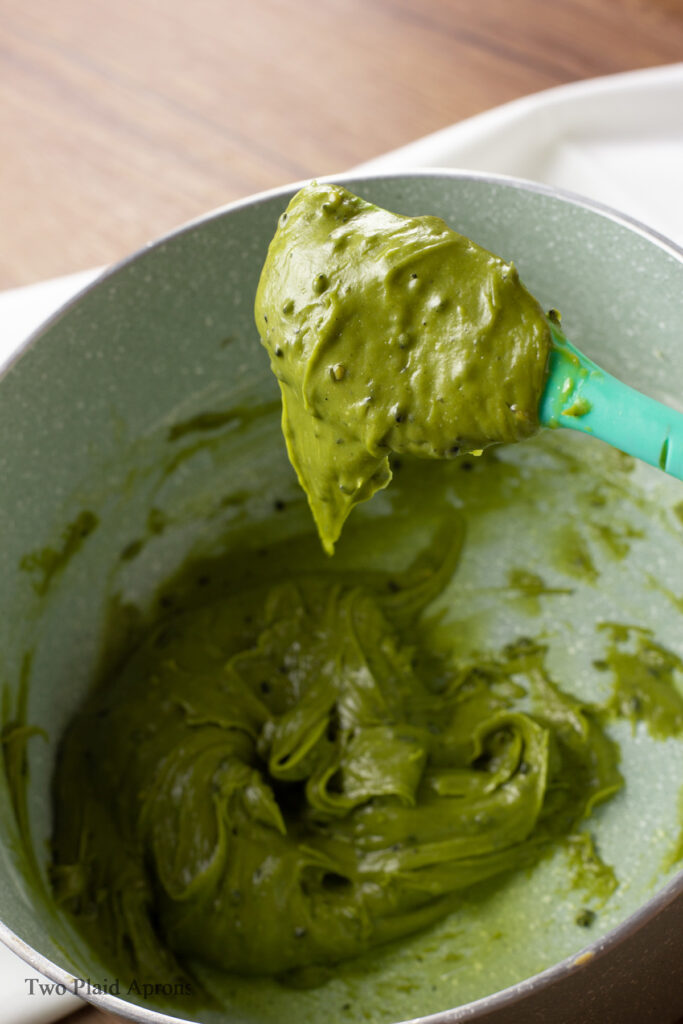
After adding tapioca flour and incorporating it completely, the batter will be a stiff dough. After adding the proper amount of eggs, the mochi bread batter becomes looser and hangs off the spatula in a "v" shape.
Proper consistency of the batter
Once all of the tapioca flour has been incorporated into the initial batter and the dough is only warm to the touch, add the beaten egg in small increments. Make sure the egg is fully incorporated in between each addition before adding the next. The batter is ready when it turns into a thick batter consistency and creates a triangle or "v" when the batter falls off.
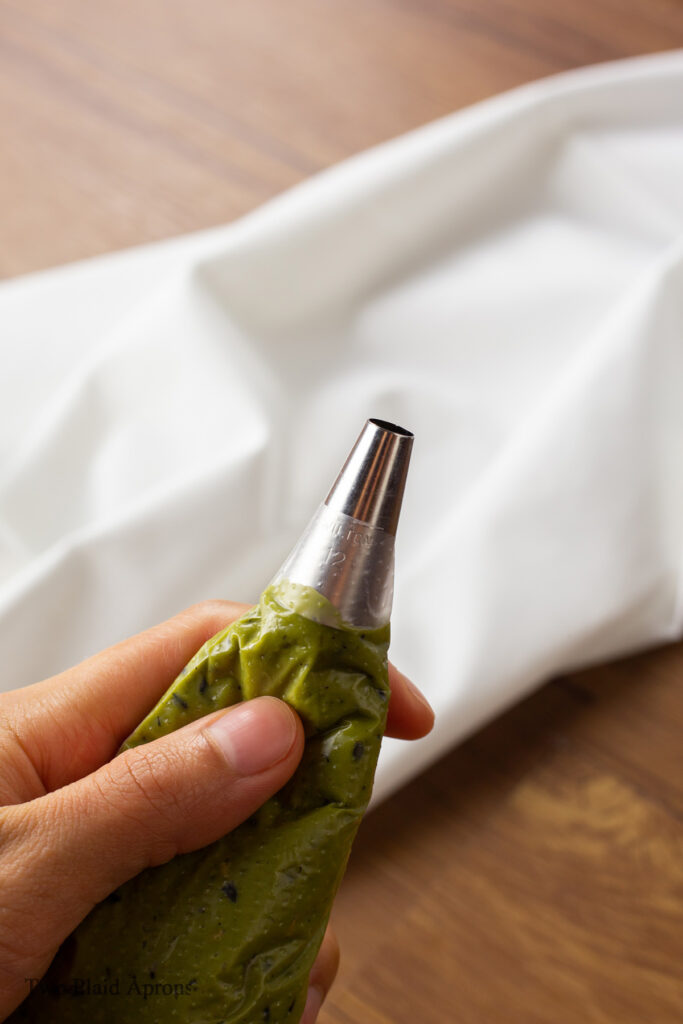
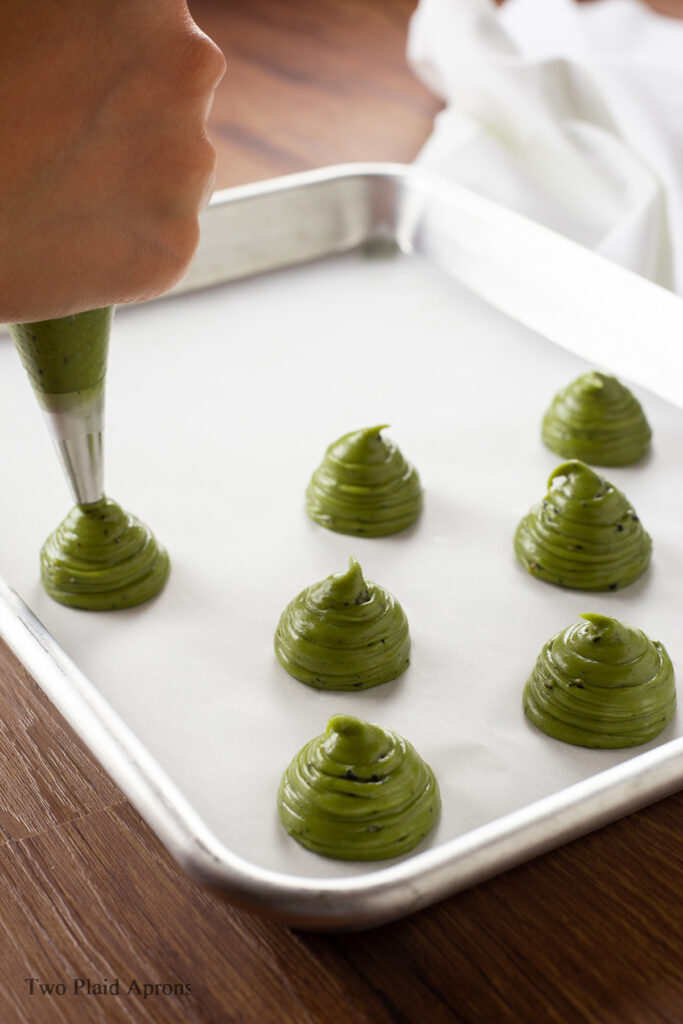
Pipping tip
Many of you guys have asked in our classic Korean mochi bread post what piping tips we use and if it's necessary, so we thought we should answer that here for the matcha mochi breads too.
We really recommend that you use a pipping tip when pipping these matcha mochi breads. The tips give the mounds of batter a better shape and structure, which we thought, helped a lot with keeping the mounds tall. As for the tip we used, any round tip is perfect. We usually fit our pipping bag with the Wilton #12 tip because it seemed like the perfect size, lol.
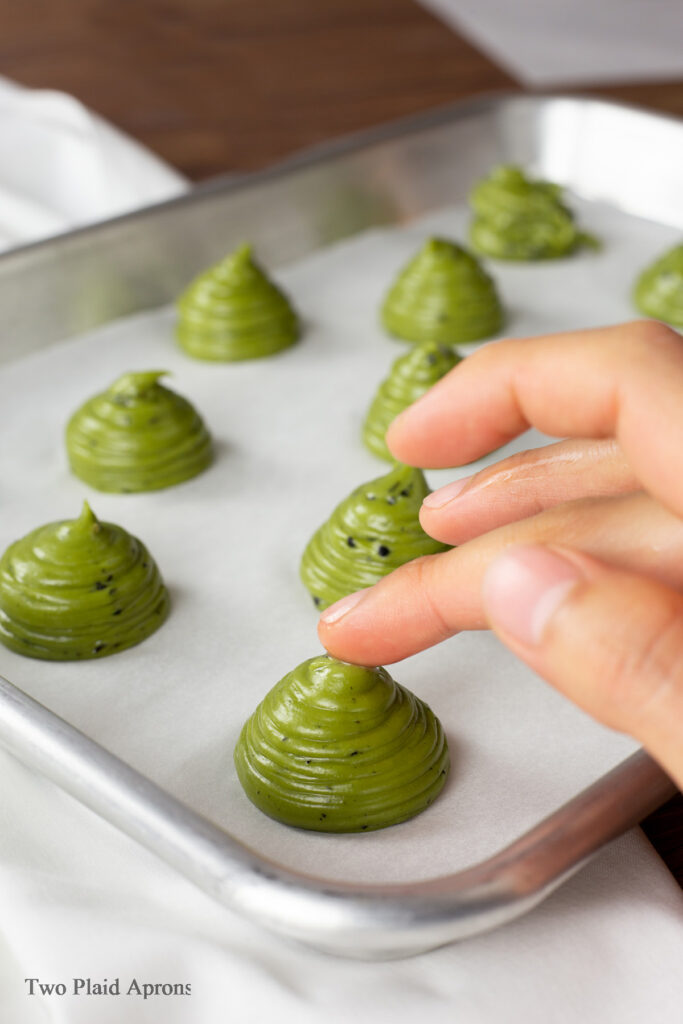
Dab each mound of batter with cold water
Like making profiteroles, we highly recommend smoothing out each dome of batter with some cold water. Just wet your finger with some cold water and dap the tips of the piped mounds of batter to smooth the domes out. This will prevent the thin tips from browning or even burning before the matcha mochi bread is done baking.
Start with high temperature baking
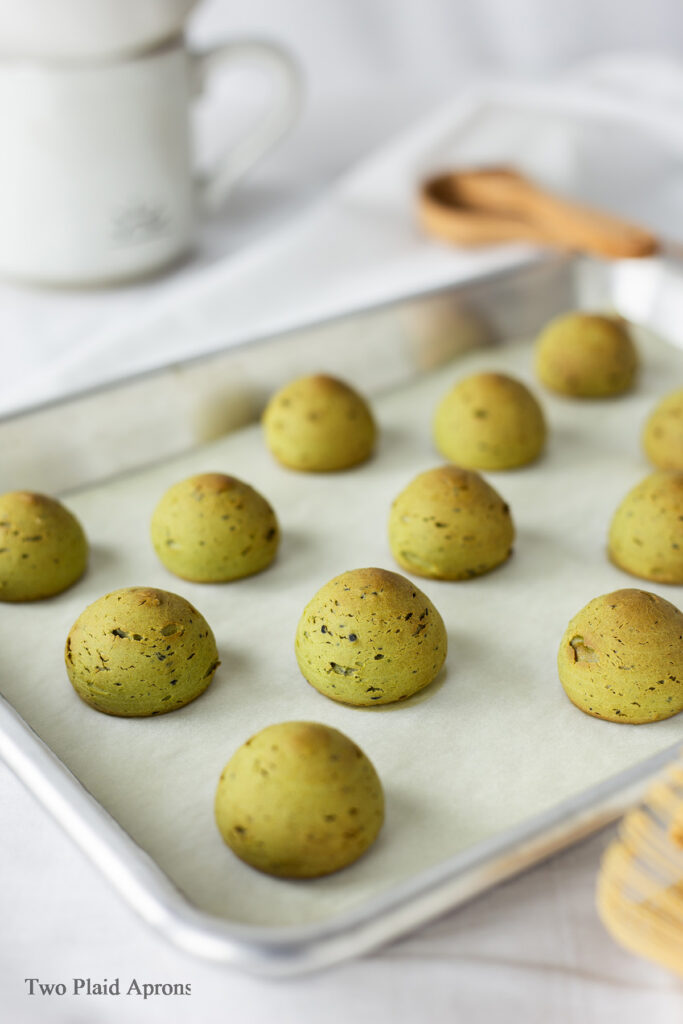
After baking SEVERAL batches of our classic Korean mochi breads and these matcha mochi breads, we realized that baking the mochi breads at a higher for the first 10 minutes help the mochi breads puff up better and create that iconic "dino egg" effect.
So, adapting from our classic Korean mochi bread recipe, we decided to increase the initial baking temperature from 350°F to 375°F. Bake the mochi breads for about 10 minutes or until most of the rise in the mochi bread is complete. Then, decrease the baking temperature to 350°F without opening the door, and continue to bake the breads for another 10 to 15 minutes, or until the breads are slightly golden brown and the outsides are firm. This way of baking will ensure that the mochi breads puffs up completely without over-baking them.
Matcha mochi bread for day two
Just like the class mochi breads, these matcha mochi breads are best enjoyed the day of, especially right after the mochi breads are just cooled. Coming out of the oven, mochi breads are slightly crispy on the outside and tenderly chewy on the inside. The perfect texture for ultimate enjoyment.
Unfortunately, mochi breads on day two don't quite do the pastry any justice. It tends to get a bit "stale" and lack that tender chew and slight crisp of the fresh ones. We did find a way to reinstate the lost chewiness, but not so much the crisp. So, if you are okay with just the pleasant chewiness on day two, here's how to do it:
- Store the leftover matcha mochi breads in an airtight container overnight.
- When ready to enjoy the mochi breads on day two, spray or splash the mochi breads with some water and microwave them on a microwave safe plate until warm (about 10-15 seconds, but each microwave is a little different). The mochi breads will be hotter on the insides than the outside, so try them in short increments.
The alternative method: baking the matcha mochi bread on day 2
The "alternative" way to enjoy these matcha mochi breads on day two is to bake them when you want to enjoy them. Simply follow the recipe up till the baking part. Don't bake them yet. Just have them pipped out and smooth out with water, then freeze them until you're ready to bake. Because this method freezes the dough, you will have to bake the matcha mochi breads 5 to 10 minutes longer (for the initial 375°F bake), or until the breads are completely puffed up. Then, decrease the baking temperature to 350° and bake till slightly golden brown, about another 10 to 15 minutes.
If you're looking for other Korean snacks and breads, you may enjoy these:
- Korean mochi bread
- Sweet potato mochi pancakes/ hotteok
- Korean sausage bread
- Korean french fry corn dog
Bake with love!
Mei ❤️
If you’ve made this recipe or any recipes from our blog, please tag us on Instagram using #twoplaidaprons! You can also tag us in your Instagram stories using @two_plaid_aprons. We would love to see your creations! It absolutely makes our day! 🥰
📖 Recipe
Matcha Mochie Bread
Ingredients
- 2 Tablespoon all-purpose flour (about 15g)
- 2 teaspoon ceremonial grade matcha , or culinary grade (about 3g)
- ⅓ cup milk (about 79mL)
- 1 Tablespoon butter (about 15g)
- 7 teaspoon granulated sugar (about 30g)
- ¼ teaspoon vanilla extract
- pinch of salt
- 65 gram tapioca flour (about ½ cup)
- 1 egg , beaten
- 1 Tablespoon black sesame seed , optional
Instructions
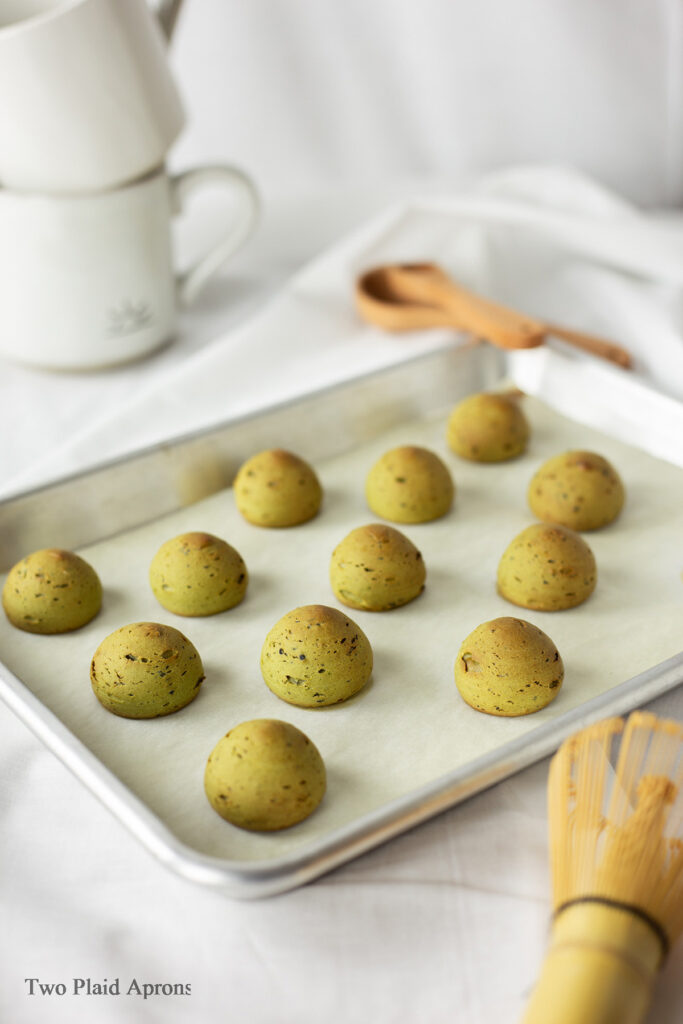
- Preheat oven to 375°F and prepare a sheet pan lined with parchment.
- Whisk together the all-purpose flour and the ceremonial grade matcha*. Set aside until needed.*We highly recommend using no lower than culinary grade matcha for these matcha mochi breads.*
- In a saucepan, bring the milk, butter, sugar, salt, and vanilla to a simmer over medium heat, stirring occasionally. *Don't scorch the milk!* Turn off the heat and add the flour and matcha mix and the black sesame seeds. Whisk the mixture until no more dry flour is visible. The mixture should resemble thick baby food.*It is okay if the mixture has a few small lumps, just mix it the best you can. If the mixture looks really loose, heat the saucepan over medium heat while constantly stirring, until the mixture thickens.*
- While the mixture is hot, add the tapioca flour and mix with a rubber spatula until all of the tapioca flour is absorbed and no more dry spots are visible. The dough will become quite stiff and thick. Let the dough cool till it's warm to the touch.*Refer to post for photo reference.*
- Once the dough has cooled, add small amounts of the beaten egg, about ¼ of it, at a time and mix until full incorporated. Repeat this step until the the batter is loose enough for pipping and falls off your spatula into a triangle or "v" shape. *You'll most likely use ½ to ⅔ of a large egg. It is very unlikely for the batter to require the entire egg, however, depending on your environment and how much moisture was lost from the milk mixture, the amount of egg needed will vary. Refer to the post for a photo reference of how the batter should look.*
- Transfer the batter into a pipping bag, fitted with a round tip. We used a Wilton #12 tip, but you can use whatever size tip you'd like. Pipe the batter into tall, dome mounds, about 1 inch wide by 1 inch tall, onto the prepared sheet pan, keeping each mound at least 1 inch apart. Repeat until all of the batter is used.Pro tip: Smear a small amount of the batter onto each corners of the parchment paper to help adhere the paper to the sheet pan. *Pipping tip is not absolutely necessary, however, we did find pipping tips helpful with keep the shape round and makes it a little easier to pipe the mounds.*
- Once all of the mounds are pipped, dip your finger into some cold water and dab the tips of of each mound to smooth off the dome mounds.
- Bake the mochi bread in the oven for about 10 minutes, then decrease the oven temperature to 350°F and continue baking for another 10 minutes, or until the matcha mochi breads are golden brown on top.
- Remove the mochi breads from the oven and let them cool at room temperature until comfortable for handling. Enjoy!


Keryn says
How do these fair if baked in a bigger size? Thinking of making them, but thinking of baking them slightly bigger than bite sized, maybe 3/4 bites rather!
Mei says
Hi Keryn!
Making these mochi breads bigger can make them look a little flatter than desired. Besides that, there shouldn't be much difference in appearance, flavor, or texture. If you decide to make these mochi breads larger, do increase the bake time to compensate for the size. I recommend increasing the bake time in 3-5 minute increments.
Hope this helps!
Happy baking!
Mei ❤️