


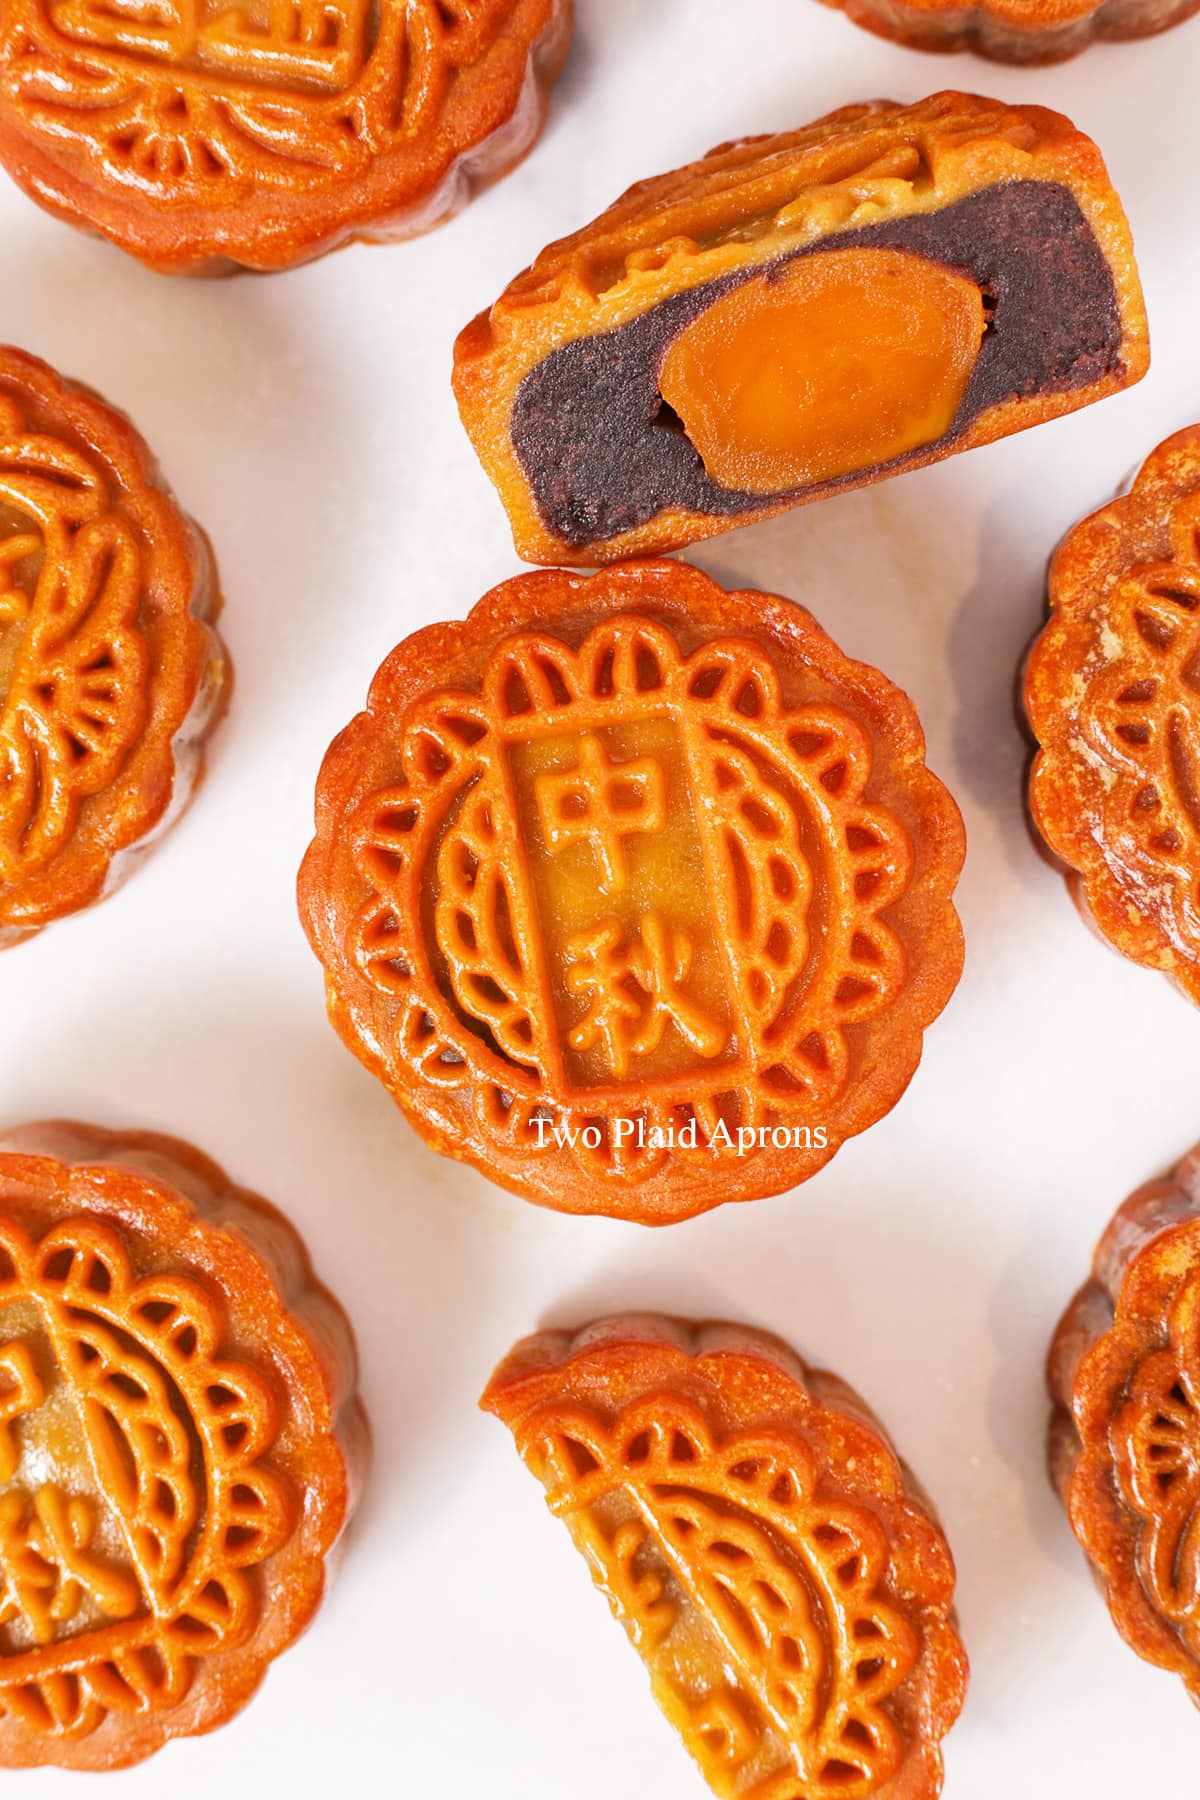
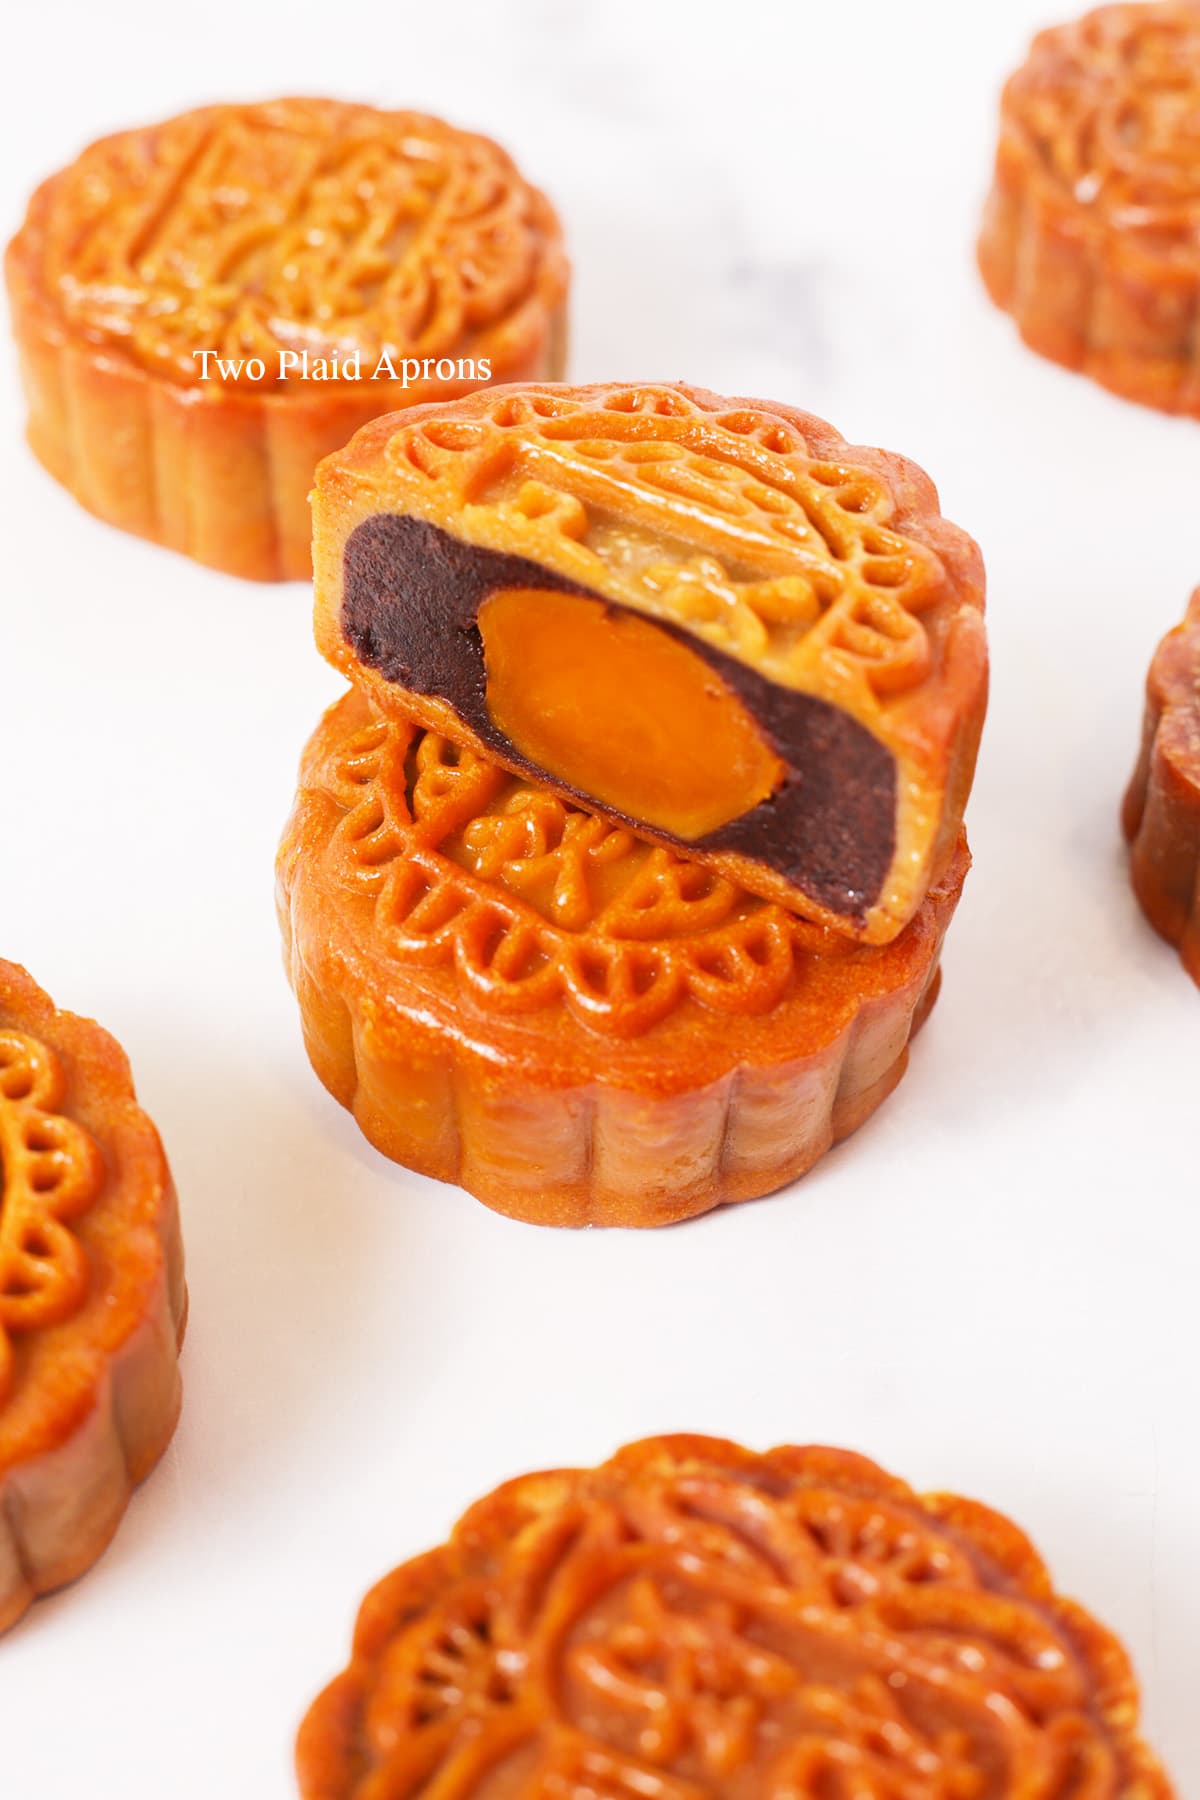
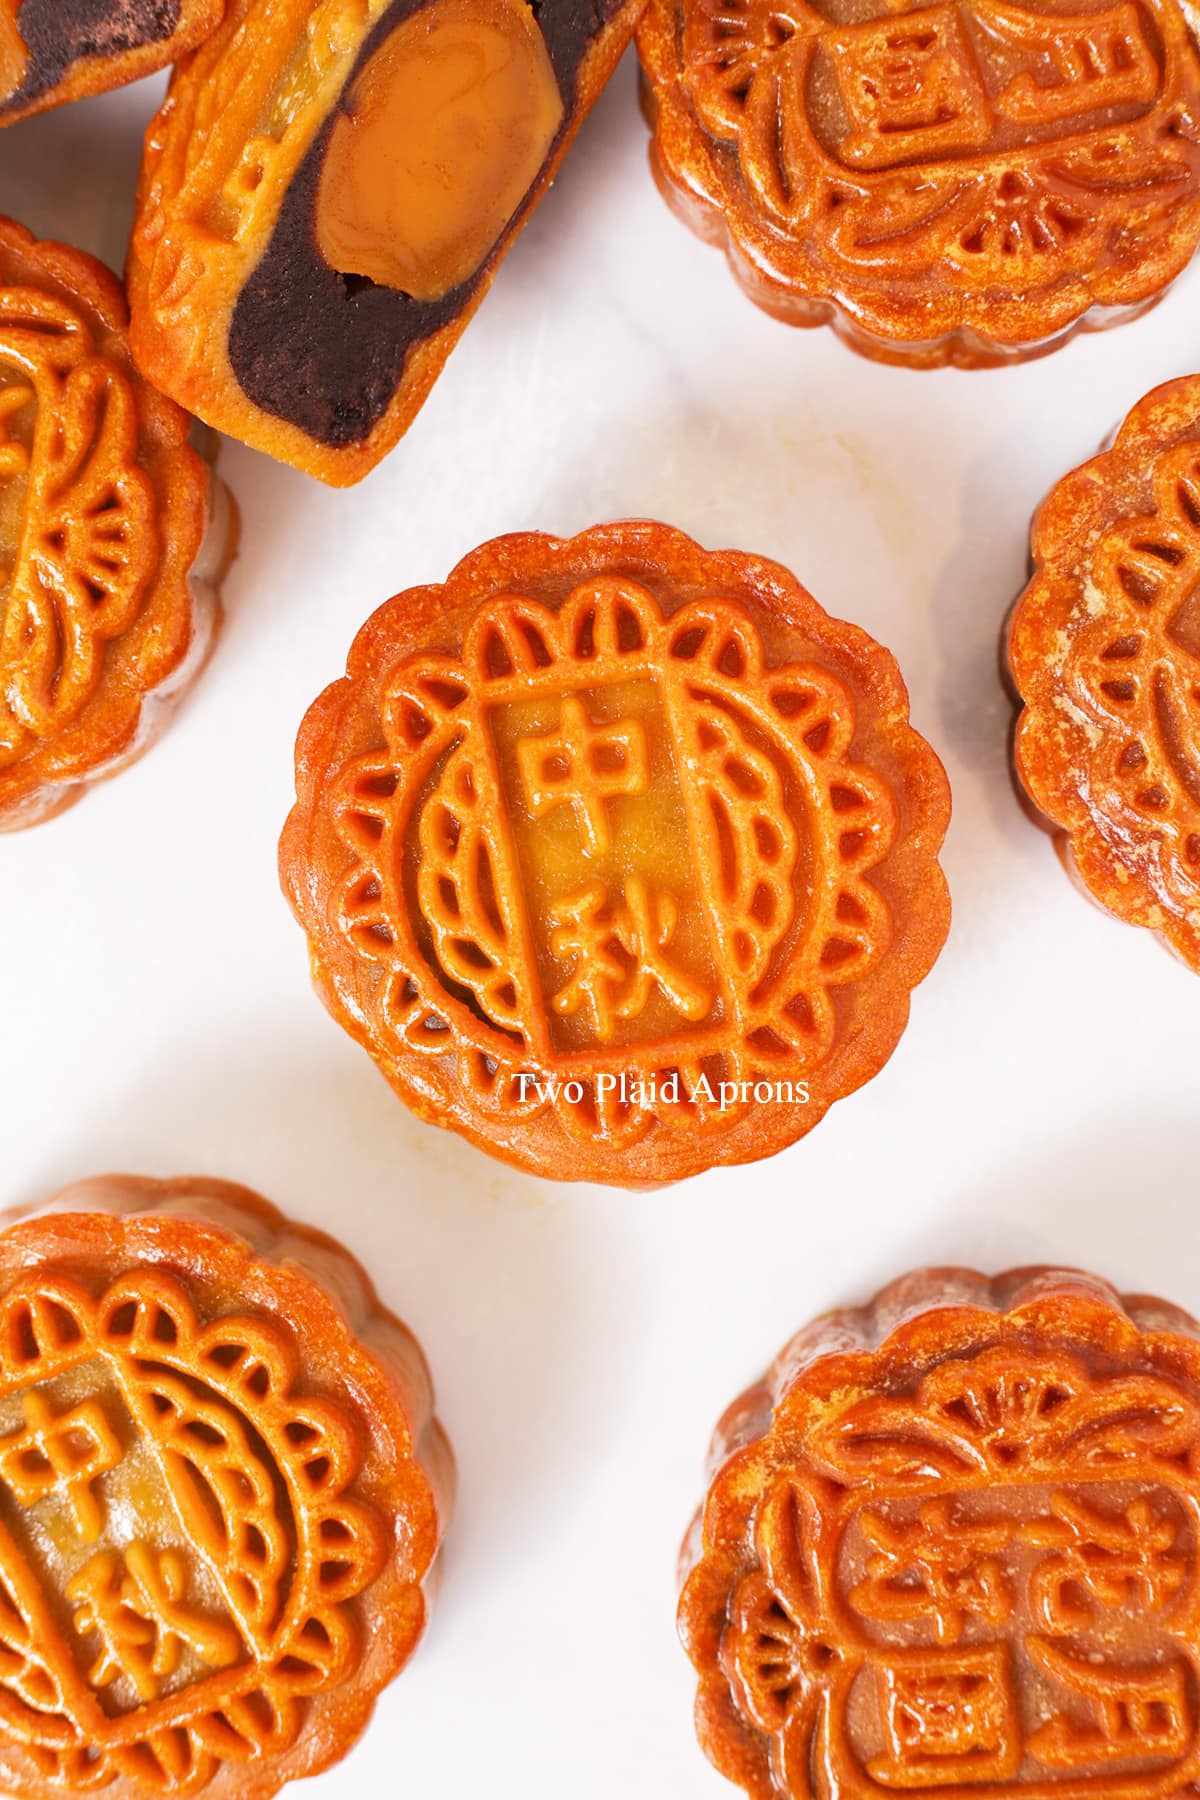
These classic Chinese mooncakes perfect desserts and snacks during the Mid-Autumn Festival, but they are even better gifts for family and friends! These mooncakes are shiny, fragrant, and beautifully golden brown on the outside and filled with sweet red bean pastes and salted egg yolks (or not if you prefer). We've shared our recipe with step by step detailed instructions and photos to make this as easy for you as possible.
If you’ve made this recipe or any recipes from our blog, please tag us on Instagram using #twoplaidaprons! You can also tag us in your Instagram stories using @two_plaid_aprons. We would love to see your creations! It absolutely makes our day! 🥰
Jump to:
What are mooncakes?
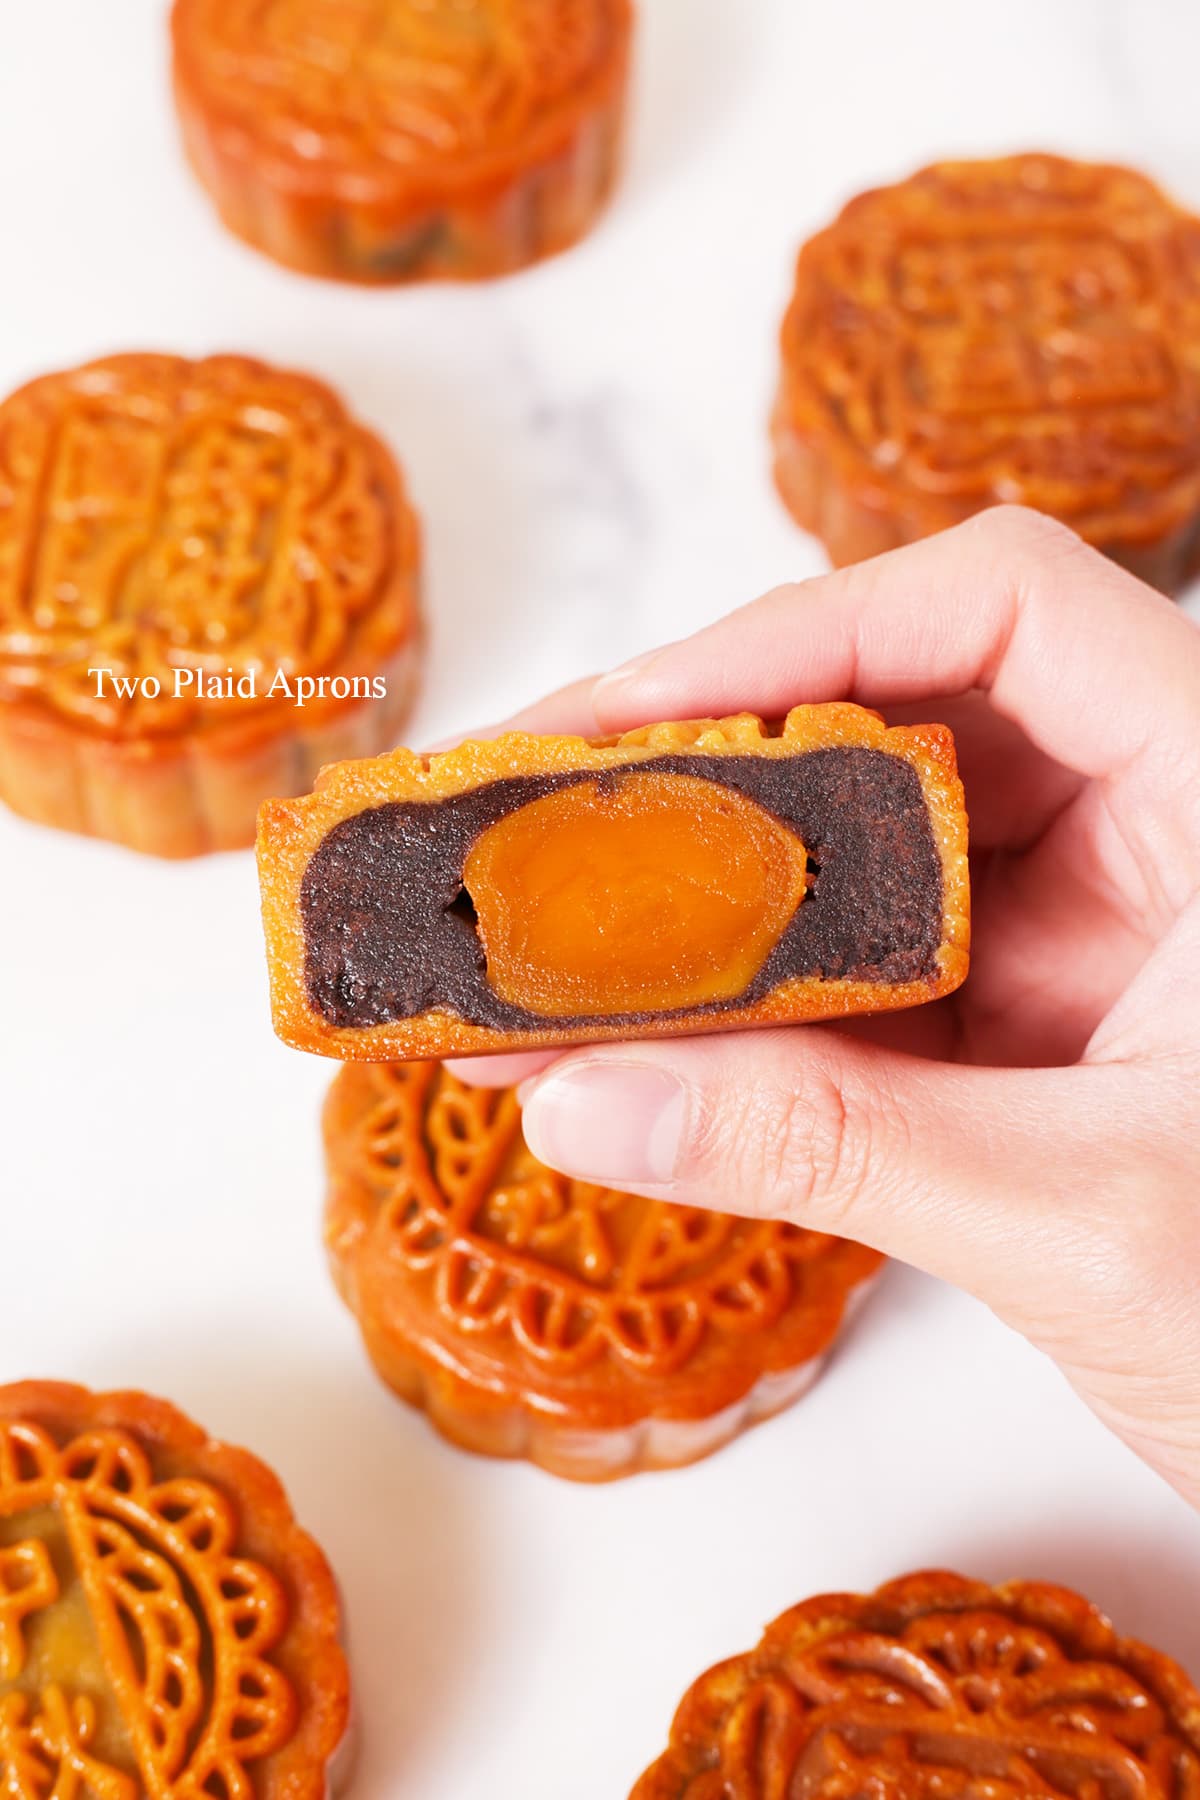
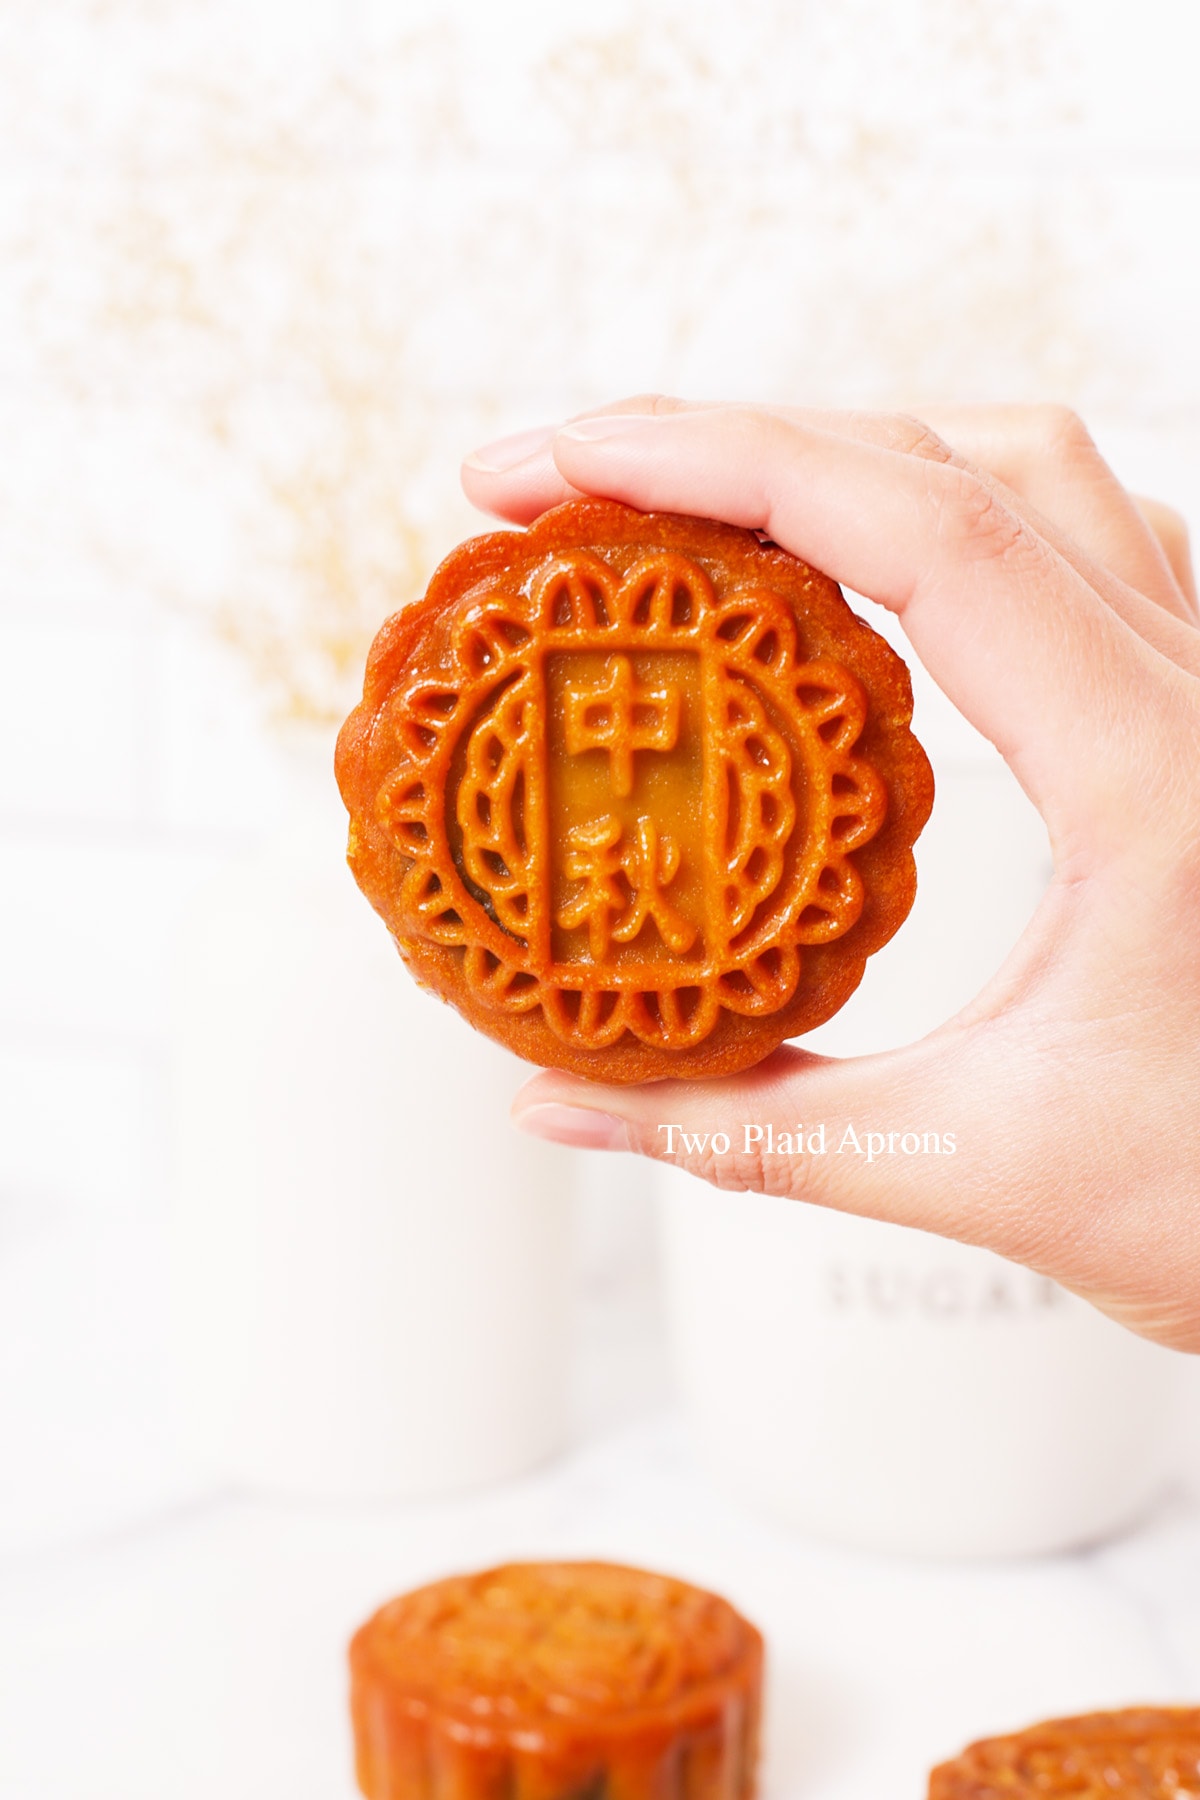
Classic Chinese mooncakes are intricate round or square pastries that are golden brown, and tender on the outside and filled with a sweet filling, such as red bean paste or lotus paste, and often also stuffed with a salted egg yolk.
Mooncakes are especially popular and enjoyed during Mid-Autumn Festival, which usually falls between mid-September and early October. They are usually available at Asian markets and often purchased as gifts for family and friends. You'd sometimes even see retail stores gift intricately packaged mooncakes to their customers during this holiday!
How to eat mooncakes
Because mooncakes are gifted and eaten as a symbol of family unity and because Mid-Autumn Festival also falls near fall harvest, it is also eaten to celebrate the year's good harvest, mooncakes are usually cut into small pieces and shared with the whole family. Although, it's most likely because they are quite a dense, heavy pastry, not that you can eat a whole mooncake by yourself!
Mooncake can be enjoyed by itself as a snack or dessert or with some hot tea.
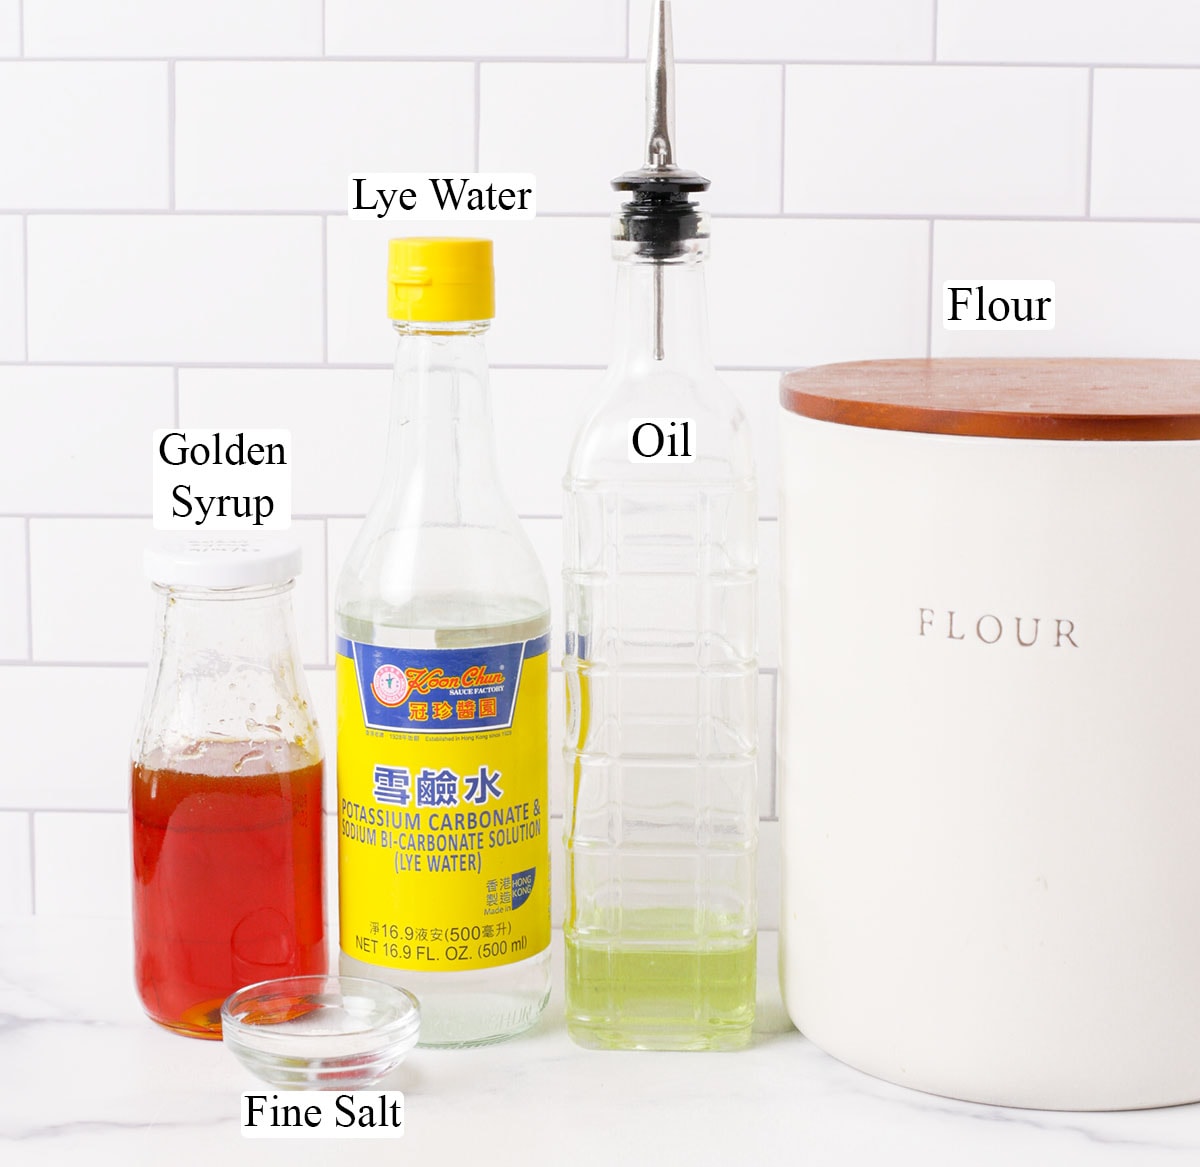
Ingredient notes
Please scroll down to the recipe card for the ingredient quantities!
For the mooncake dough:
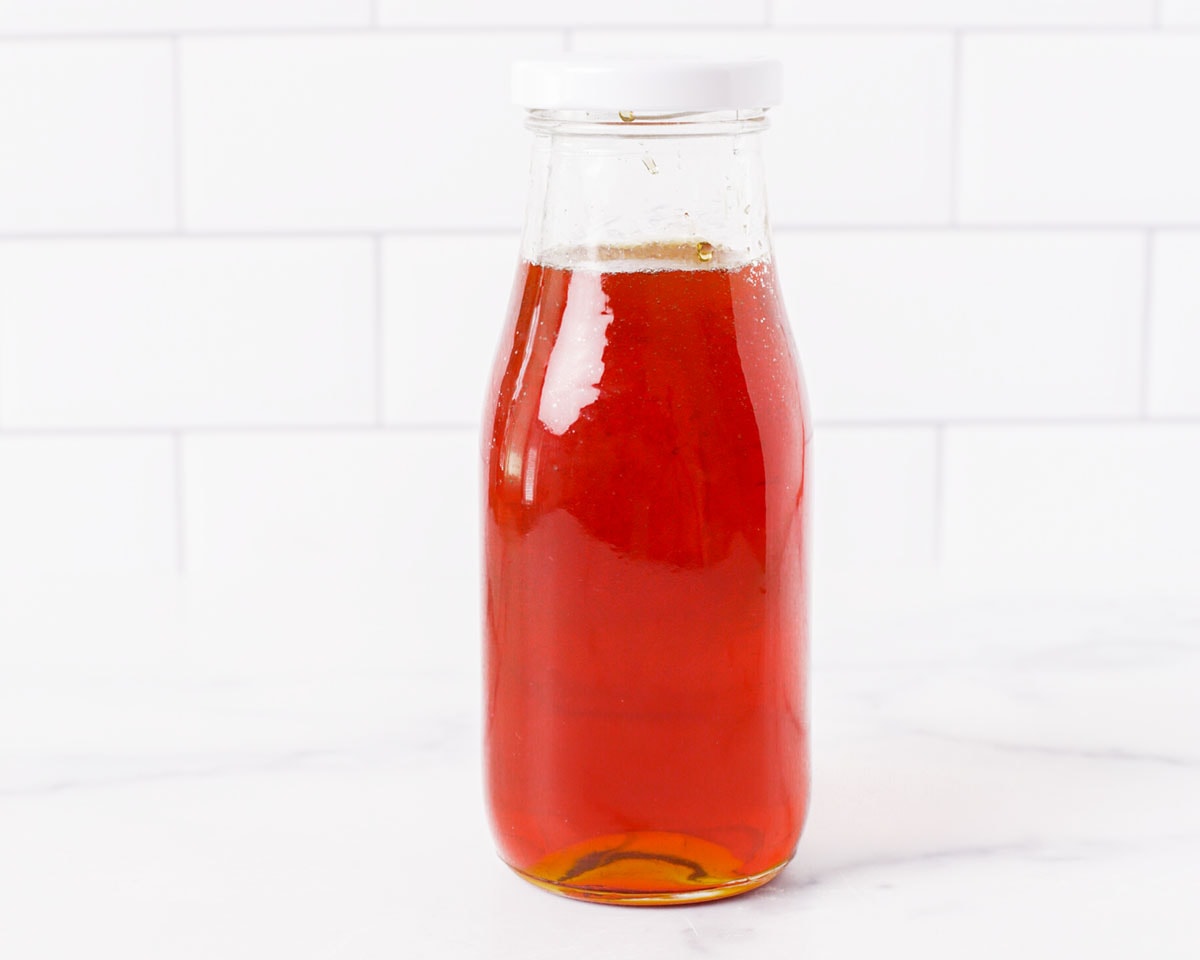
- Golden syrup - This is also known as inverted syrup, and it's made with sugar, water, lemon juice, and baking soda. It's fairly easy to make at home but can also be purchased at Asian markets. If you can't find golden syrup, you can use honey instead. The purpose of using golden syrup is to give the mooncake dough a nice golden color and to keep the pastry moist and tender.
- Oil - Any neutral oil like avocado, grapeseed, or vegetable oil will do.
- Salt - Fine salt is recommended.
- Lye water - This is also known as potassium carbonate solution. It's an dietary alkaline solution that gives starches a browner, yellower color, like in ramen noodles and red bean sticky rice dumplings (zongzi).

- All-purpose flour - Make sure to weigh the flour if possible or use the fluff, spoon, and level method to get the most accurate measurement.
- Fluff, spoon, and level method: First, use a spoon to fluff the flour that's in the flour bag or canister. Then, spoon the fluffed flour into the dry measuring cup until it overflows. Lastly, use a straight-edge, like the back of a butter knife, to scrape off the excess flour. DO NOT tap or shake during this process.
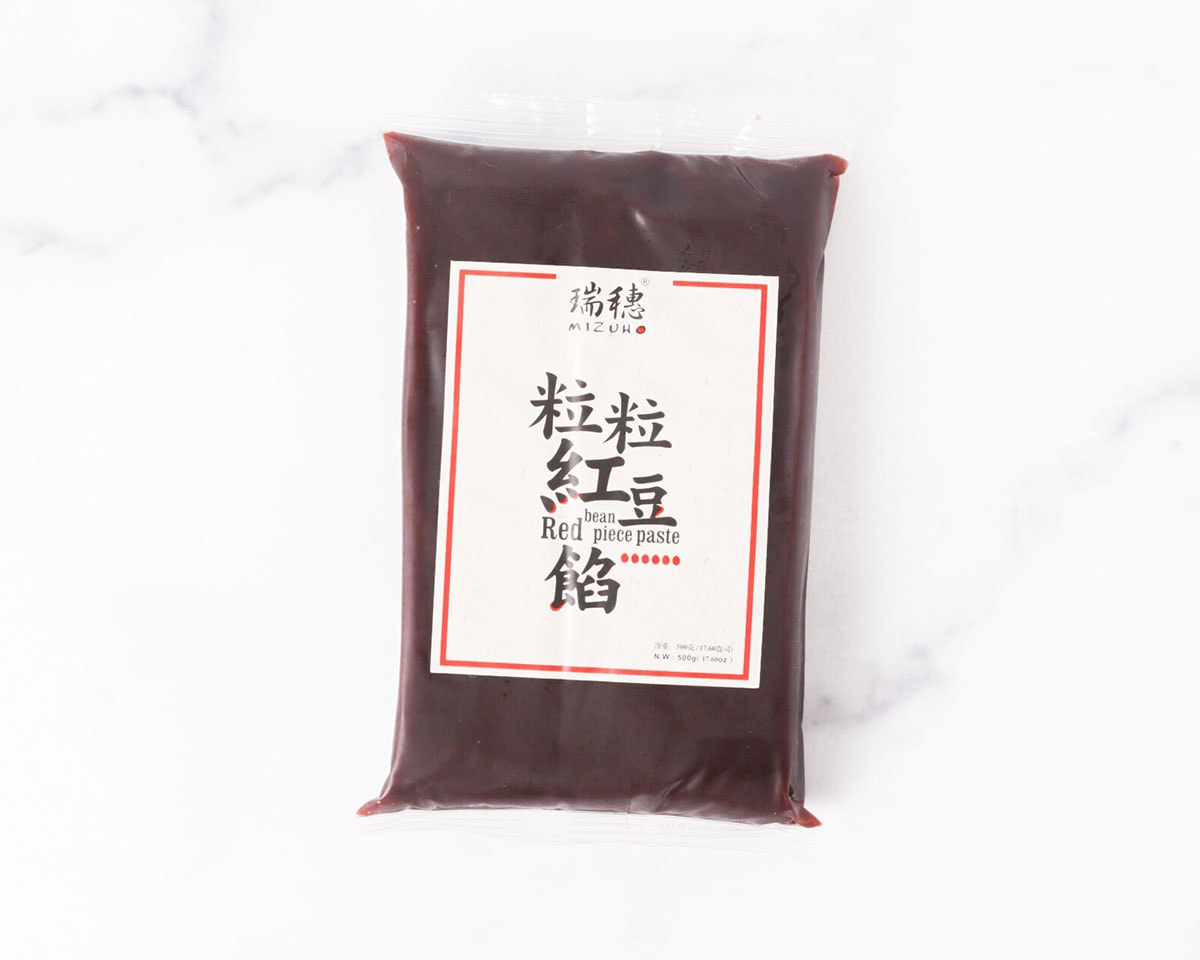
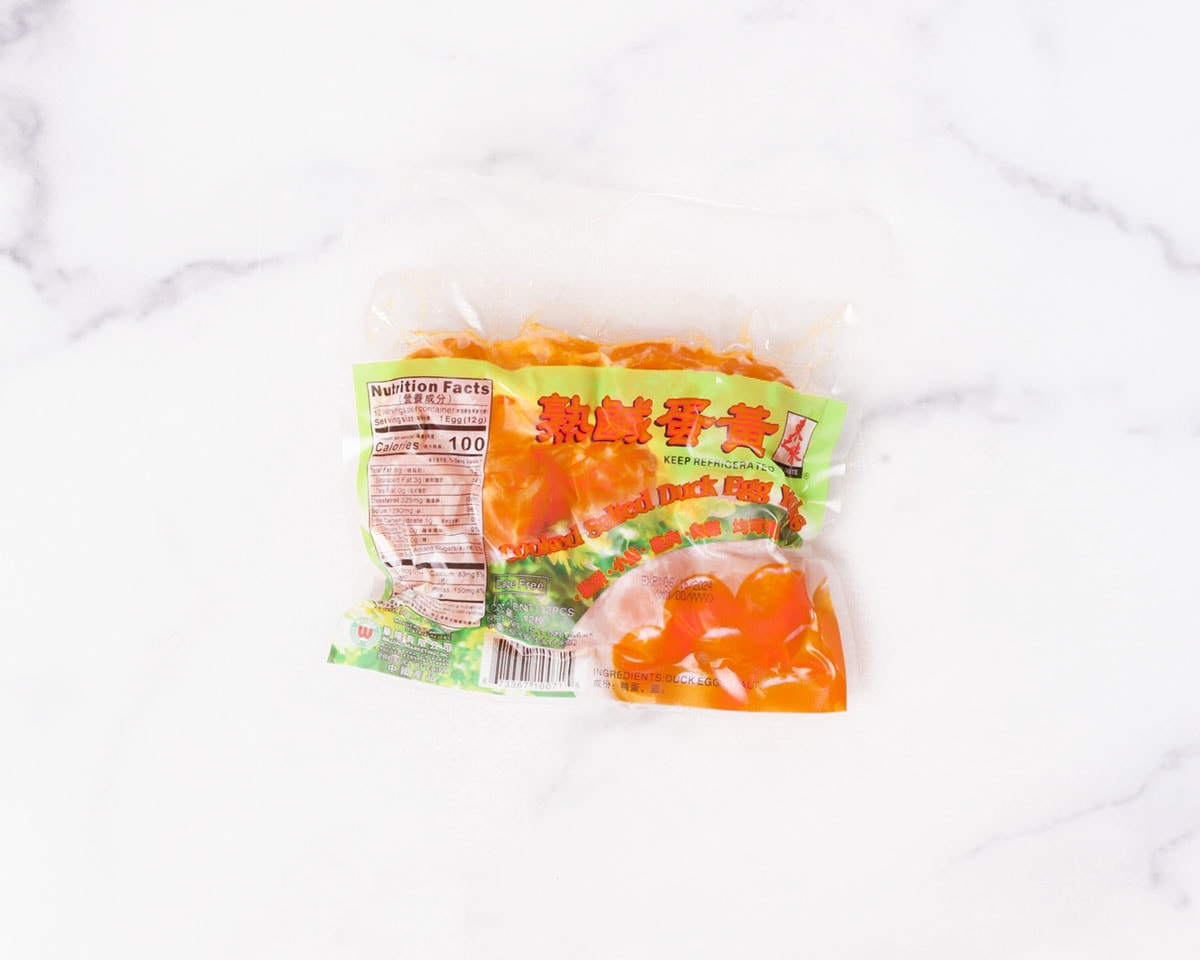
For the filling:
- Read bean paste - You can use homemade red bean paste or use store-bought ones. Our homemade red bean paste recipe uses adzuki beans, a little oil, sugar, and some maltose syrup, since our homemade version uses way less oil and sugar than store-bought red bean paste. It's definitely worth it if you have the time because you get to control how sweet you want your red bean paste and there won't be any unnecessary fillers.
- Salted egg yolk - These are highly sought after in mooncakes and the more salted yolks there are in a mooncake, the more expensive the mooncakes are. But to be honest, salted yolks in mooncakes are really personal preference, so you can definitely do without. You can purchase vaccumm packed, already cooked salted yolks to save time. It's super convenient but the texture and flavor of the yolks are not usually the best. If you have time, we highly recommend making salted yolks yourself. You can use duck eggs or even chicken eggs! Just make sure to start at least 1 month ahead of time.
How to make classic Chinese mooncakes (with red bean paste)
Please scroll down to the recipe card for the full recipe and instructions!
Golden syrup (if making):
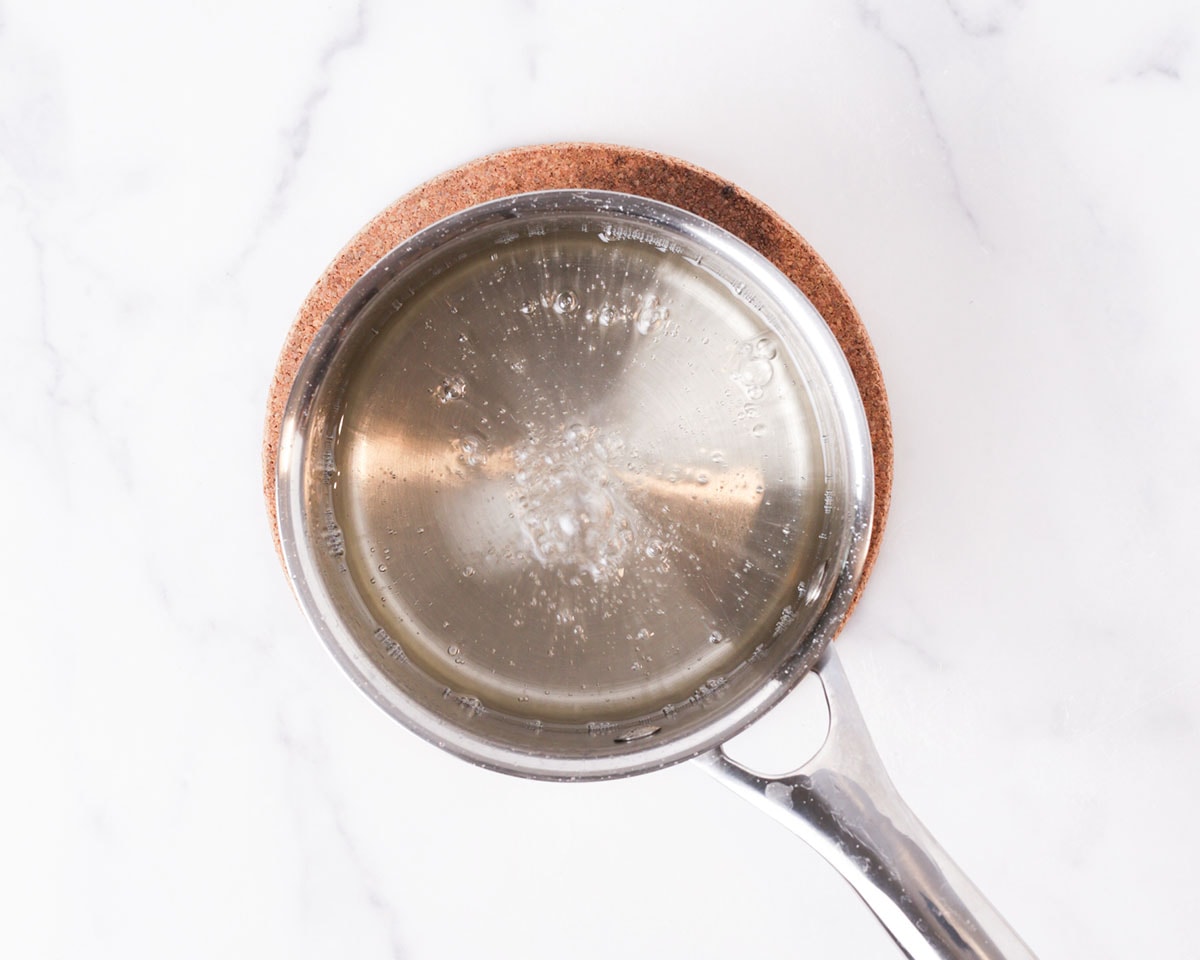
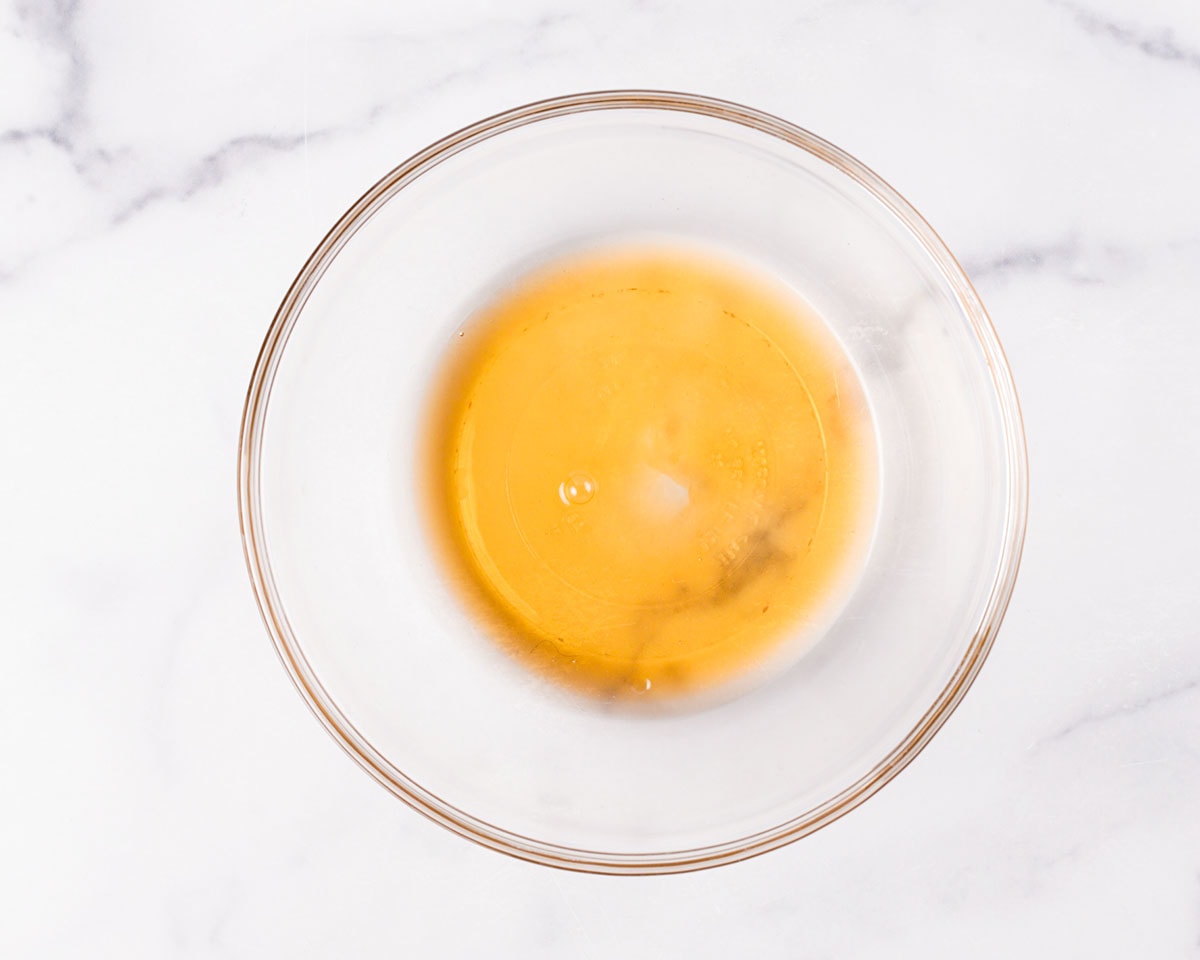
1. Combine ingredients. In a saucepan add the water and lemon juice and gently add the sugar. Place over medium to medium high heat and bring to a simmer. Gently stir occasionally.
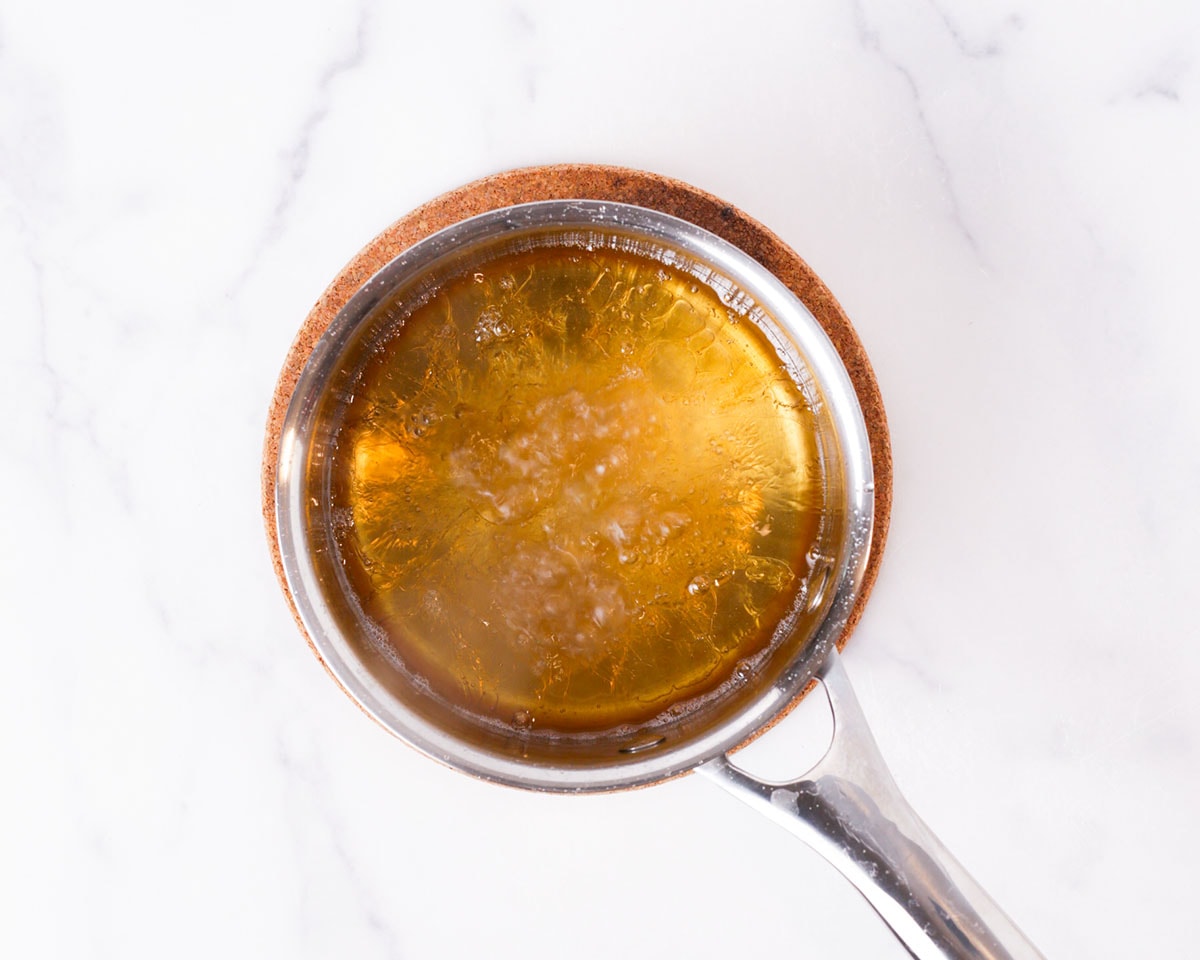
2. Cook the syrup. Allow the syrup to cook until it turns a light amber color, around 295°F/ 146°C. Be very careful! The syrup will be VERY hot.

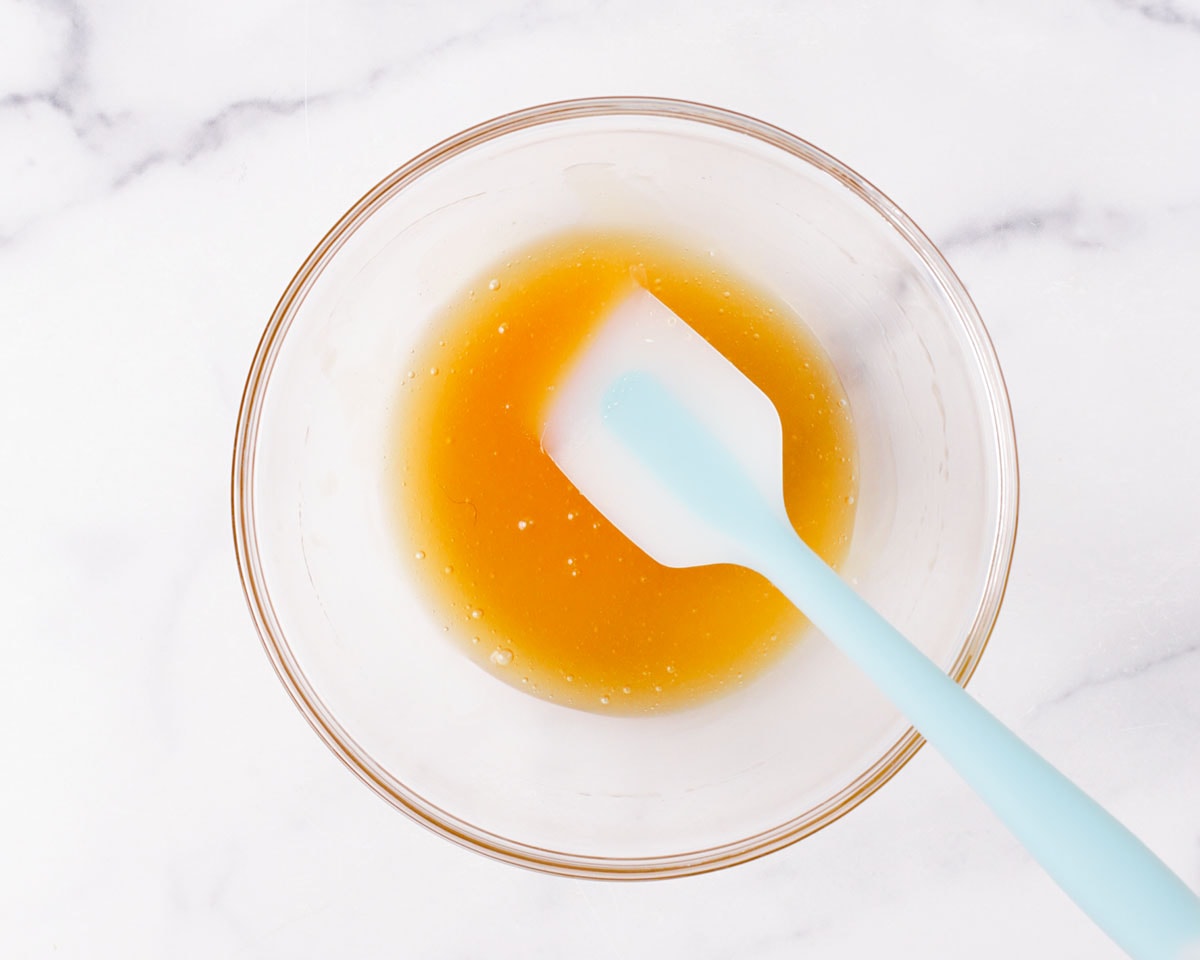
3. Make baking soda solution. While the syrup is cooking, mix the baking soda with ¼ cup of water. Set aside.
4. Add baking soda solution. Once the syrup is ready, immediately remove from the heat. Add the prepared baking soda solution and gently stir until combined. This is to neutralize the acid in the syrup and to also thin out the syrup.
5. Cool and store. Allow the golden syrup to cool completely before storing in a sanitized container. Store the syrup in a cool, dry place, and if stored properly, it could last for up to 1 year.
📝 Note: The syrup may have a lot of foam after initially making, but the foam should disappear after the syrup rests overnight. So it's highly recommended that the syrup is made at least 1 day ahead of time. If the foam is still present the next day, the syrup may be too thick. Add a couple teaspoons of water at a time to the syrup to help thin it out.
Red bean paste - Instant Pot Method (if making):
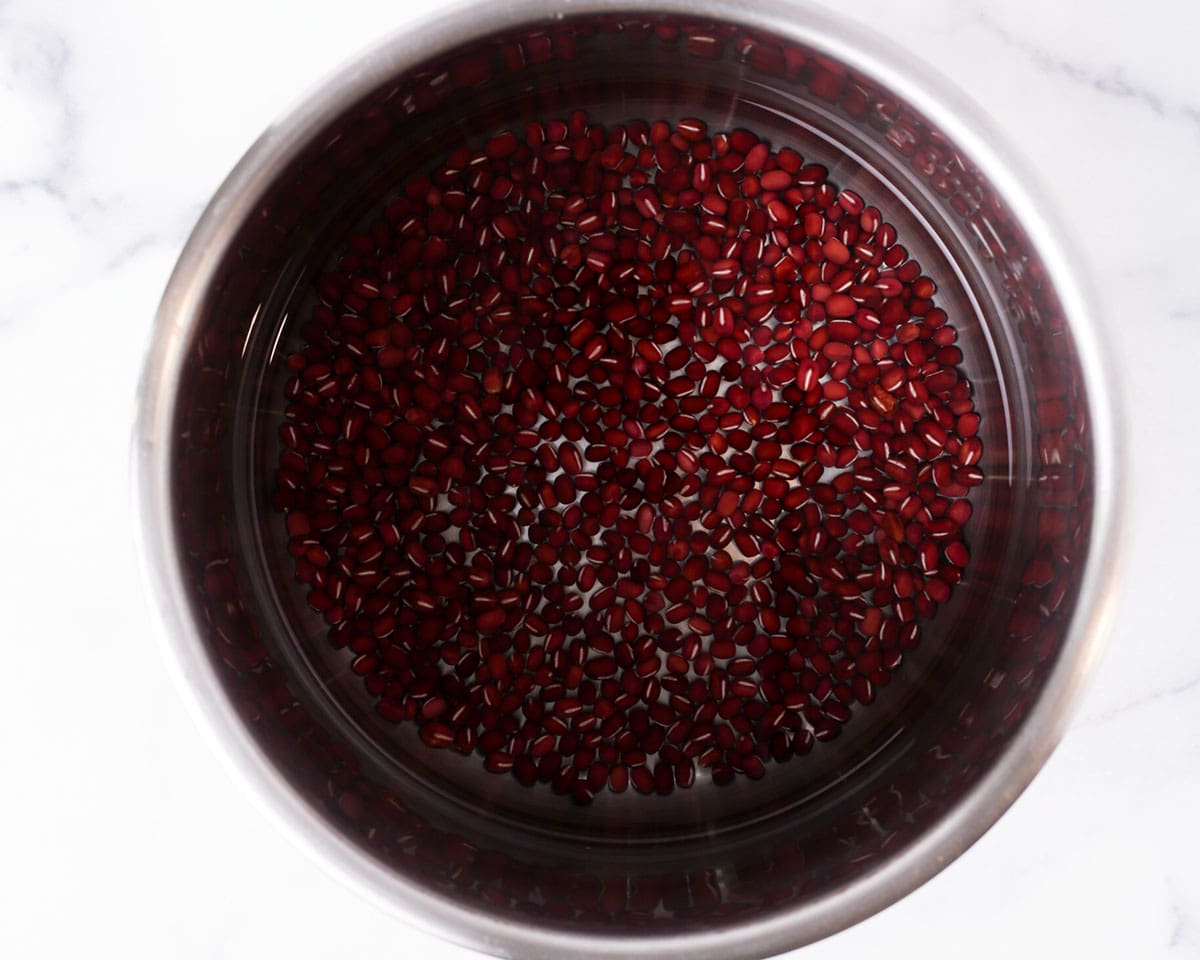
1. Clean the beans. Discard any adzuki beans that are black or broken. Then rinse the bean a couple times to remove any debris. Drain and transfer the beans to the Instant Pot along with the 4 cups of water.
2. Pressure cook the beans. Close the lid and turn the venting valve to "SEAL". Select the "Pressure Cook" function and set the time to 25 minutes, normal cook, and high pressure. Once done, allow the Instant Pot to natural release for 10 minutes, then manually release the rest of the pressure.
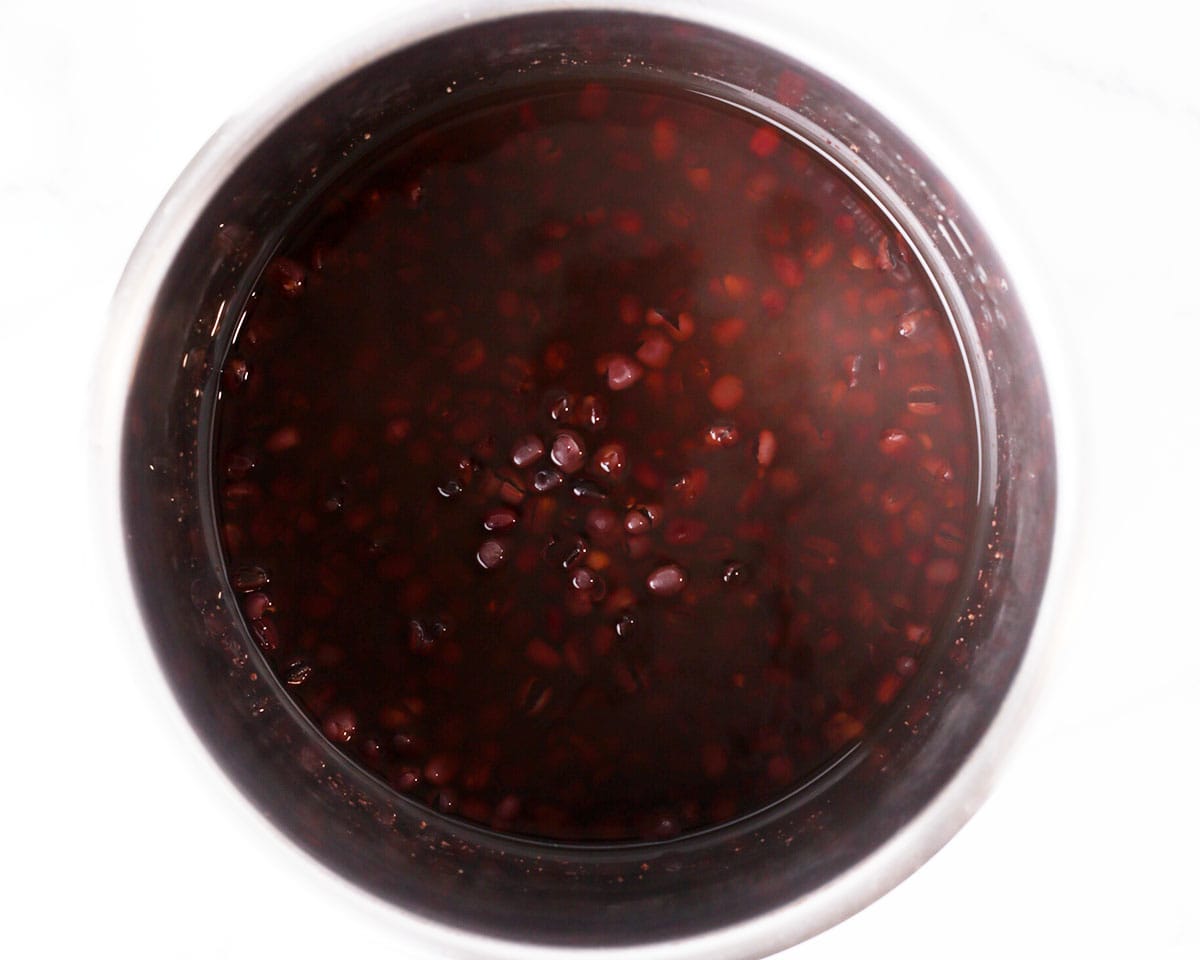
🧐 How to tell if the beans are cooked? To test out if your beans are cooked, mash it between your fingers. It should be very soft.
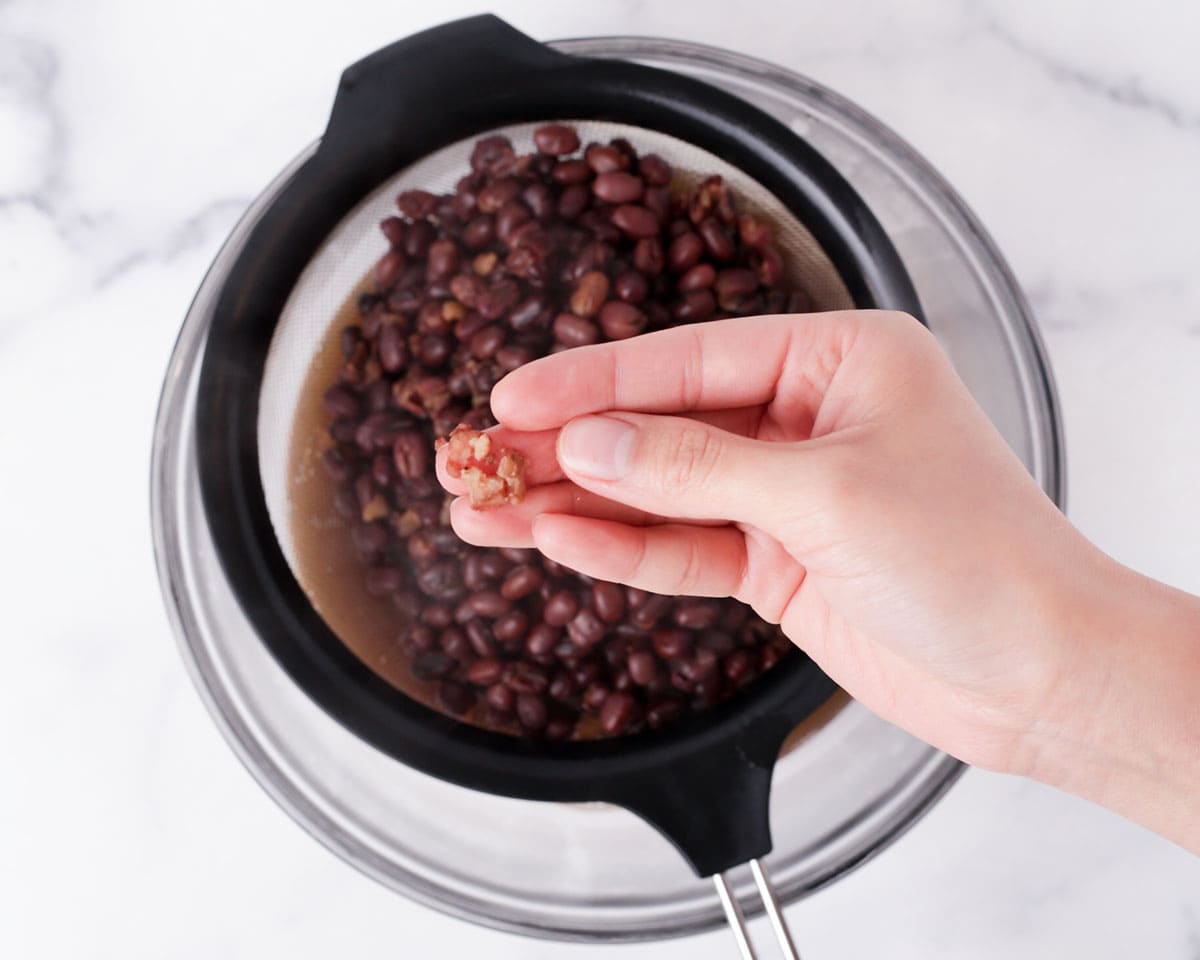
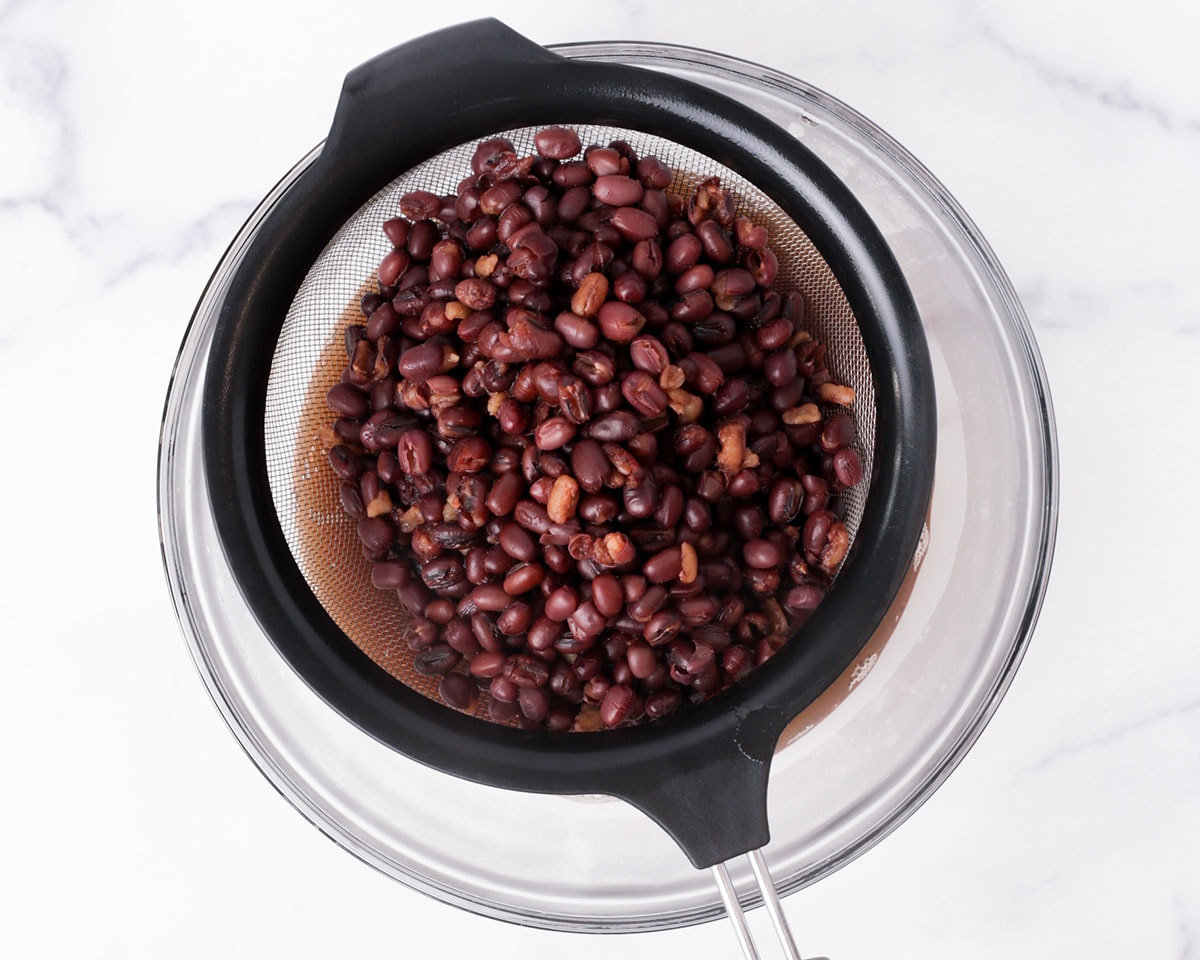
3. Strain. Using a mesh strainer, strain the cooked adzuki beans. Give the mesh strainer a couple of shakes to remove excess liquid but no need to press.
4. Blend until smooth. Transfer the adzuki beans to a blender and until smooth or as fine as possible.
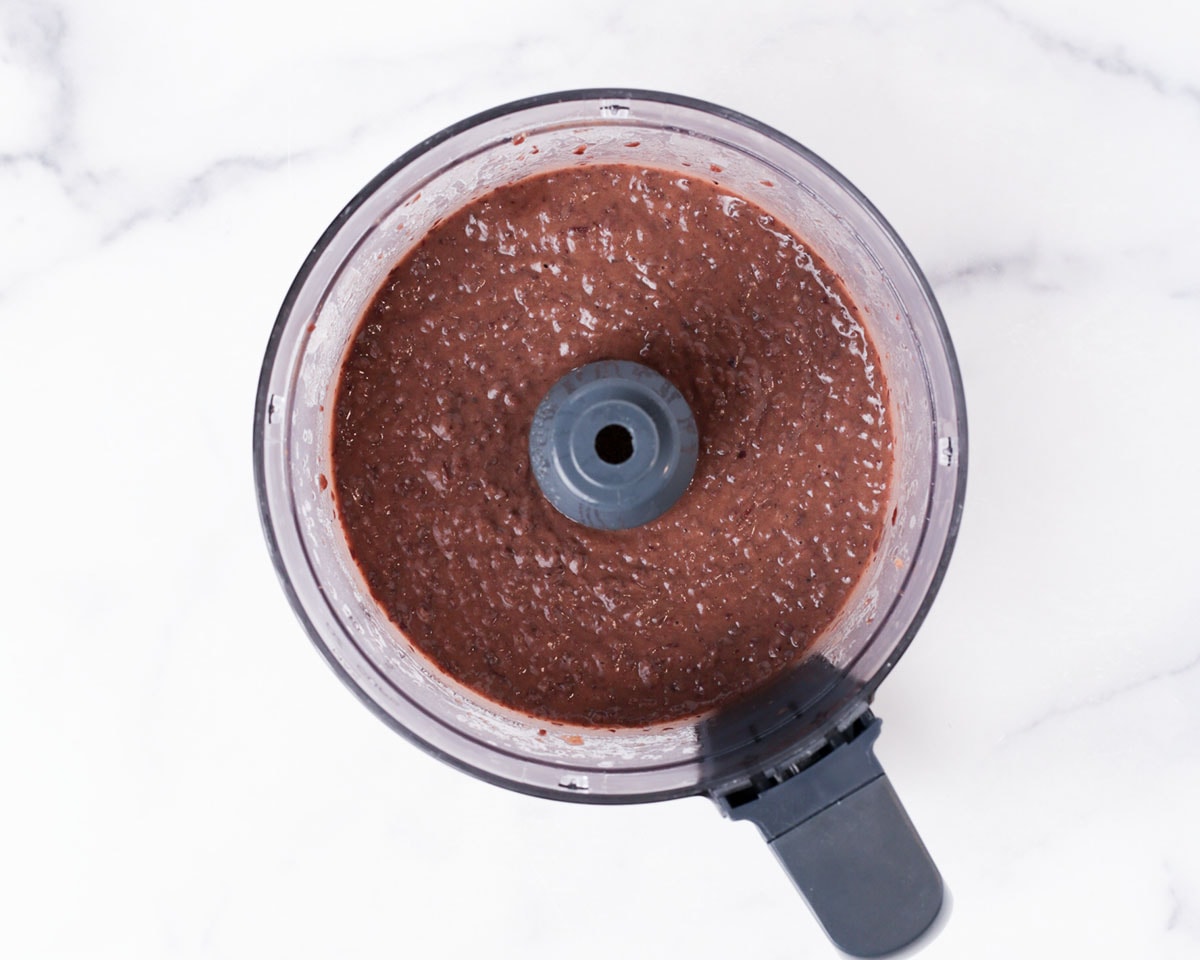
🌟 Pro tip: Reserve some of the bean liquid to help thin out the bean paste if it's too thin to blend. Add 1 tablespoon at a time. However, try to use as little as possible, because the more liquid added, the longer the beans will have to cook for.
5. Cook the bean paste. Transfer the bean paste to a nonstick pan and add the oil. Using a rubber spatula, stir and cook the bean paste on medium low heat for a few minutes until the oil is absorbed.
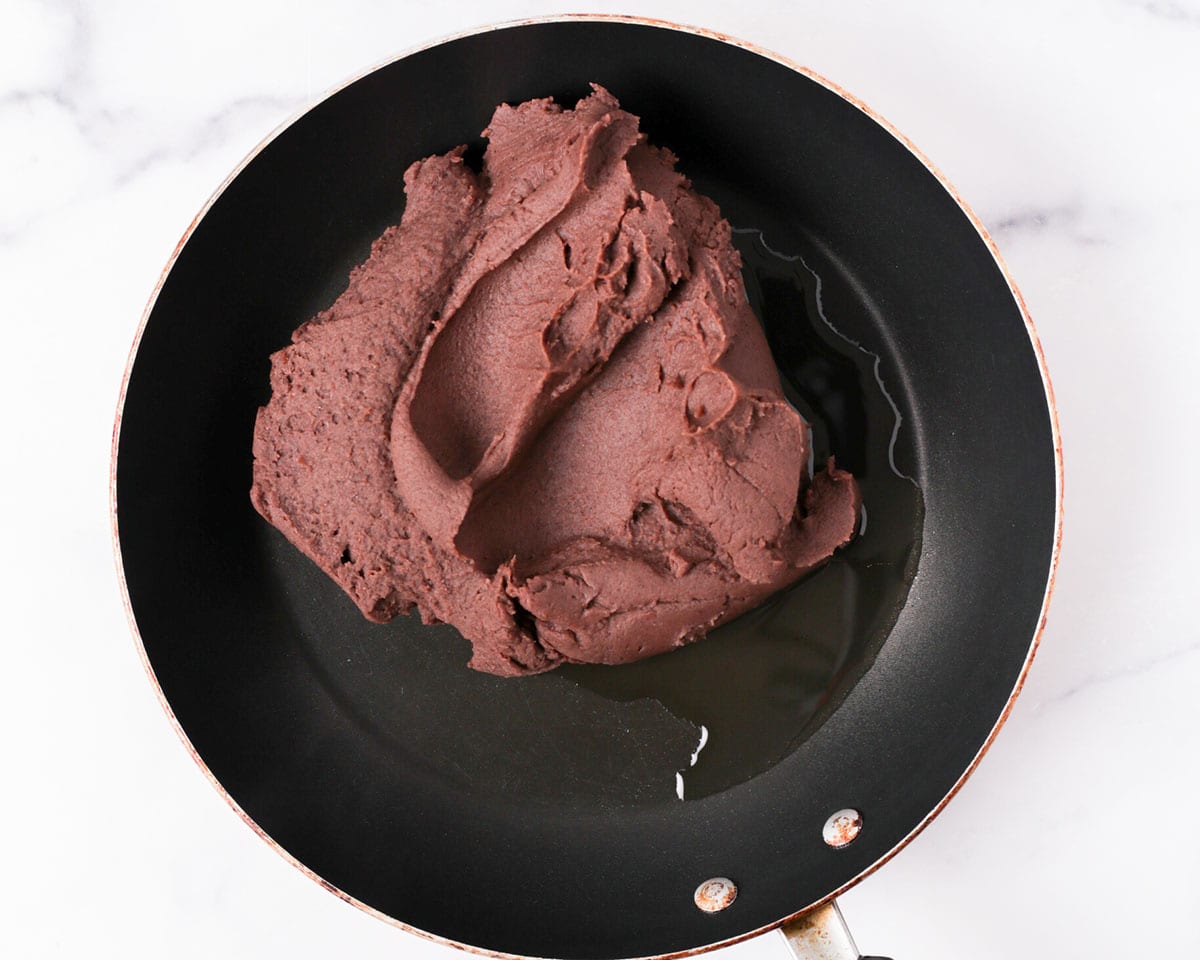
Then add the sugar and salt and cook until the paste becomes drier and resembles play-dough.
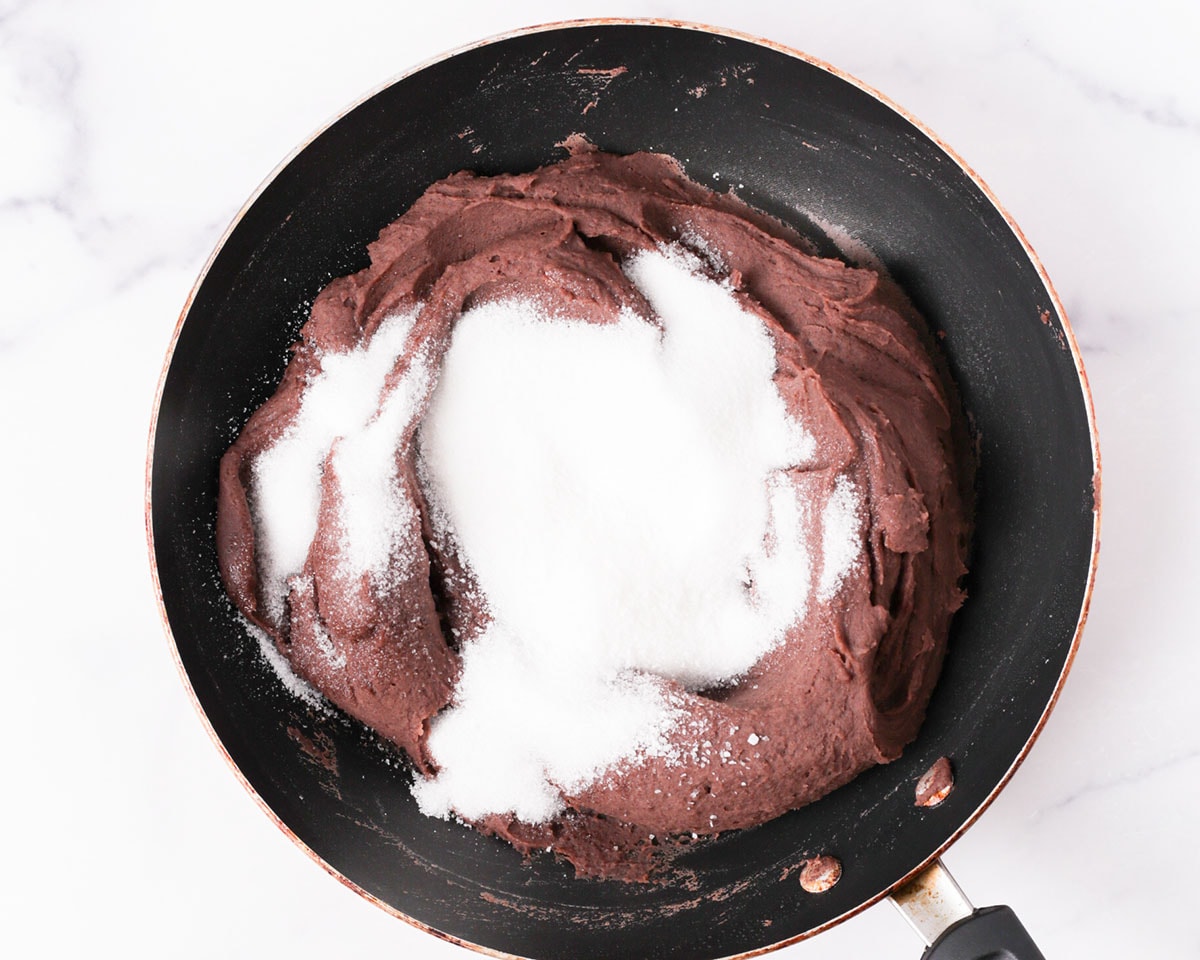
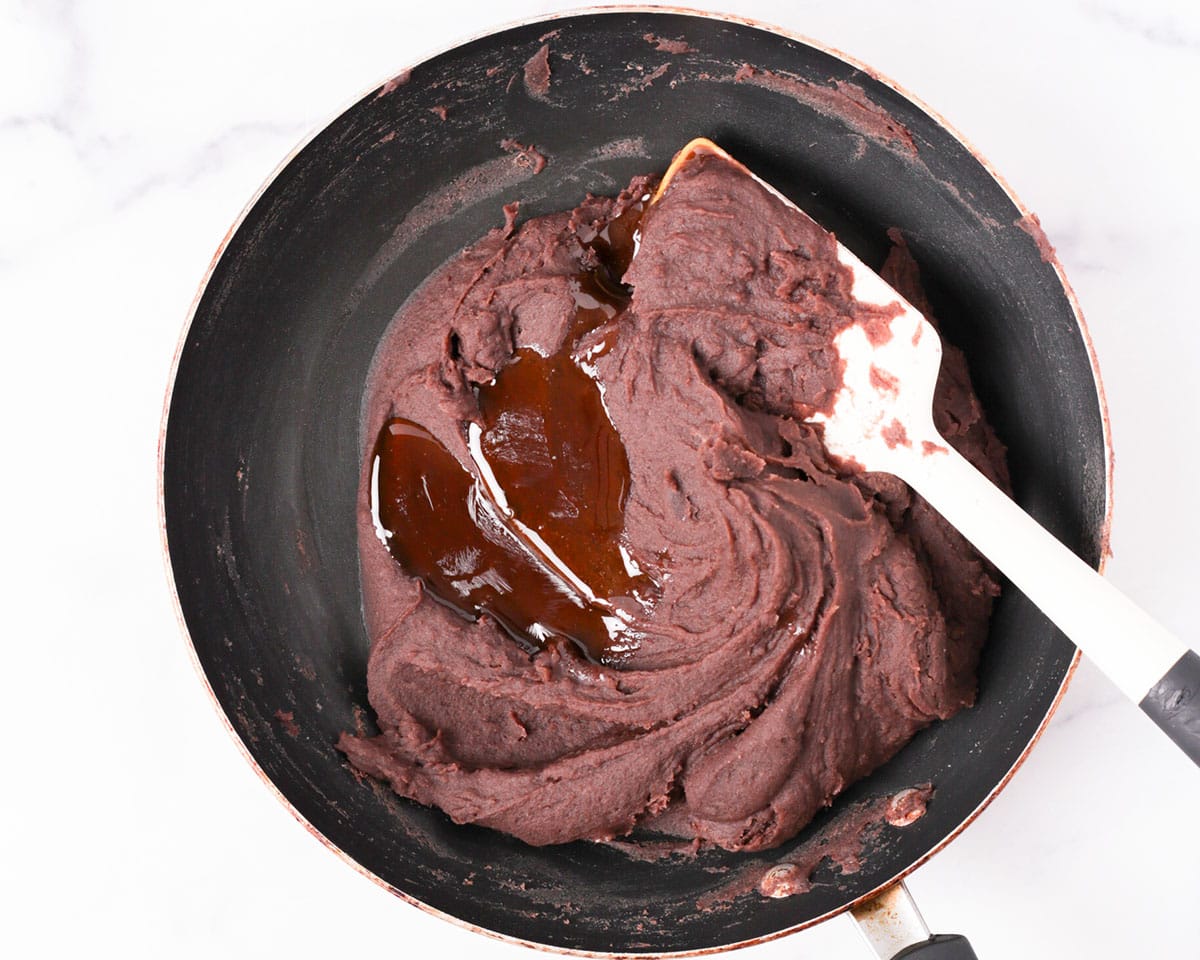
Finally, add the maltose syrup and cook until the paste no longer sticks to the pan or the spatula.
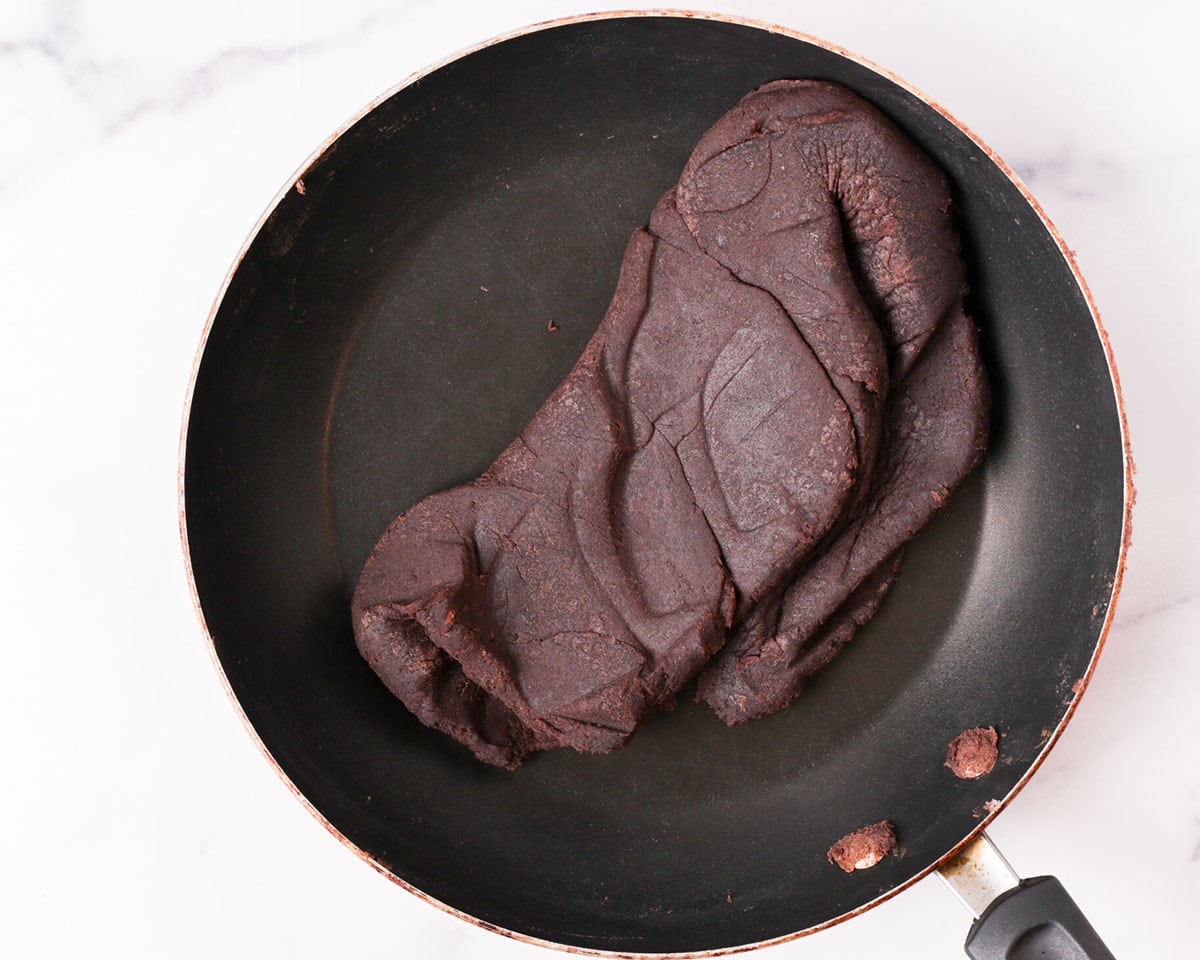
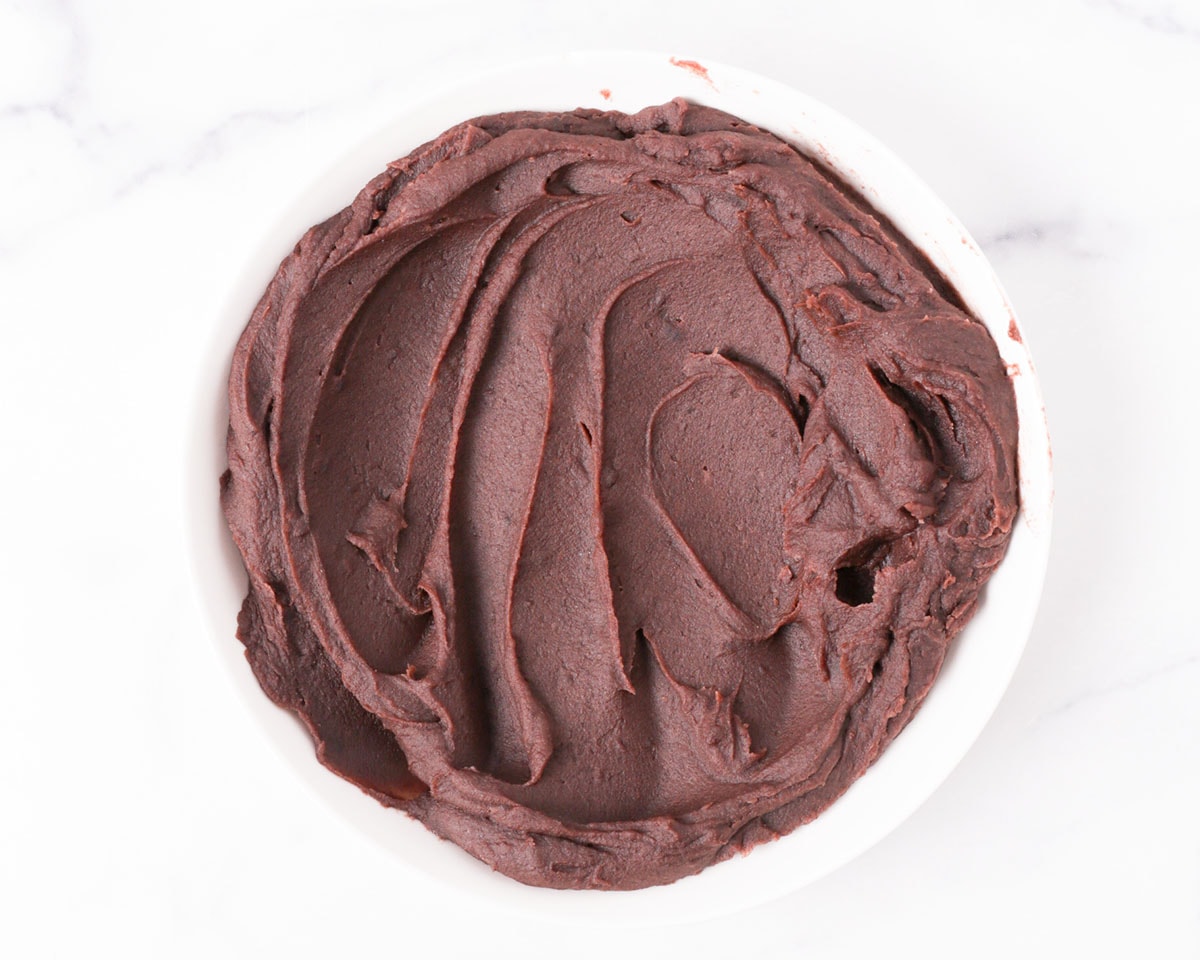
6. Cool. Transfer the red bean paste to a plate or bowl. Spread out the bean paste and loosely cover with cling wrap, making sure the wrap touches the surface of the bean paste.
Salted yolk (if using):
1. Preheat the oven to 350°F/180°C and prepare a sheet pan lined with parchment paper.
2. Spray with clear liquor. Arrange the salted yolks on the sheet pan, about 1 inch apart and spray each yolk with some clear liquor, like bai jiu (Chinese clear rice wine), vodka, or even a non-flavor soju.
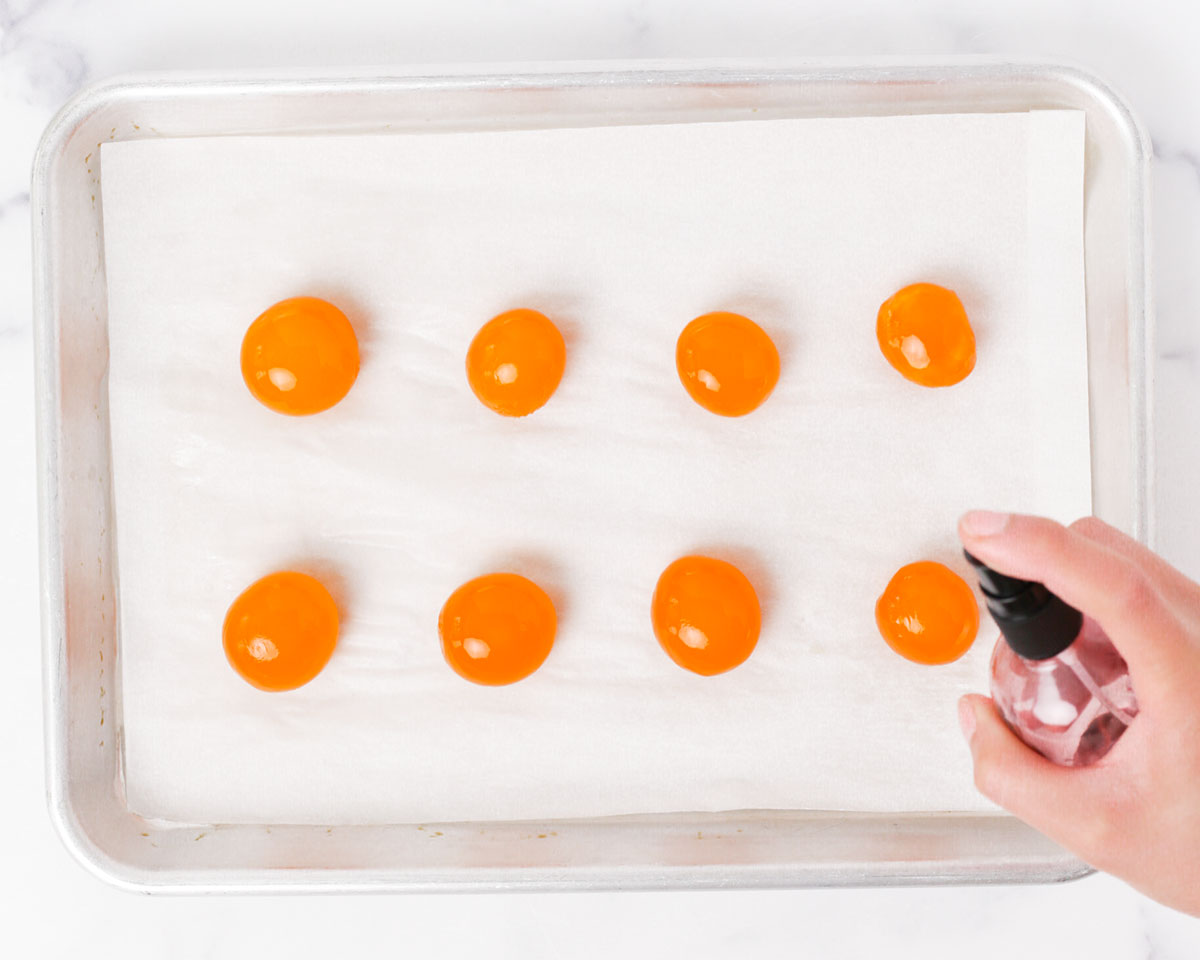
🌟 Pro tip: If you don't have a spray bottle, you can just pour some clear liquor into a small bowl and roll each yolk in the liquor.
3. Bake. For store-bought salted yolks, bake for about 10 minutes and about 15 minutes for homemade salted yolks. The yolks are done when they become foamy and releases their oil.
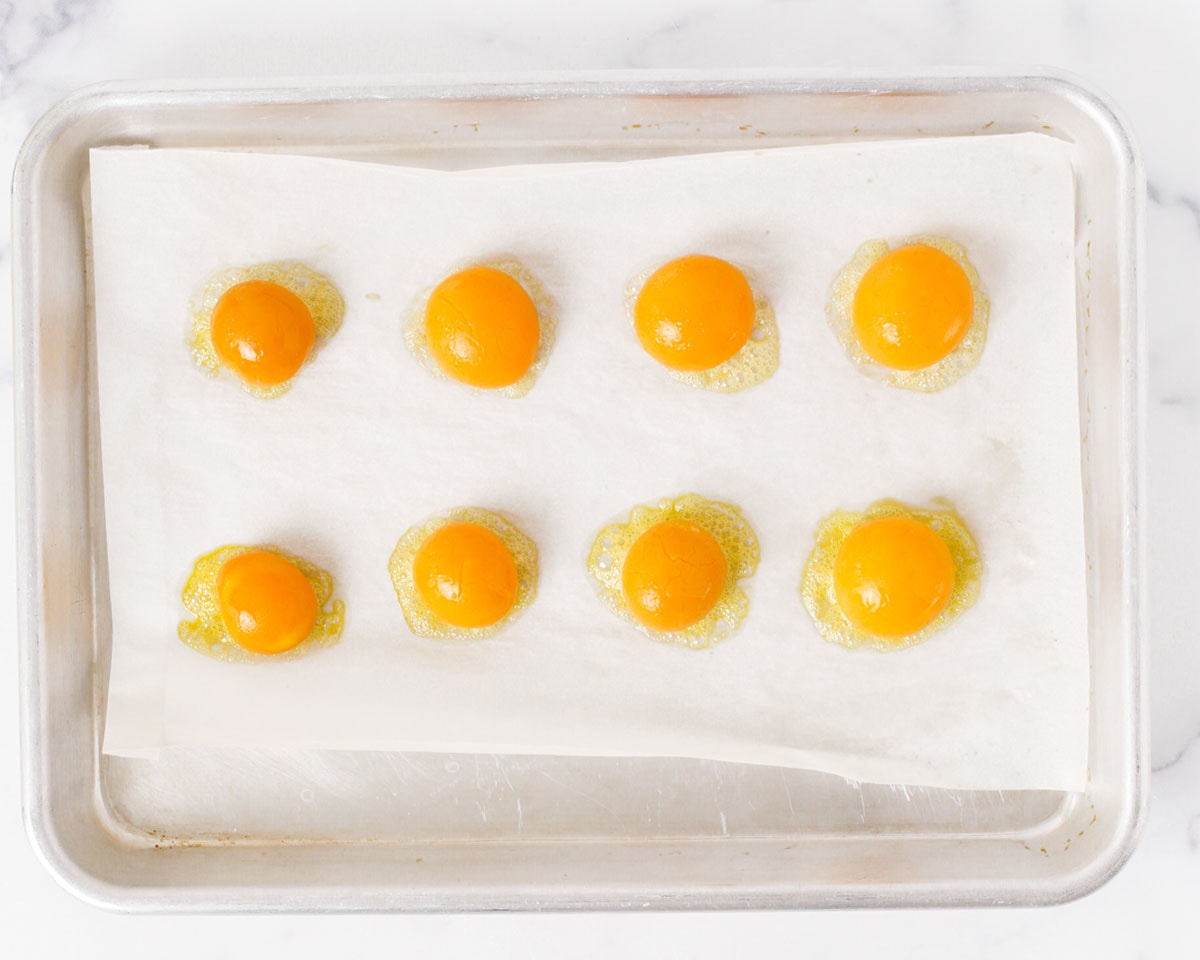
4. Cool. Remove from the oven and allow them to cool completely before using.
For the mooncake dough:
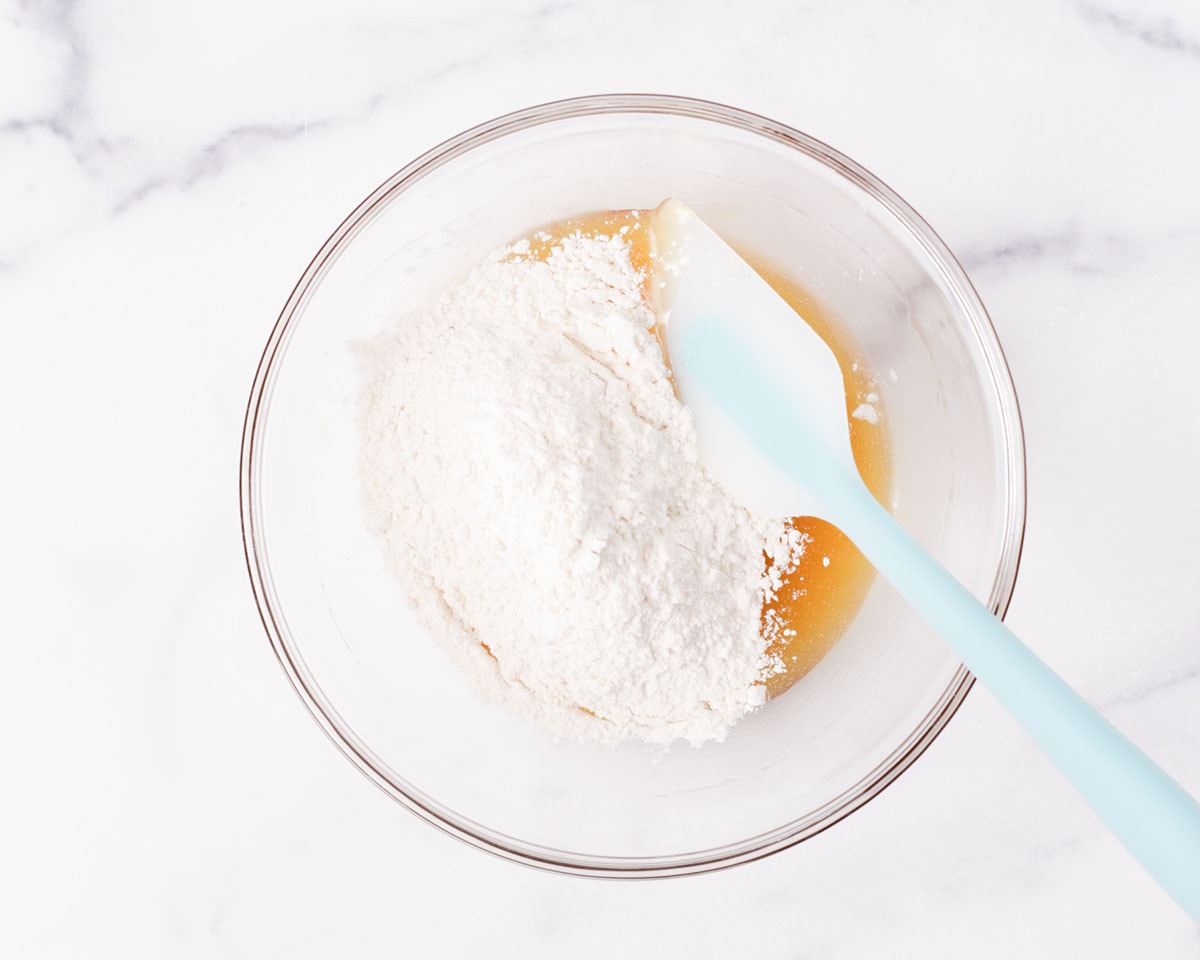
1. Mix the wet ingredients. In a mixing bowl, using a rubber spatula, mix together golden syrup, oil, salt, and lye water until well combined.
2. Make the dough. Add the flour and mix until the dough comes together and no more dry flour is visible. If needed use your hands to knead briefly.

📝 Note: The dough will be tacky but not overly sticky. If needed, add an additional tablespoon or two of flour.
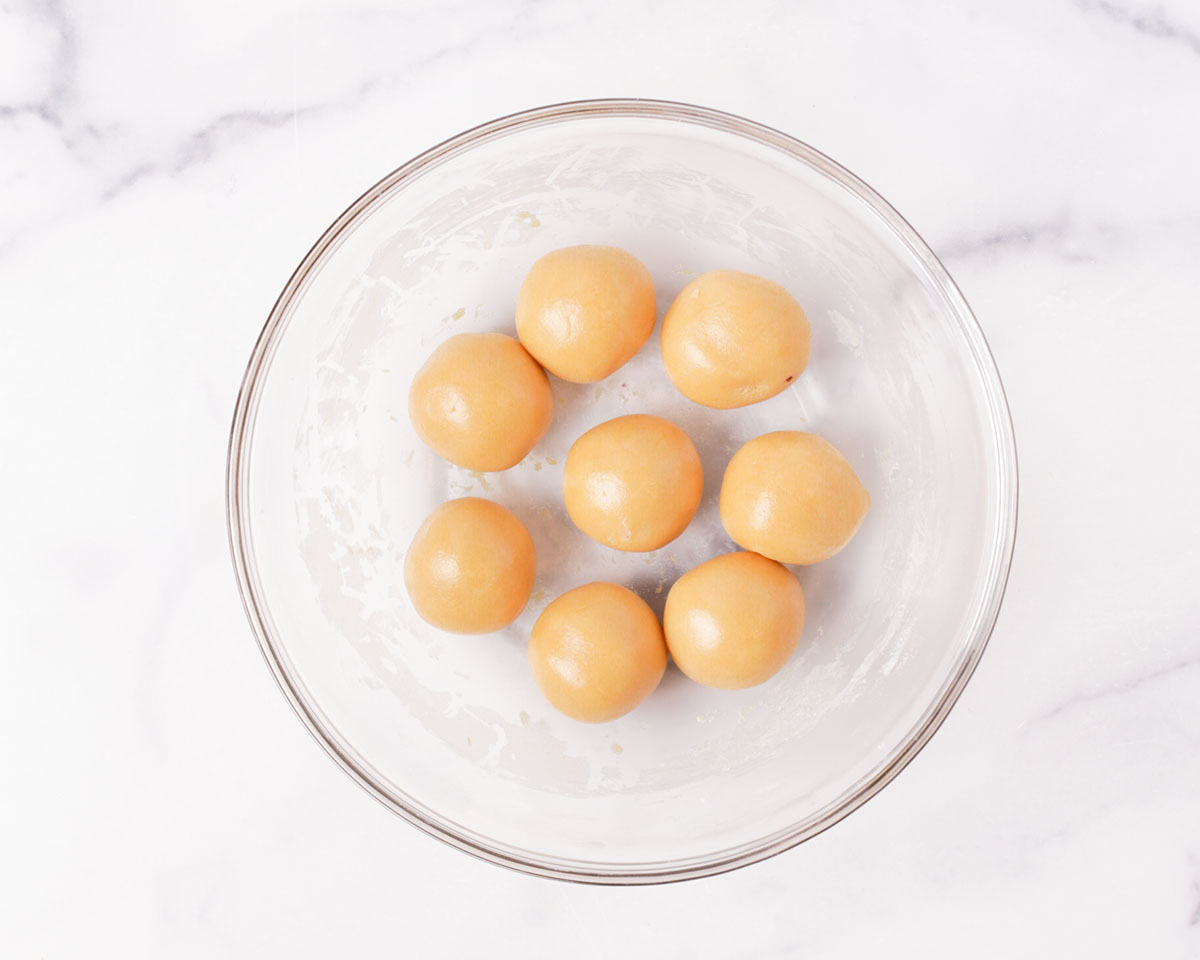
3. Rest. Cover and set the mooncake dough aside to rest for at least 30 minutes while you prep.
Preparation:
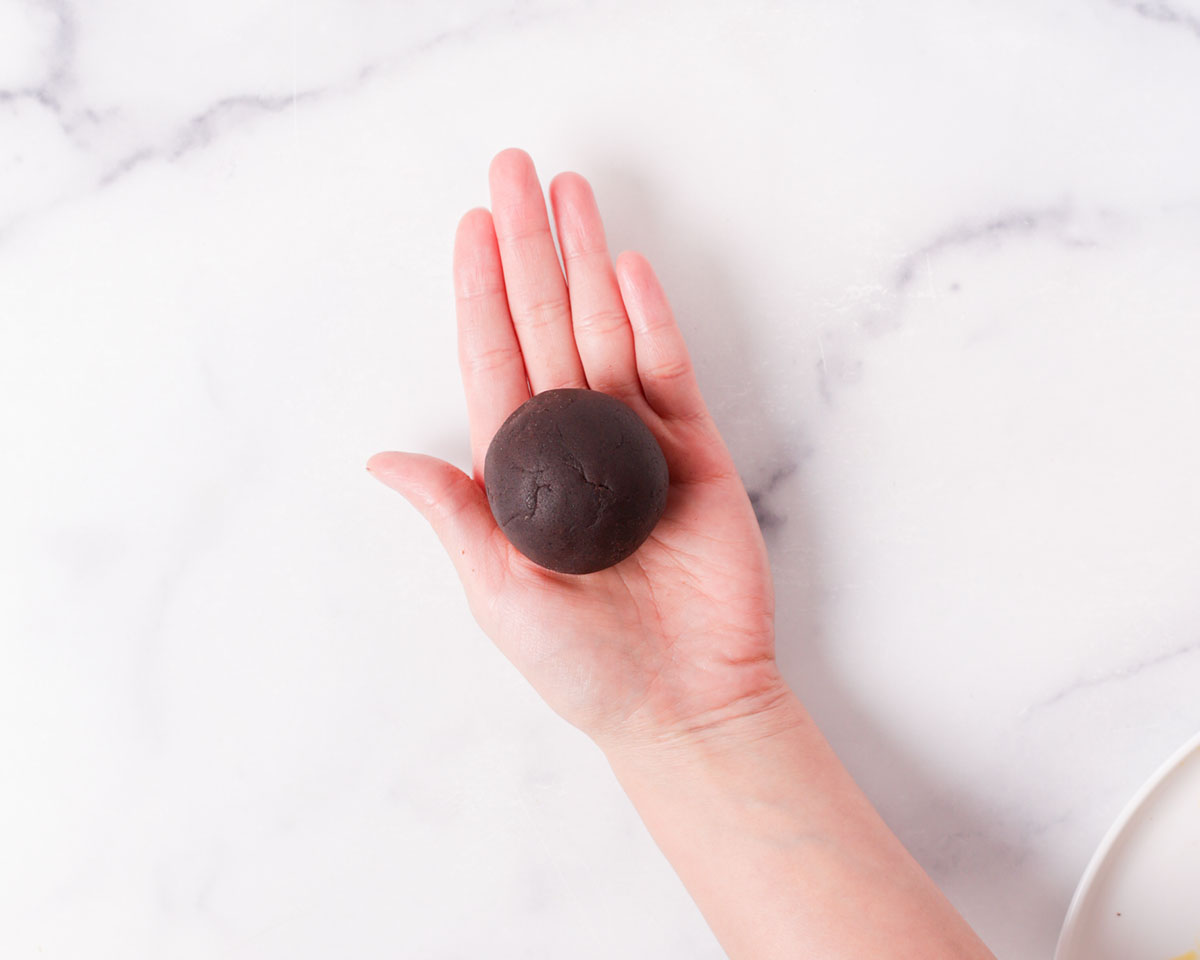
1. Dough: Portion the mooncake dough into 8 (30g) portions for 100 gram molds and 15 (15g) portions for 50 gram molds. Roll each piece of dough in your between your palms to round them out.
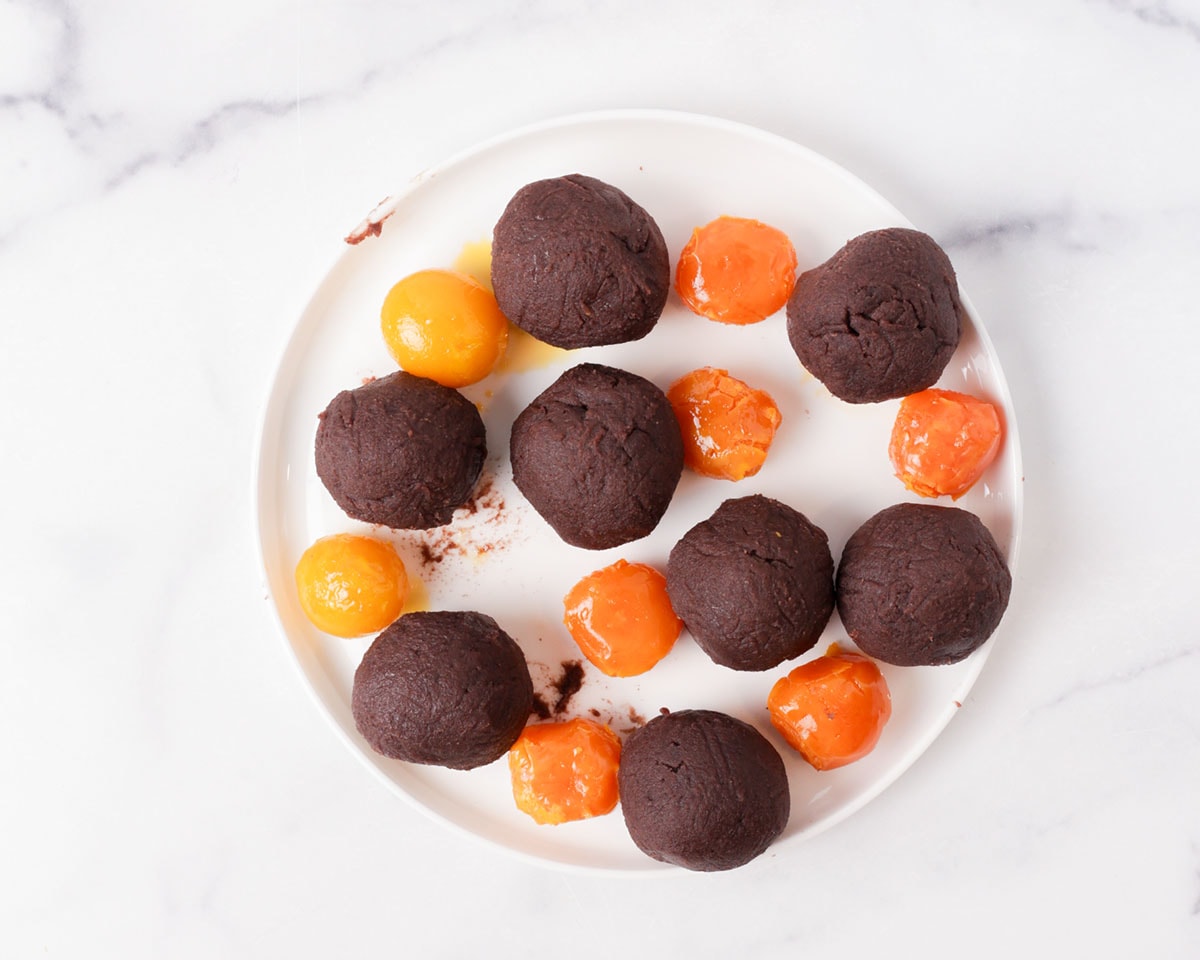
2. Filling: The filling needs to equal 70 grams total for 100 gram molds and 35 grams for 50 gram mold, whether you are using salted yolks or not. So if you are not add salted yolks to the mooncake, portion out 8 (70g) red bean paste for 100 gram molds and 15 (35g) red bean paste for 50 gram molds. If adding salted yolks, weight each yolk and pair it with enough red bean paste to total 70 grams for 100 gram molds and 35 grams for 50 gram molds. Round out each portion of the red bean paste.
📝 Note: If you prefer, you can cut the salted yolks in half after baking so that the yolks won't be too big for the 50 gram mooncakes.
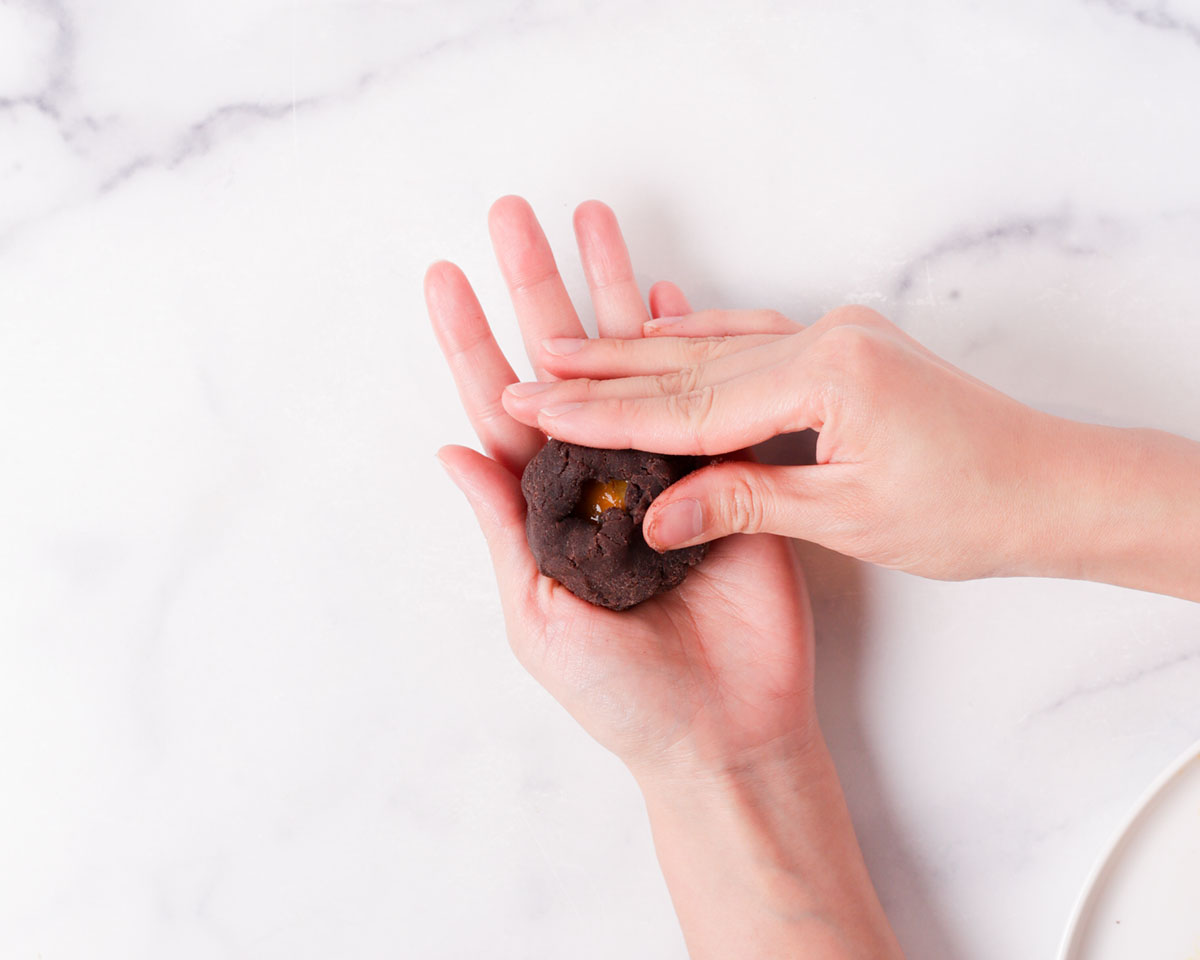
3. If using salted yolks: Working with one set of filling at a time, use your thumb to create an indentation in the center of the red bean paste that's large enough to fit the salted yolk. Press the yolk into the bean paste and wrap the paste around the yolk.
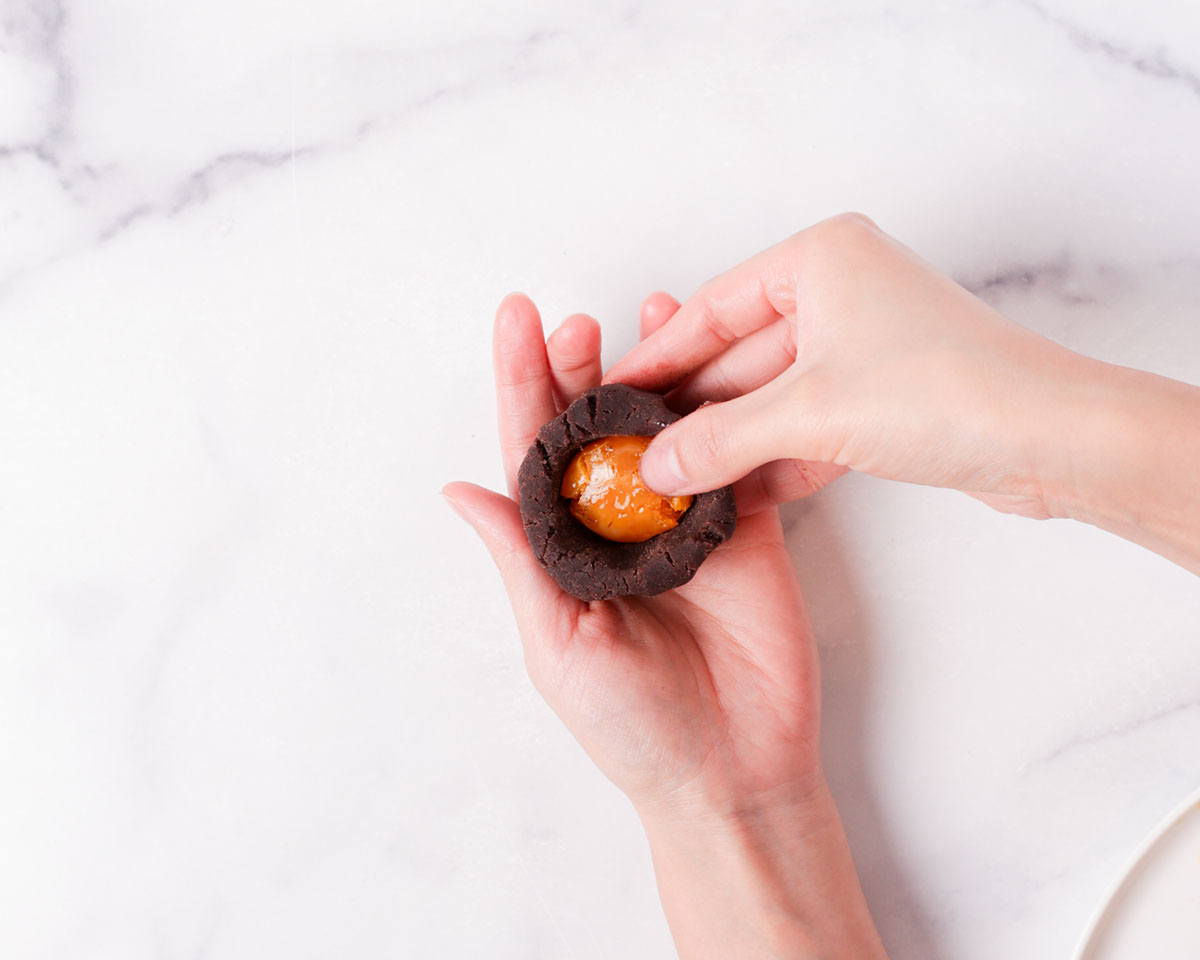
Seal the seam and roll the filling in your palms to round it out. Repeat with the remaining pairs of filling.
Shape:
1. Preheat the oven to 400°F/205°C and prepare a sheet pan lined with parchment paper or silicon baking mat.
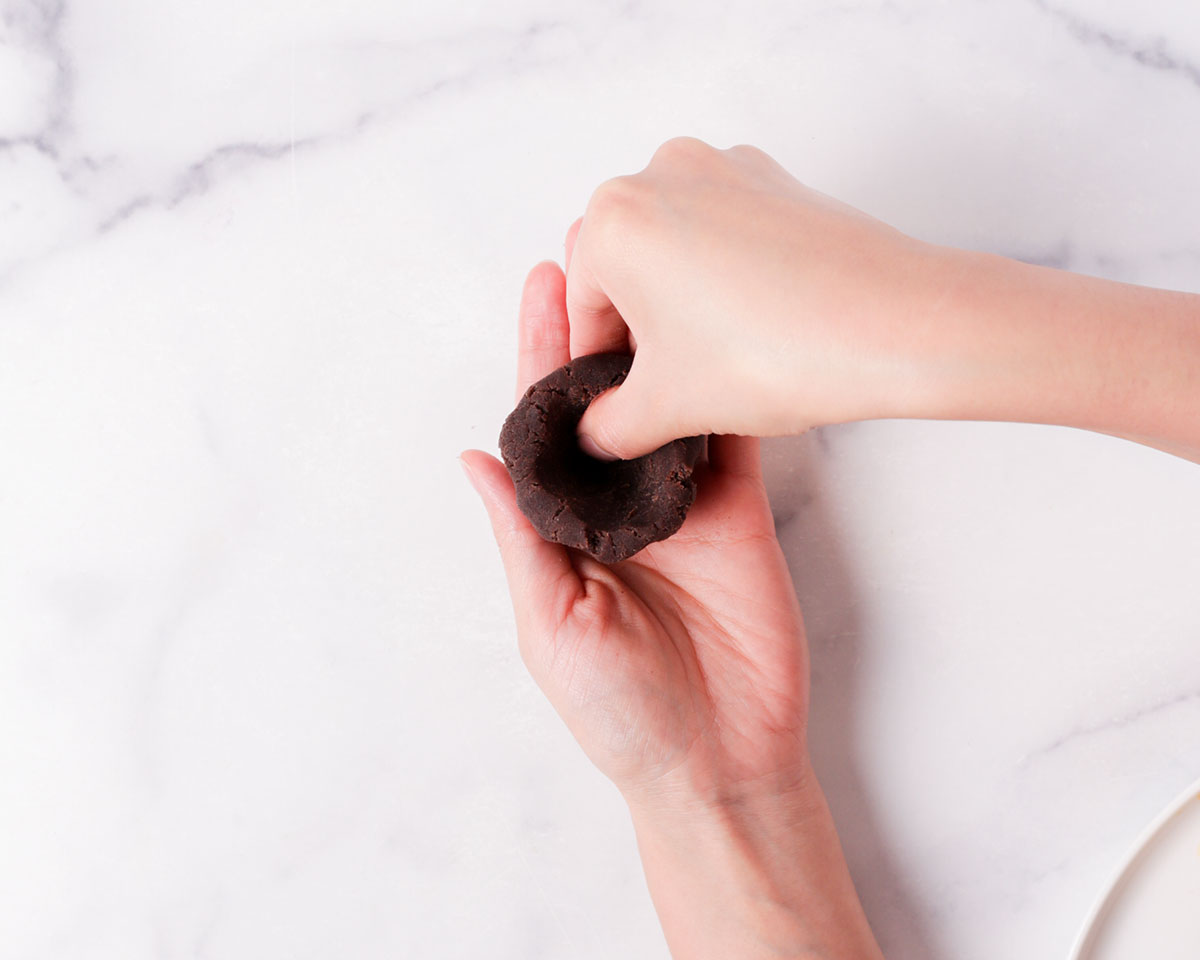
2. Flatten mooncake dough. With gloved hands, flatten a ball of mooncake dough into a thin disc using your palms. For 100g mooncakes, the disc should be about 3-4 inches wide, and 2-3 inches wide for 50g mooncakes.
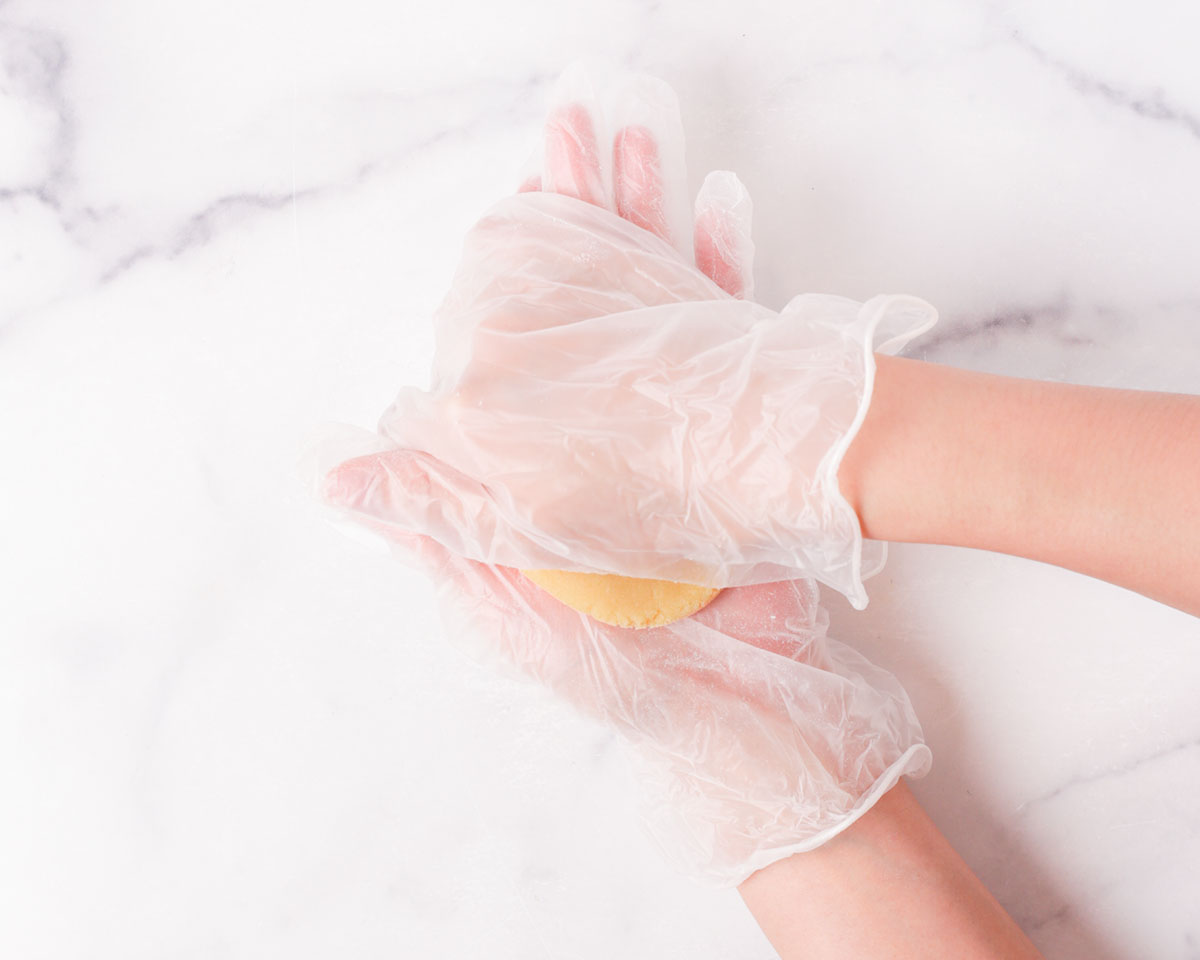
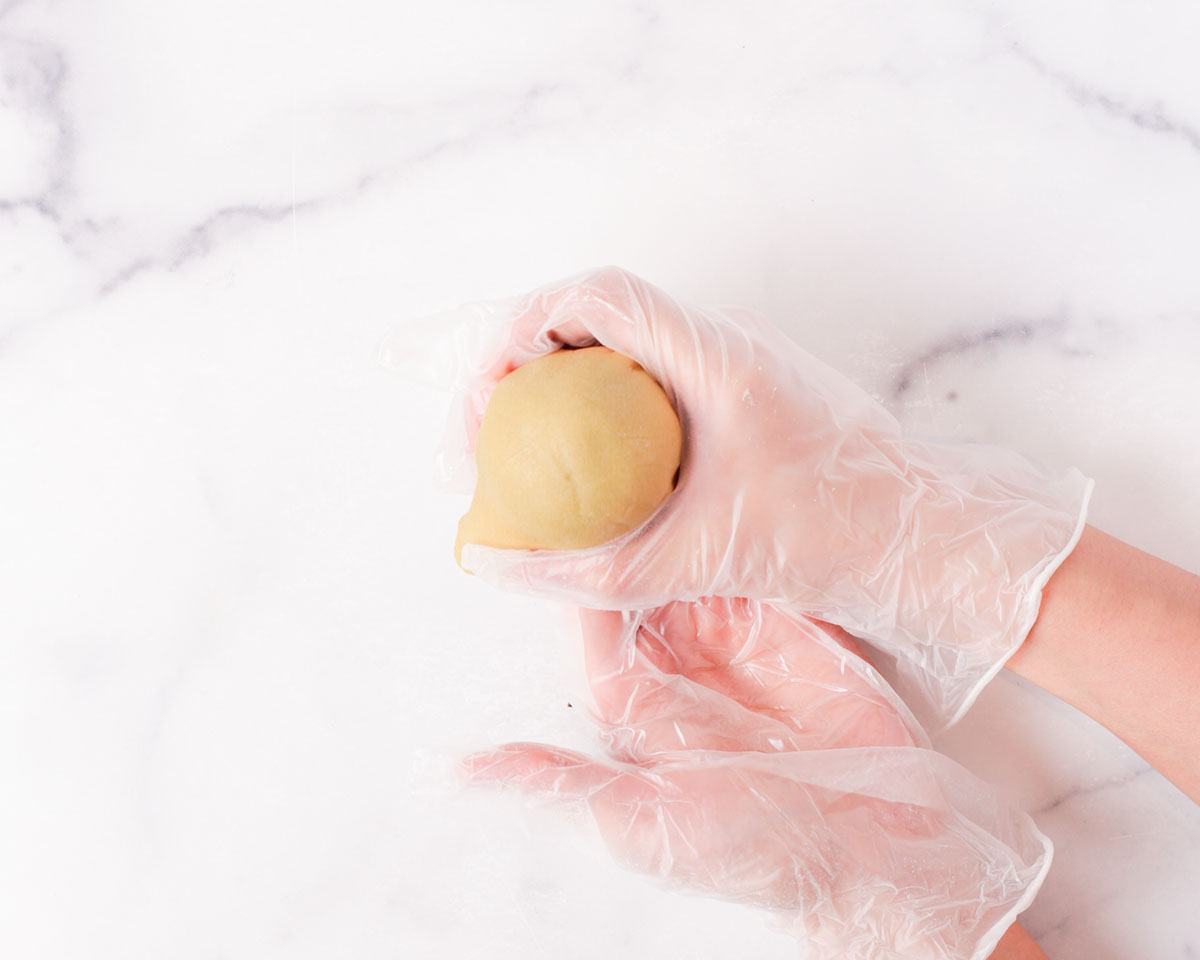
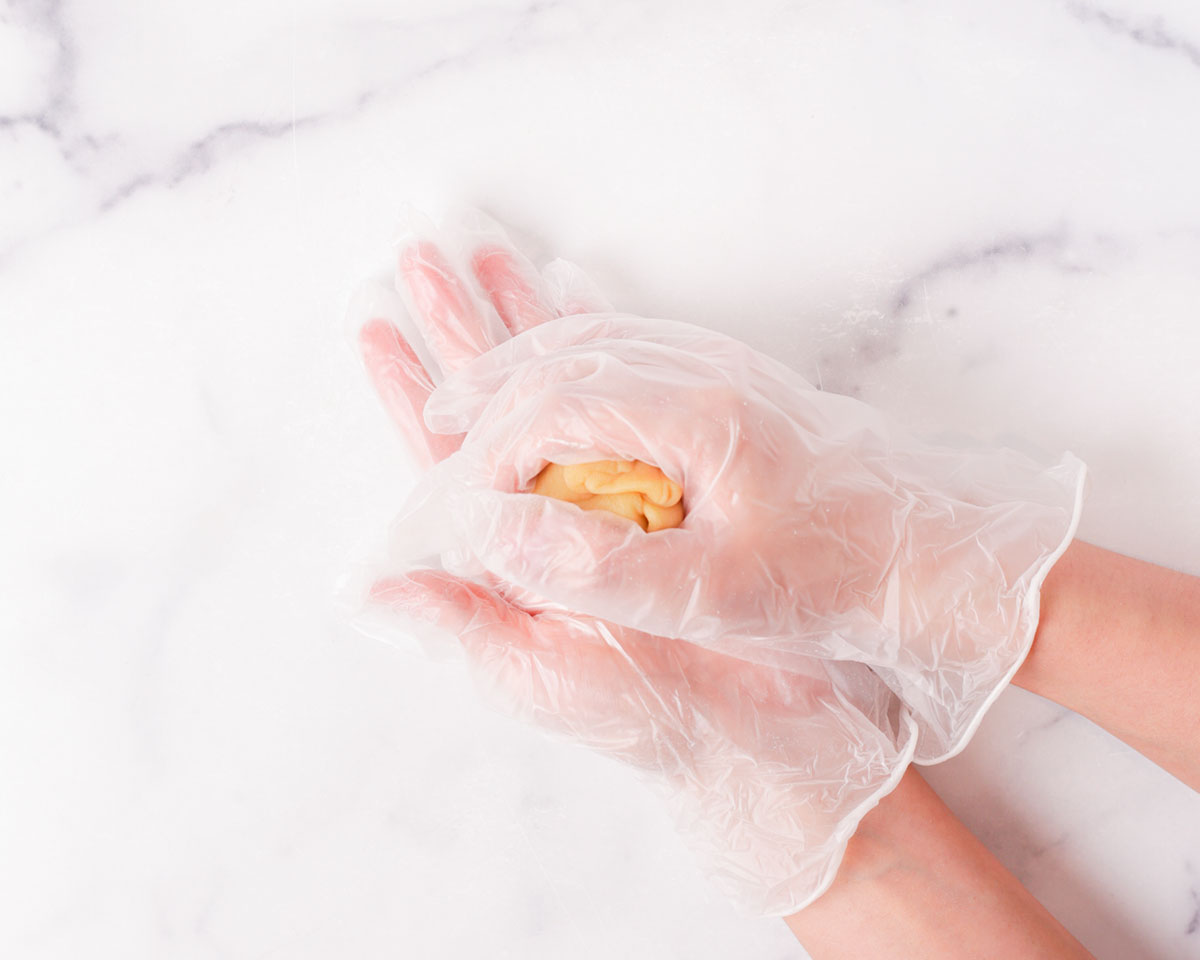
3. Wrap the filling. Place the prepared mooncake filling in the center of the dough, then turn your hand upside-down to allow the dough to drape over the filling and to peel off the glove.
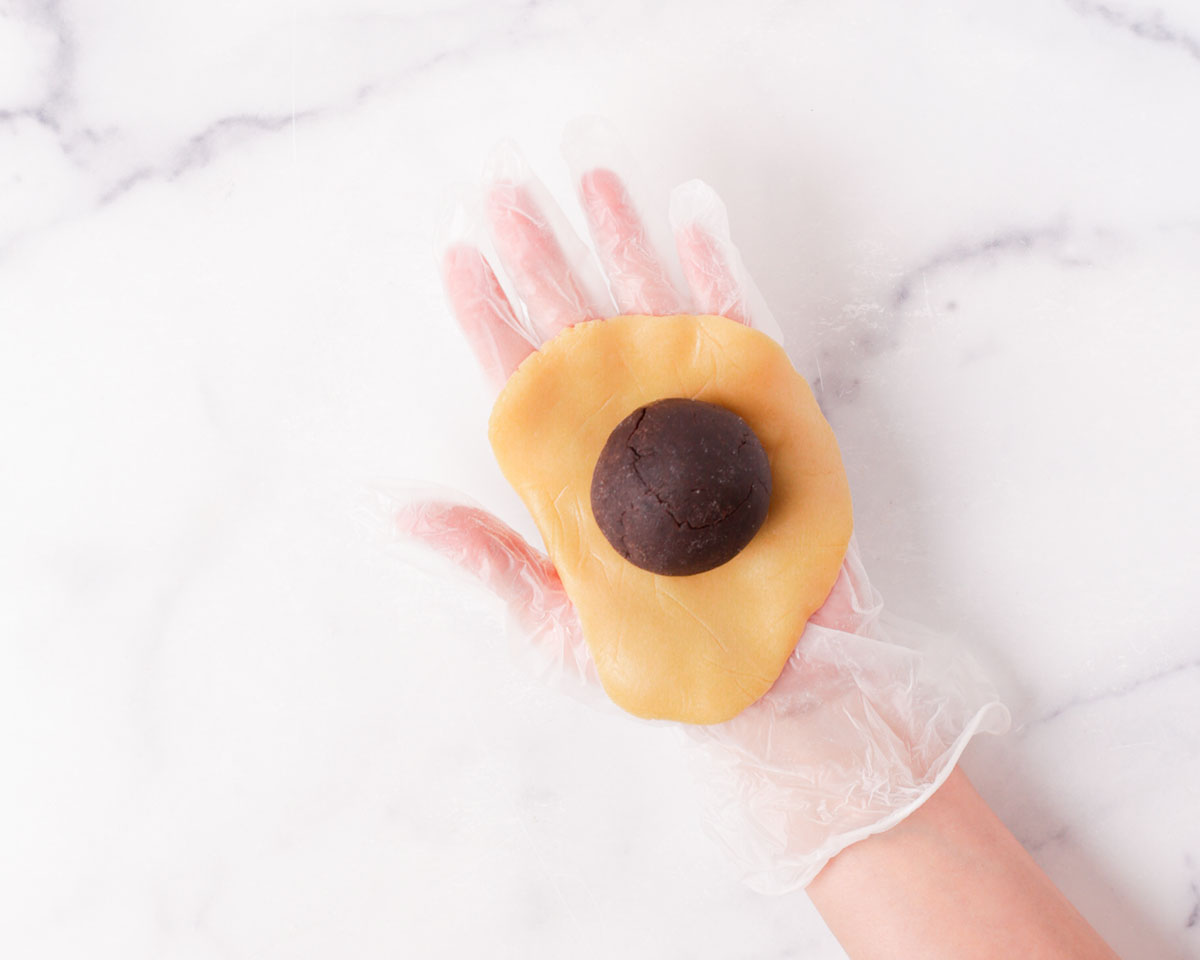
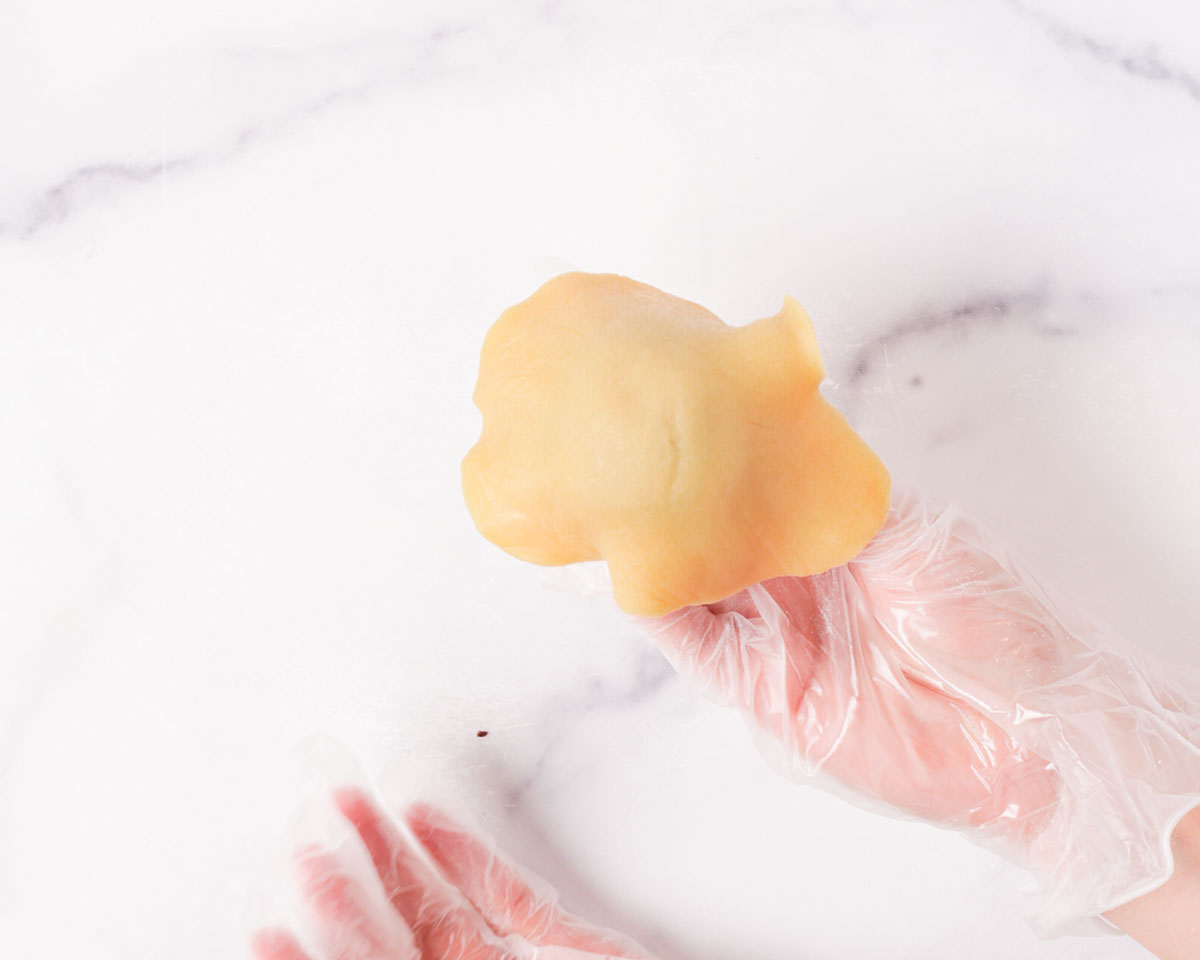
Wrap the dough around the filling and flip it right-side up to seal the filling. You may need to mold the dough to entirely cover the filling. Roll the mooncake in your palms to round it out.

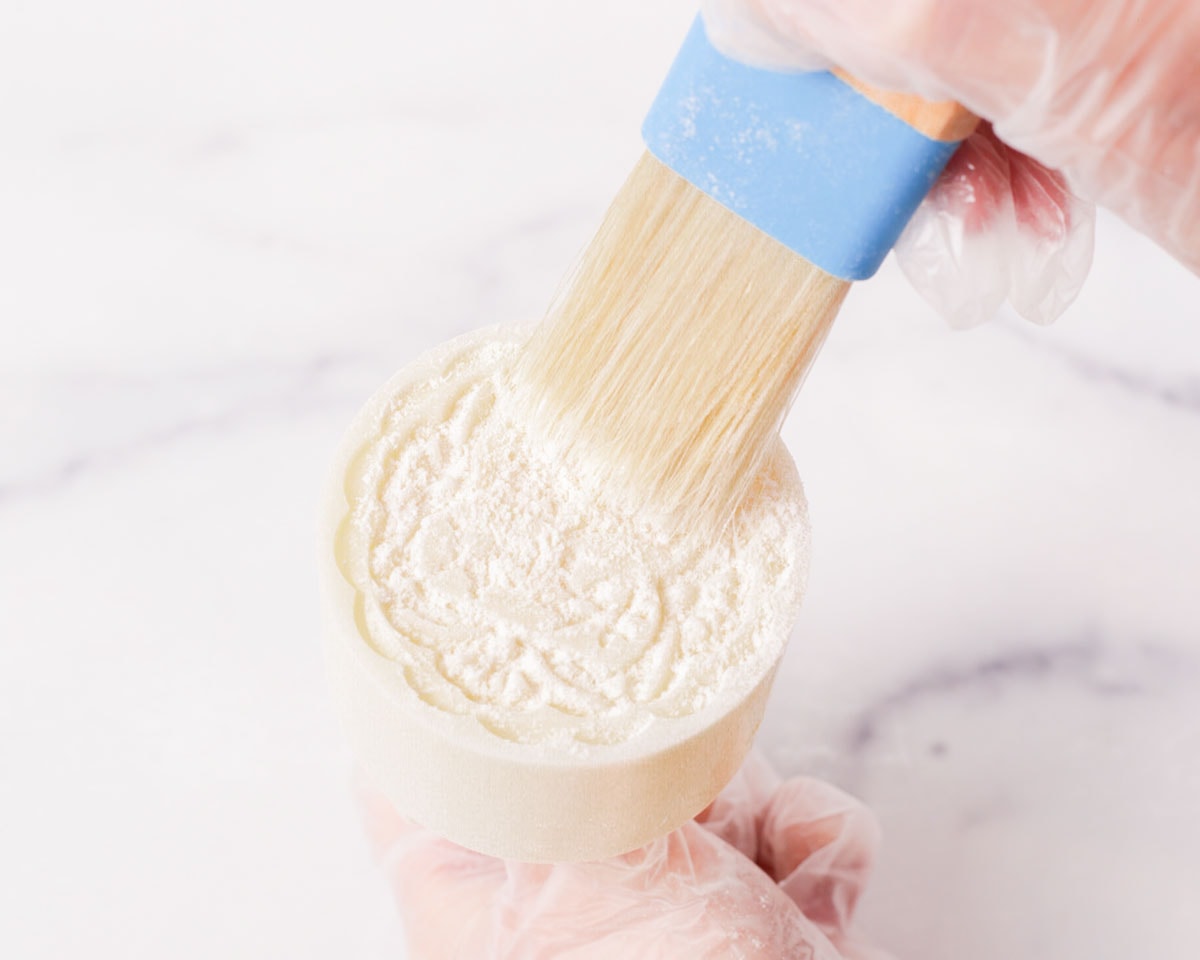
4. Dust with flour. Dust the mooncake with some flour and use a pastry brush to dust off the excess. Also dust the inside of the mooncake mold well with flour.
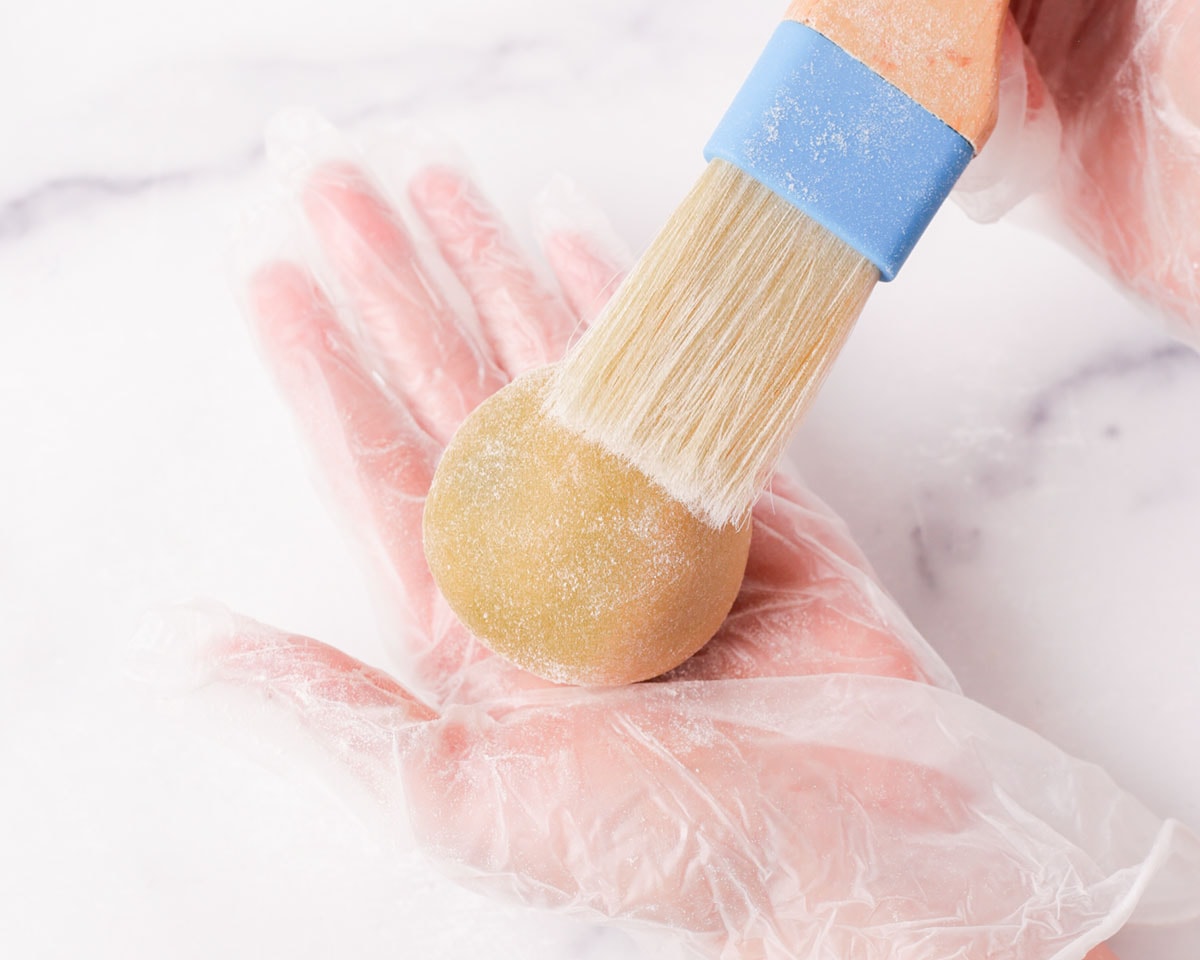
🌟 Pro tip: The first mooncake is the most likely one to stick. So use one of the mooncake doughs and press it into the mooncake mold's pattern like you would a putty. This is to transfer some oil and stickiness to the mold so that flour can adhere better. After, just roll up the dough to use for mooncakes.
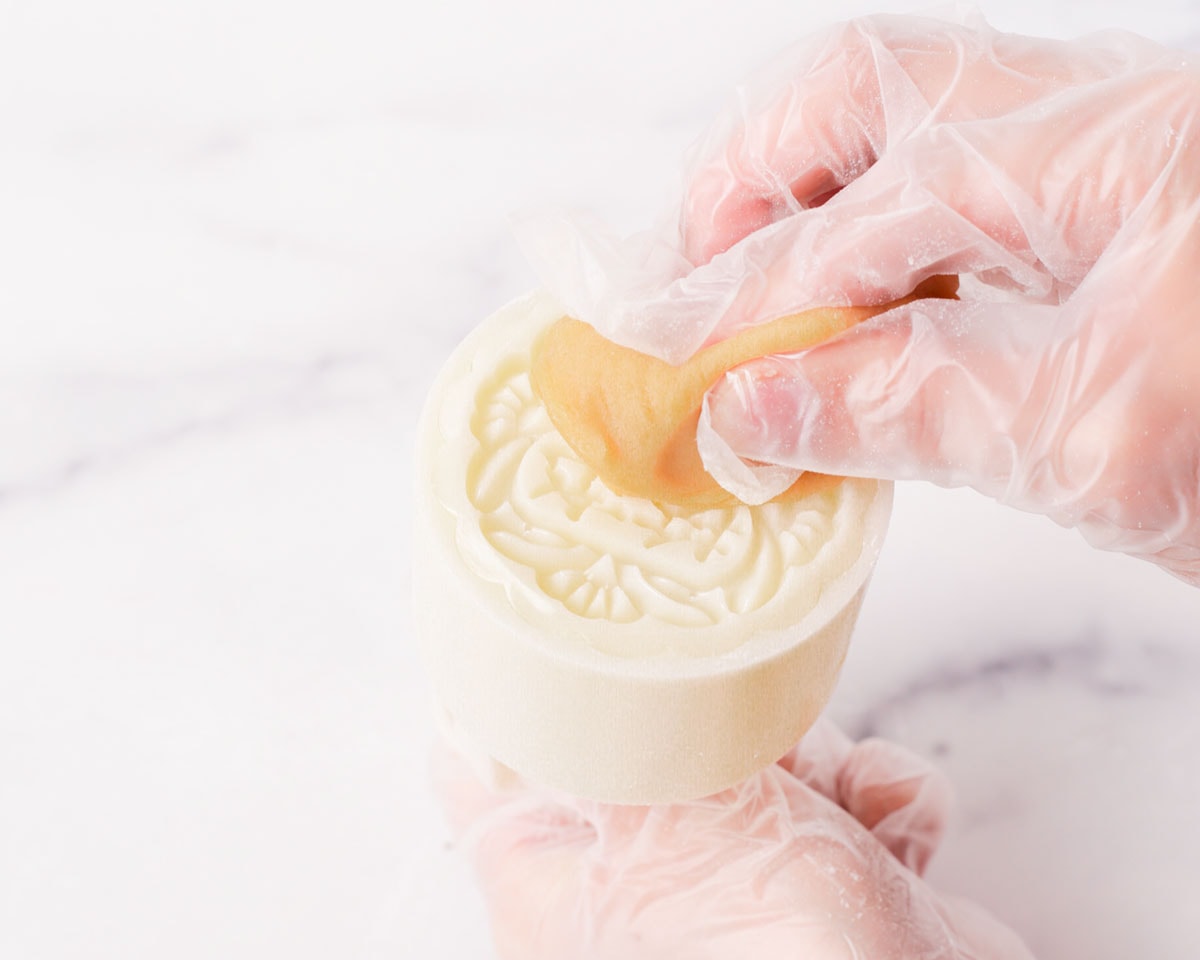
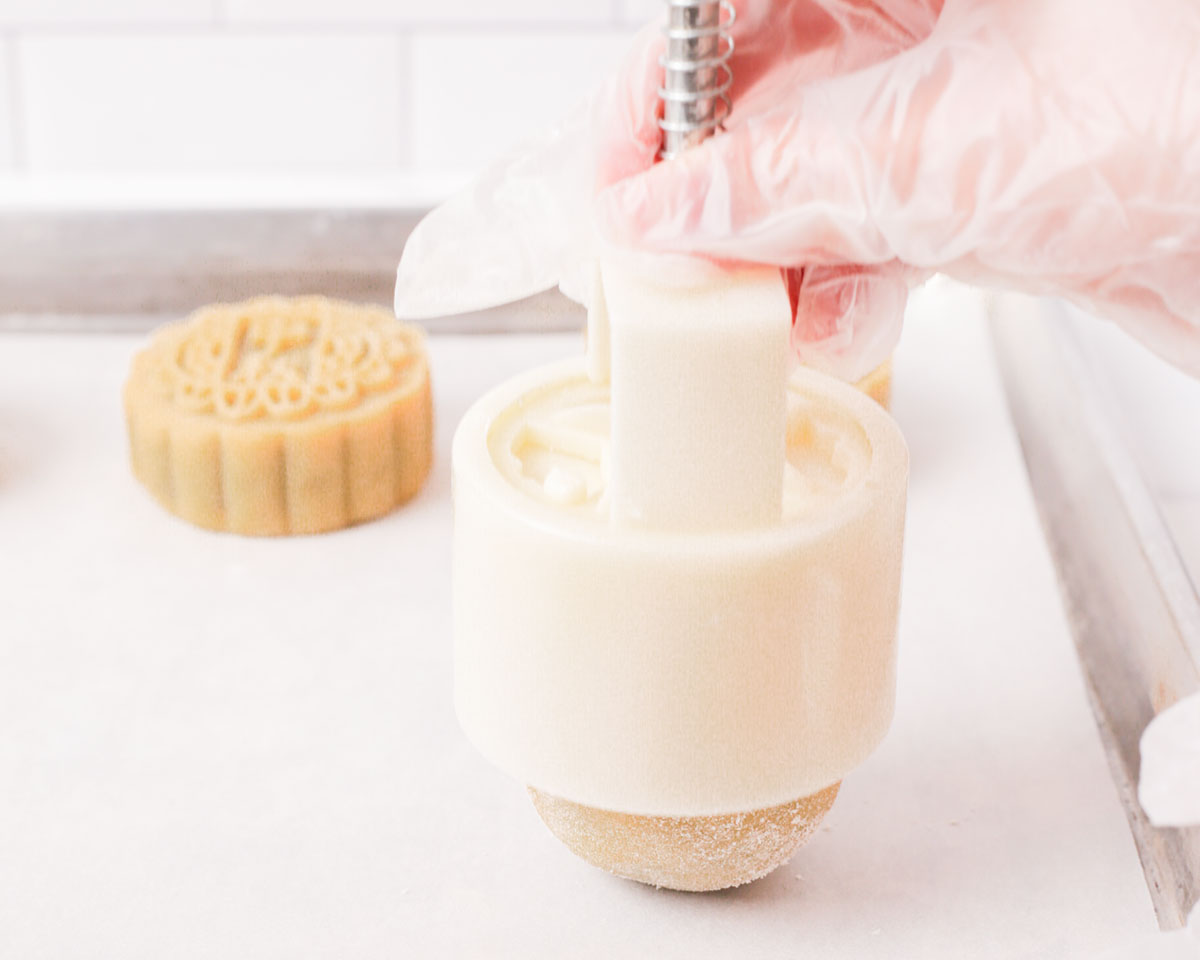
5. Shape the mooncake. Place the dusted mooncake on the prepared sheet pan. Fit the mooncake mold over the mooncake and press down the lever firmly to shape the mooncake.
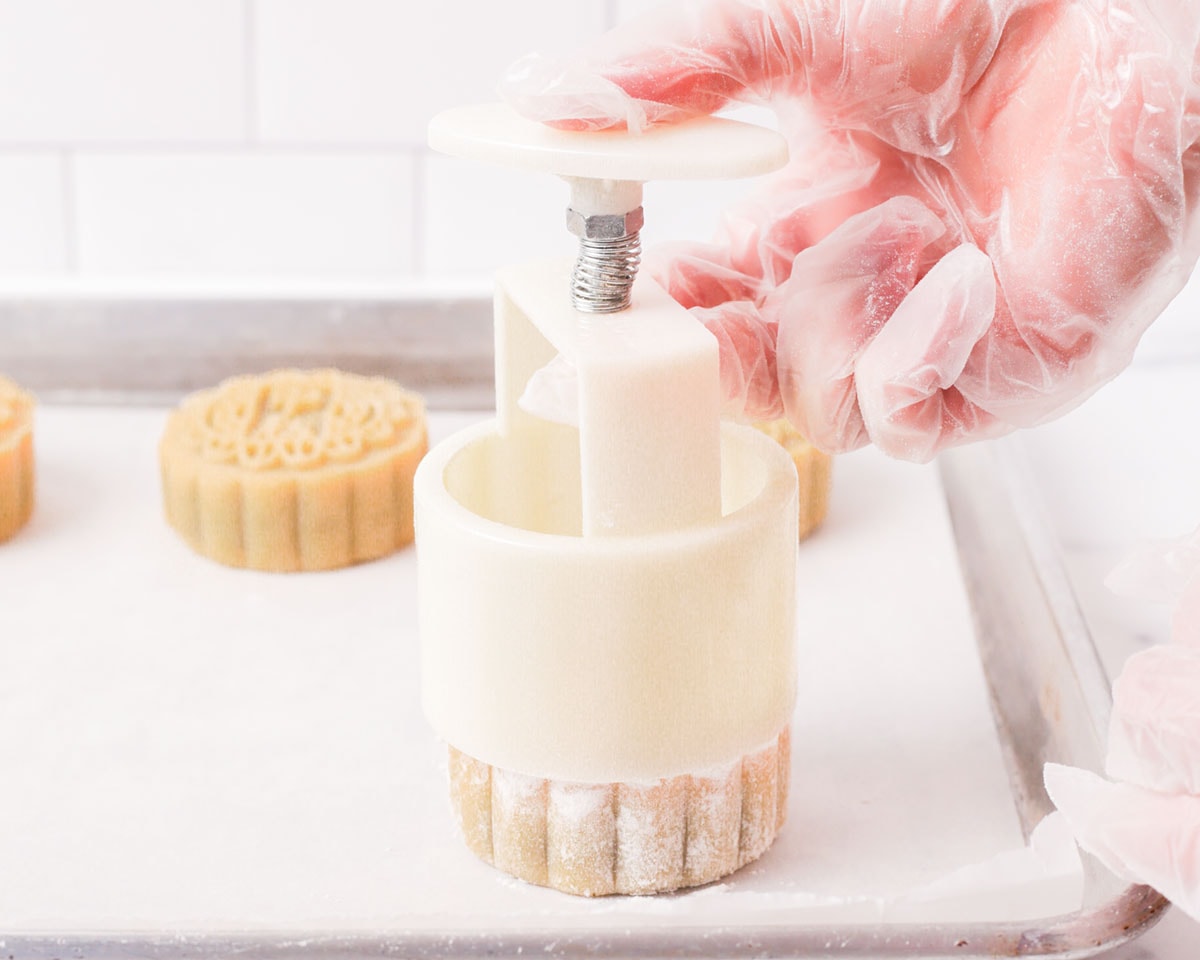
Gently dust off any excess flour and repeat this process with the remaining filling and dough. Make sure to spread them about 1 inch apart.
📝 Note: For 50g molds, you may need to shape the mooncake into an oblong shape so that it can fit into the mold.*
Bake:
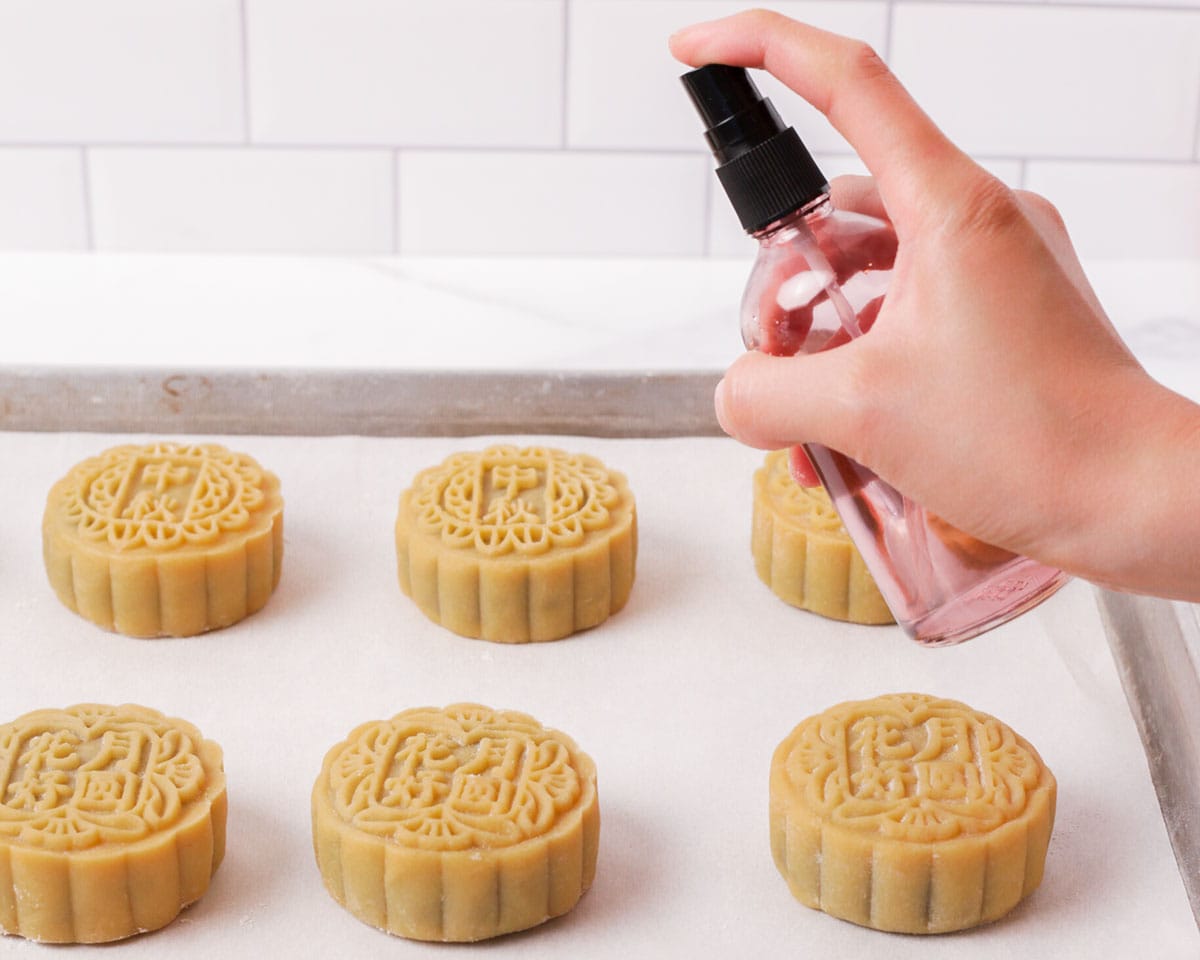
1. Spray mooncakes with water. Once finished with shaping, lightly spray each mooncake with 1-2 spritz of water. Bake for 5 minutes.
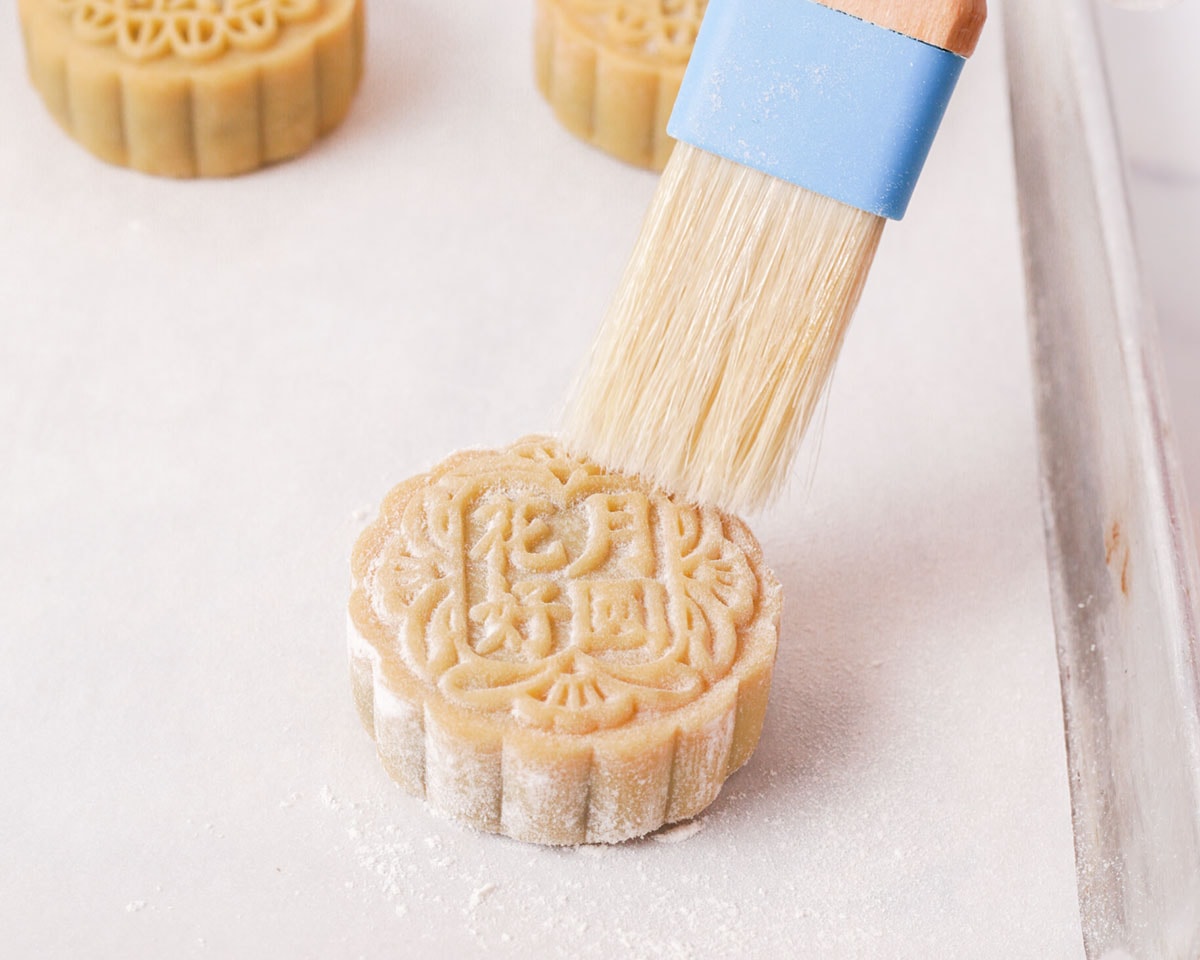
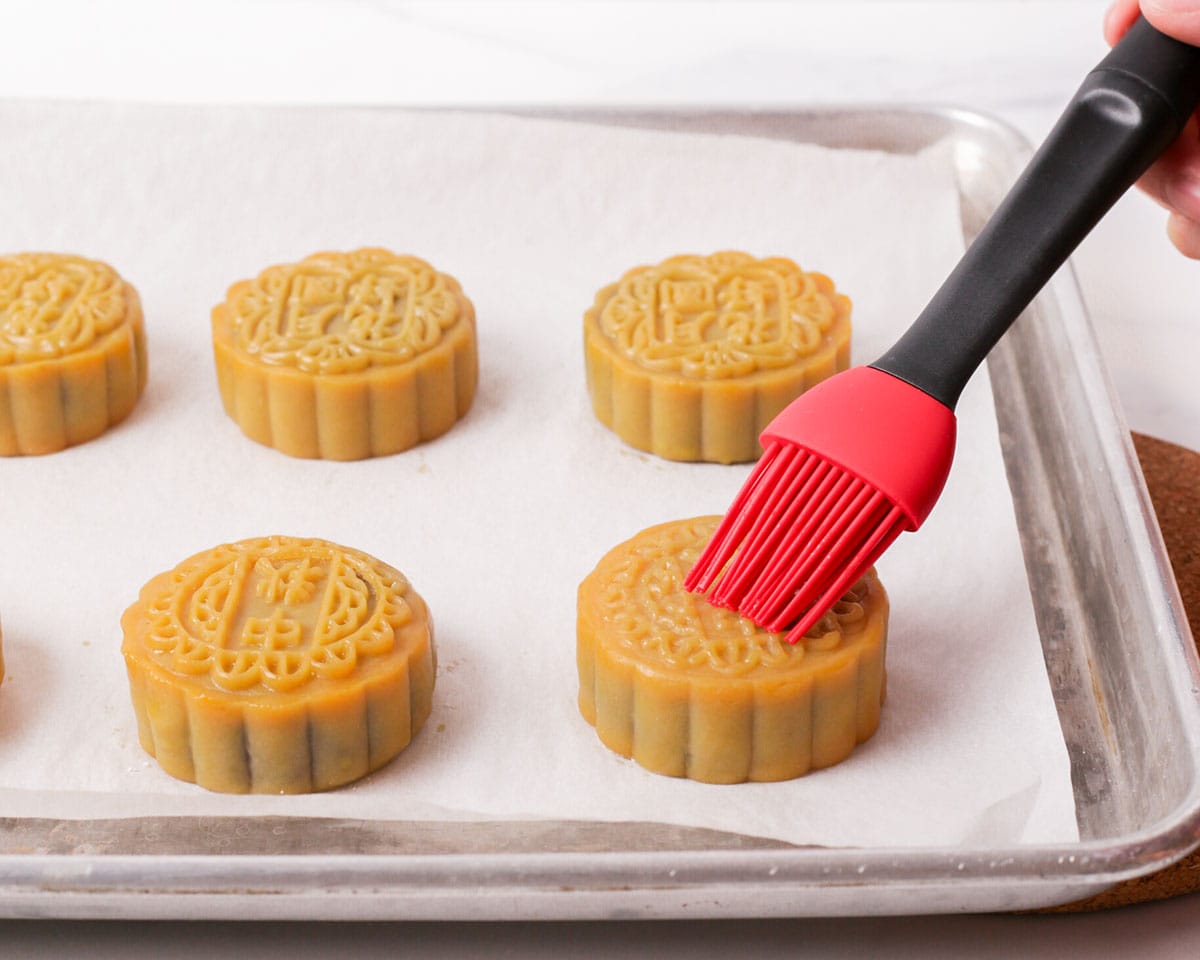
2. Brush with egg wash. After 5 minutes, remove the mooncakes from the oven and decrease the temperature to 325°F/160°C. Lightly brush the mooncakes with the prepared egg wash. Make sure to not brush with too much egg wash or the pattern may get blurred.
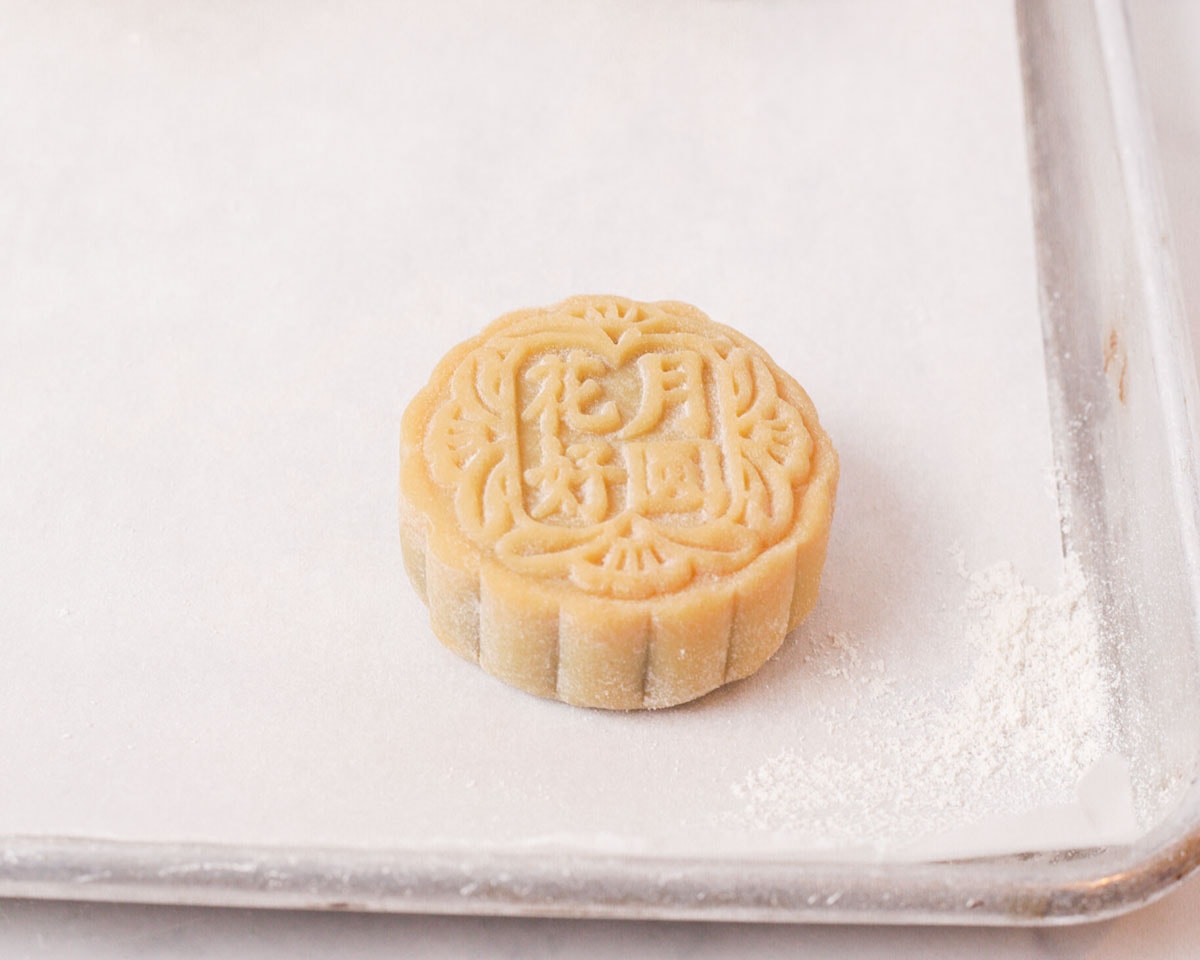
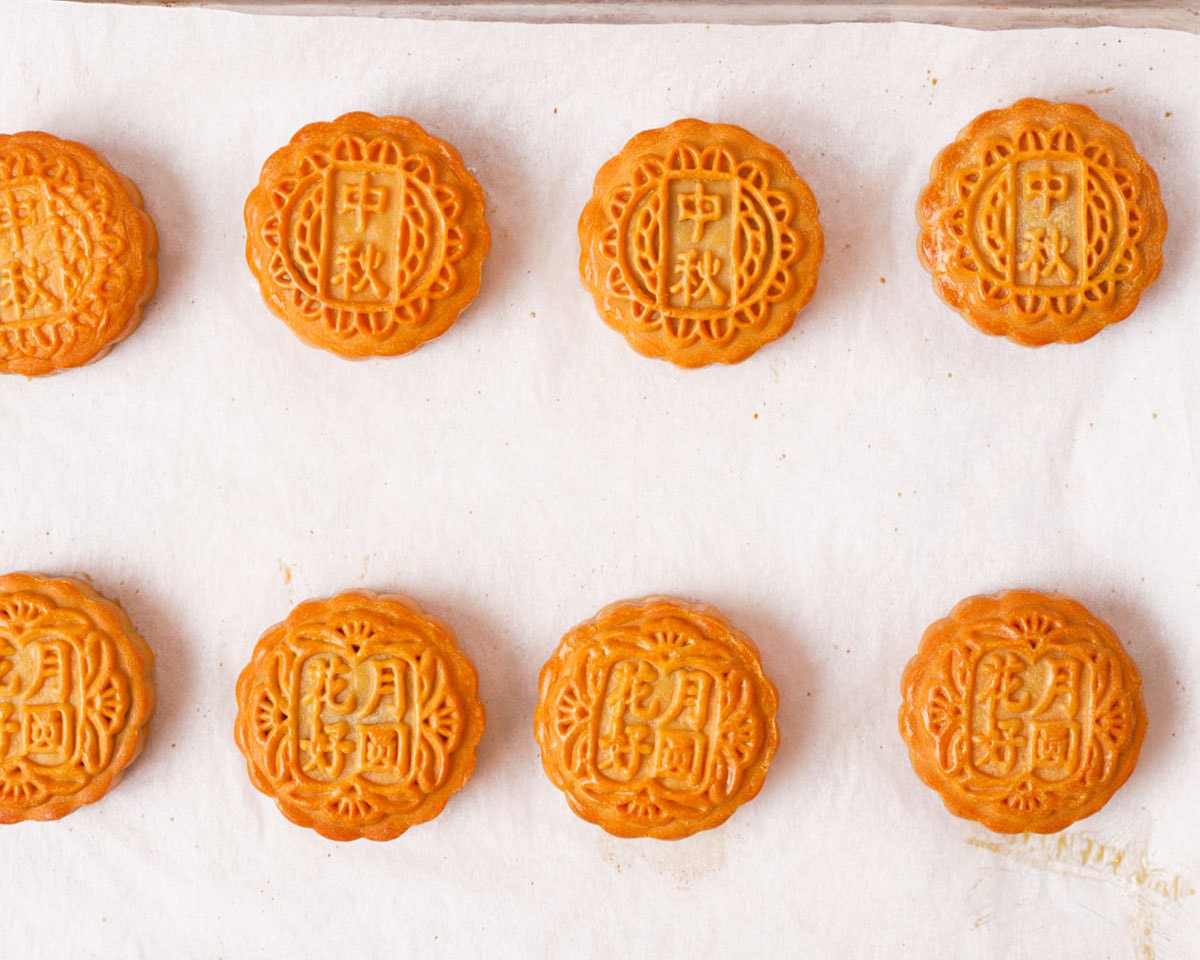
3. Bake till golden. When the oven is at the right temperature, bake the mooncakes for another 10 to 15 minutes or until golden brown. Remove from the oven and allow the mooncakes to cool completely at room temperature before handling.
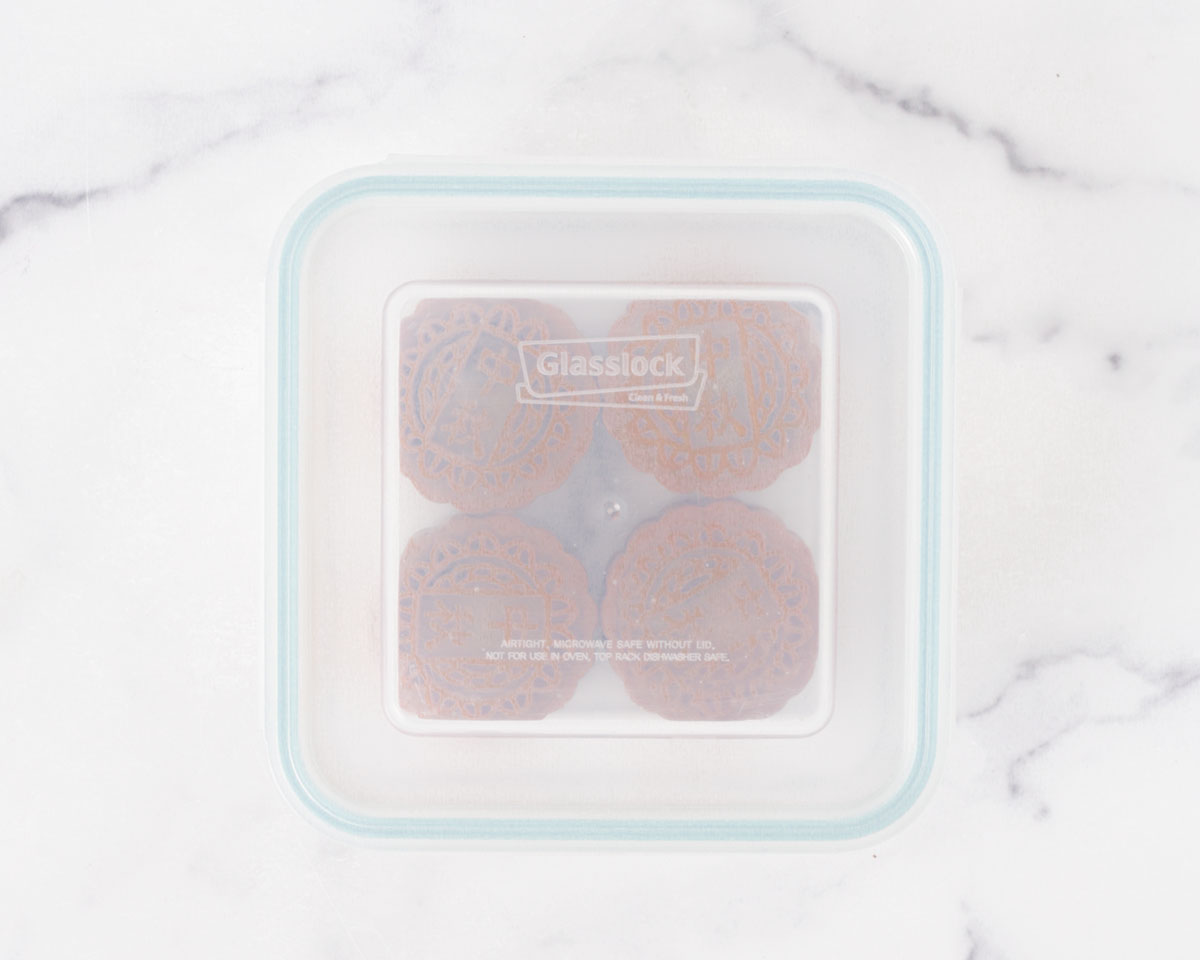
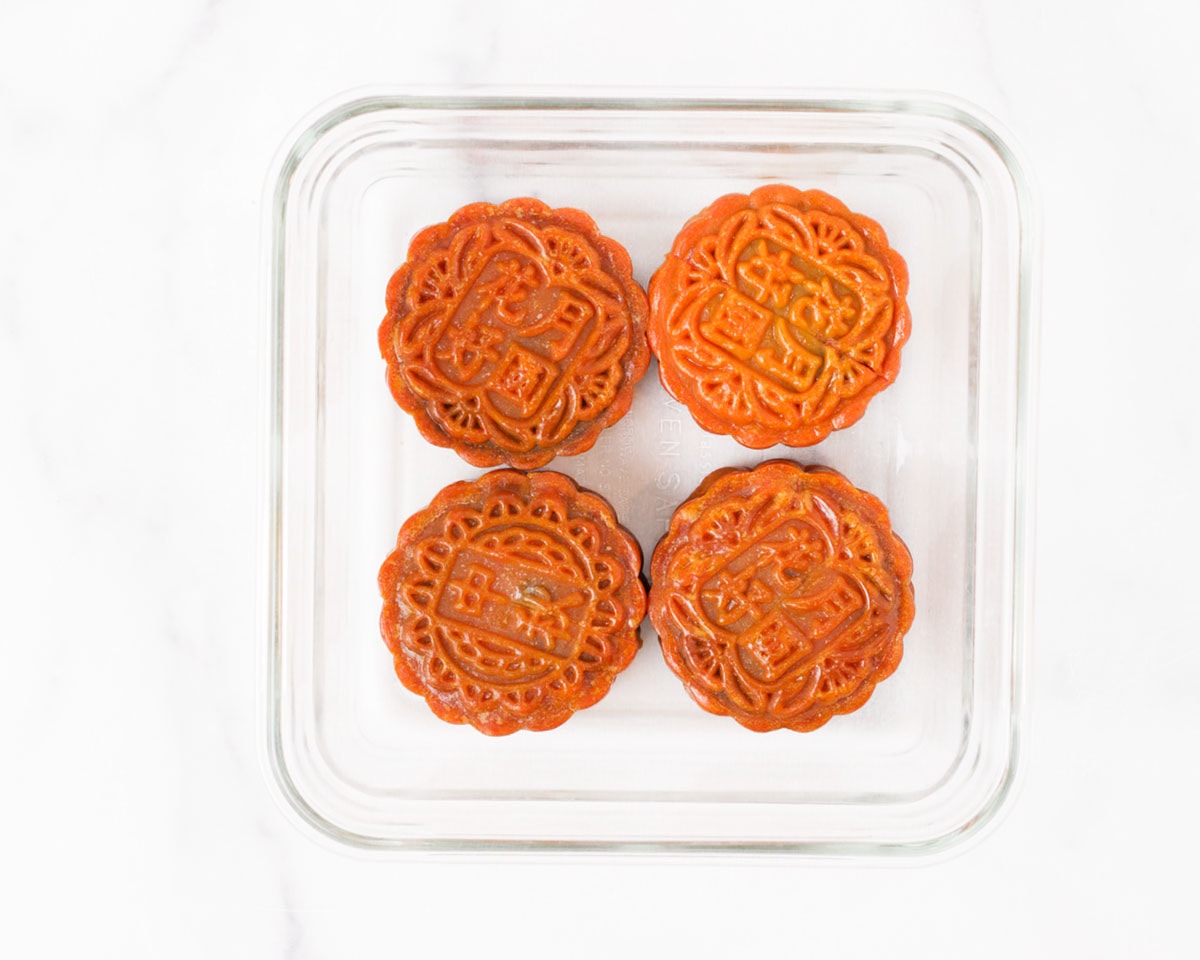
4. Cool and allow to mature. Once cooled, transfer the mooncakes into airtight containers, in a single layer. Allow the mooncakes to mature at room temperature for 2 days for best flavor and texture. Enjoy on their own or with tea!
Recipe tips
- If needed, use a little more dough than filling to make the assembly process easier. The best ratio of mooncake skin to filling is 7 to 3, which is what our recipe is based on. However if this is too difficult, you can increase the dough to 40 grams and decrease the filling to 60 grams for the 100 gram mooncake. For the 50 gram mooncake, increase the dough to 20 grams and decrease the filling to 30 grams.
- Don't skip spraying water on the mooncakes! Water helps to set the mooncake and prevents the skin from cracking.
- Make homemade red bean paste and salted duck yolks for best flavor or use store-bought ones for convenience and to save time. If you have the time, it is definitely worth making the filling from scratch because it tastes so much better, you can control the sweetness and flavor, and there won't be unnecessary fillers.
- Wear gloves when assembling the mooncakes. The mooncake dough will be quite tacky. Gloves will make the whole process much easier and less messy.
- Let the mooncakes mature for at 2 days for best flavor, appearance, and texture. This process is called "hui you" (回油) in Chinese, and it translate to "return of oil". This process makes the mooncakes, shiny, tender, and helps develop a prettier golden color.
Storage
After the mooncakes mature for 2 days at room temperature (in airtight containers), they can be stored in the fridge for up to 3 to 4 weeks.
When ready to enjoy, simply allow the mooncakes to warm up at room temperature.
FAQ
Mooncakes are made of a thin, slightly sweet wheat pastry on the outside and filled with a sweet filling, such as red bean paste or lotus paste, and often times also stuffed with one, up to 4 salted egg yolks.
Mooncakes are usually eaten during Mid-Autumn Festival, which lasts for 8 days. This holiday falls on the 15th day of the eighth lunar month, which is usually between mid-September and early October.
You can easily make golden syrup at home or purchase it at Chinese markets. If you can't find it, you can use honey instead.
📖 Recipe
Chinese Mooncakes with Red Bean Paste
Ingredients
For the mooncake dough:
- ¼ cup golden syrup homemade of store-bought
- 2½ tablespoons oil any neutral oil like avocado, grapeseed, vegetable
- 1 teaspoon lye water also known potassium carbonate solution
- 1 cup all-purpose flour fluffed, spooned & leveled* see notes (plus more for dusting)
- Pinch of salt (preferably fine salt)
- 1 large egg yolk mixed with 1 tablespoon of water for egg wash
For the filling:
- 16 ounces red bean paste homemade or store-bought *see notes
- 8-15 pieces cooked salted duck egg yolk homemade or store-bought (optional) *see notes
- Clear liquor for spraying (use high-proof liquor like vodka, white rice wine, unflavored soju)
Homemade golden syrup (if making):
- 1 cup granulated sugar
- ⅓ cup water
- 1 tablespoon lemon juice
- ¼ cup water
- ⅛ teaspoon baking soda
Homemade red bean paste (if making):
- 1 cup dry azuki bean (sometimes called red beans)
- 4 cups water
- 2 tablespoons oil any neutral oil avocado, grapeseed, vegetable
- ½ cup granulated sugar
- Pinch of salt (optional)
- 1 tablespoon maltose syrup (optional to make bean paste more malleable)
Instructions
Day before - homemade golden syrup (if making):
- In a saucepan, add the sugar, gently add the ⅓ cup of water, and the lemon juice.
- Place the saucepan over medium high heat and bring the mixture to a boil. Once at a boil, reduce the heat to medium and simmer the syrup until it turns amber in color or around 295°F. Gently stir occasionally.*Be very careful! The syrup will be extremely hot. Also, as the syrup starts to darken, it can change shades very quickly. So when it starts to change color, make sure to keep an eye on it.*
- While the syrup is simmering, mix together the ¼ cup of water and baking soda. Set aside until needed.
- When the syrup is at the right color, immediately remove from heat and add the baking soda water solution. The syrup will bubble for a moment. Stir until well combined and the syrup stops bubbling.
- Allow the syrup to cool then transfer to a sanitized container and store at room temperature overnight. The syrup may have a lot of foam on top at this point but the foam should dissipate as it sits.*Refer to the post above for more details.*
Homemade red bean paste - Instant Pot Method (if making):
- Discard any adzuki beans that are black or broken. Then rinse the bean a couple times to remove any debris. Drain and transfer the beans to the Instant Pot along with the 4 cups of water.
- Place the lid onto the Instant Pot and turn it to the lock position. Turn the venting valve to "SEAL" and select the "Pressure Cook" function. Set the time to 25 minutes, normal cook, and high pressure. Once done, allow the Instant Pot to natural release for 10 minutes, then manually release the rest of the pressure.
- Using a mesh strainer, strain the cooked adzuki beans. Give the mesh strainer a couple of shakes to remove excess liquid but no need to press. Transfer the beans to a blender and reserve some of the liquid.
- Blend the adzuki until smooth or as fine as possible. If necessary, add a little of the reserved bean liquid to help the beans blend easier, starting with 1 tablespoon at a time. Try to use a little extra liquid as possible because the more that's added the longer the bean paste will have to be cooked for.
- Transfer the blended bean paste to a nonstick pan and add the oil. Using a rubber spatula, stir and cook the bean paste on medium low heat for a few minutes until the oil is absorbed. Then add the sugar and salt and cook until the paste becomes drier and resembles play-dough. Add the maltose syrup and cook until the paste no longer sticks to the pan or the spatula. Transfer the red bean paste to a plate or bowl. Spread out the bean paste and loosely cover with clinge wrap, making sure the wrap touches the surface of the bean paste.
Salted egg yolk (if using):
- Preheat the oven to 350°F and prepare a sheet pan lined with parchment paper.
- Arrange the salted yolks on the prepared sheet pan, spaced about 1 inch apart. Spray each yolk with some clear liquor and bake until the egg yolks release it's oil and starts to foam, about 10 minutes for store-bought packaged ones and about 10 to 15 minutes for homemade ones.*If you don't have a spray bottle, you can also pour some clear liquor into a bowl and roll each yolk in the liquor.*
- Once done baking, remove from the oven and allow the yolks to cool completely at room temperature before using.
Mooncake dough:
- In a small mixing bowl, add the golden syrup, oil, lye water, and salt. Stir with a spatula until well combined. Then add flour and mix until a dough comes together and no more dry flour is visible. Cover and set aside to rest for at least 30 minutes.*The dough will be tacky but should not be sticky. Depending on your environment's humidity and your golden syrup, an additional tablespoon or two of flour may be needed.*
Assemble and bake:
- If using a 100 gram mold:Dough: Portion the mooncake dough into 30g portions (should be 8 portions) . Roll each piece of dough in your between your palms to round them out.Filling: The filling needs to equal 70 grams total whether you are using salted yolks or not. So if you are not add salted yolks to the mooncake, portion out eight 70g red bean paste. If adding salted yolks, weight each yolk and pair it with enough red bean paste to total 70 grams. Round out each portion of the red bean paste.
- If using a 50 gram mold:Dough: Portion the mooncake dough into 15g portions (should be 15 portions). Roll each piece of dough in your between your palms to round them out.Filling: The filling needs to equal 35 grams total whether you are using salted yolks or not. So if you are not add salted yolks to the mooncake, make fifteen 35g portions of bean paste. If adding salted yolks, weight each yolk and pair it with enough red bean paste to total 35 grams. Round out each portion of the red bean paste.*If you prefer, you can cut the salted yolks in half after baking so that the yolks won't be too big for the mooncakes.*
- If using salted yolks in the filling:Working with one set of filling at a time, use your thumb to create an indentation in the center of the red bean paste that's large enough to fit the salted yolk. Press the yolk into the bean paste and wrap the paste around the yolk. Seal the seam and roll the filling in your palms to round it out. Repeat with the remaining pairs of filling.
- Preheat the oven to 400°F and prepare a sheet pan lined with parchment paper or silicon baking mat.
- Shape:With gloved hands, flatten a ball of mooncake dough into a thin disc using your palms. For 100g mooncakes, the disc should be about 3-4 inches wide, and 2-3 inches wide for 50g mooncakes.
- Place the prepared mooncake filling in the center of the dough, then turn your hand upside-down to allow the dough to drape over the filling and to peel off the glove. Wrap the dough around the filling and flip it right-side up to seal the filling. You may need to mold the dough to entirely cover the filling. Roll the mooncake in your palms to round it out.*Refer to the post above for photo reference of this process!*
- Dust the mooncake with some flour and use a pastry brush to dust off the excess. Also dust the inside of the mooncake mold well with flour.
- Place the dusted mooncake on the prepared sheet pan. Fit the mooncake mold over the mooncake and press down the lever firmly to shape the mooncake. Gently dust off any excess flour and repeat this process with the remaining filling and dough. Make sure to spread them about 1 inch apart.*For 50g molds, you may need to shape the mooncake into an oblong shape so that it can fit into the mold.*
- Bake:Once finished with shaping, lightly spray each mooncake with 1-2 spritz of water. Bake for 5 minutes.
- After 5 minutes, remove the mooncakes from the oven and decrease the temperature to 325°F. Lightly brush the mooncakes with the prepared egg wash. Make sure to not brush with too much egg wash or the pattern may get blurred.
- When the oven is at the right temperature, bake the mooncakes for another 10 to 15 minutes or until golden brown. Remove from the oven and allow the mooncakes to cool completely at room temperature before handling.
- Once cooled, transfer the mooncakes into airtight containers, in a single layer. Allow the mooncakes to mature at room temperature for 2 days for best flavor and texture. Enjoy on their own or with tea!
Notes
- Fluffed, spooned & leveled - To get the most accurate measurement, use a scale. The best alternative is to follow this fluff, spoon, and level technique to prevent using too much flour. This is recommended for all flour measurements.
- First, fluff up the flour in your bag or canister with a spoon. Next, spoon the flour into your dry measuring cup until it overflows. Do no shake or tap. Lastly, use a straight edge, like the back of a butter knife, to scrape and level off the flour.
- Red bean paste - This can be easily made at home, but you can also find it at most Asian markets and save time. Store-bought ones are usually a bit sweeter and oilier but convenient to use.
- Salted duck egg yolk - You can make your own salted duck eggs (or chicken eggs!) and collect the yolks for mooncakes or buy the vacuum packed ones from Chinese markets.

Comments
No Comments