


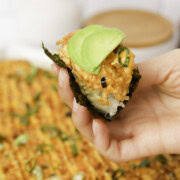
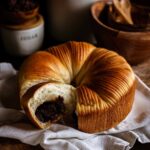
This eggless wool bread with red bean paste is made with an easy milk bread base that makes the bread look Instagram worthy, pillowy soft, and tastes amazing with springy texture!
Wool bread took over the food trends like Korean cream cheese garlic breads and Korean mochi breads , so of course we had to give it a try! After all, we are lovers of all carbs, especially bread, haha.
What is wool bread?
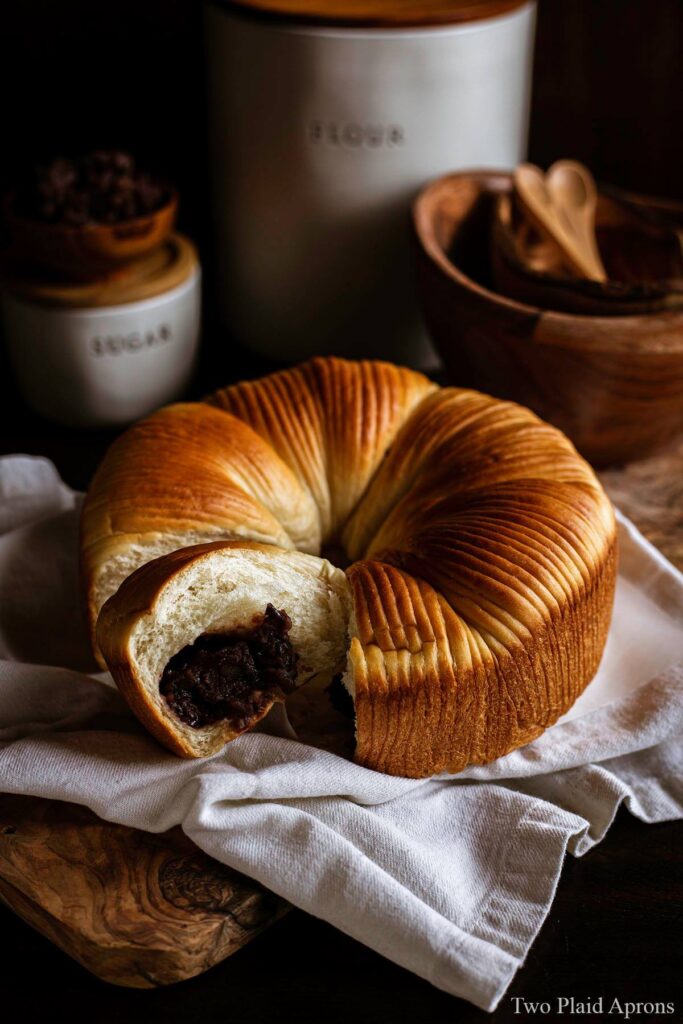
Wool bread, and also known as wool roll bread, is a pillowy soft enriched yeast bread stuffed with various fillings. Not only is it tasty, it's also incredibly pretty and whimsical. The bread itself resembles wool yarn spools, but a golden brown and delicious one.
We first came across wool bread through Subtle Asian Baking, an online community that shares Asian baked goodies created by fans of Asian cuisine and followers of the community. Gotta say, the wool bread caught my attention at first glance! Did you get intrigued by the "wool" too?

Using milk bread as the base of this wool bread
Because the wool bread was described as and also looked super pillowy and soft, there was no doubt that we had to use milk bread base to create this bread. Milk bread is known to be super moist, springy, and tender, it's hard to find another competitor. Plus, our version of the milk bread is eggless, so the bread came out really nice and white, which we thought was really fitting for "wool," lol.
Importance of using boiling hot water
Milk breads are commonly made two ways: "yudane" or "tangzhong." What are those? Well, both are gelatinized starch made by cooking the flour. Yudane, the Japanese term, for a sandy paste made by stirring boiling hot water into the flour to cook it. In Chinese, we call it "tang mian" or 烫面, literally meaning to scald flour. The other method, tangzhong (汤种), meaning water roux, or cooking water and flour into a thick paste where the flour is gelatinized.
With both methods, the ultimate goal is gelatinize a portion of the total flour used. In order to gelatinize flour, it is best to cook the water roux to about 150°F for tangzhong and use boiling hot water that's 150°F or higher for yudane. This will provide more moisture for your bread without making the dough difficult to handle and would give your bread better, springy texture with the addition of a little longer shelf life.

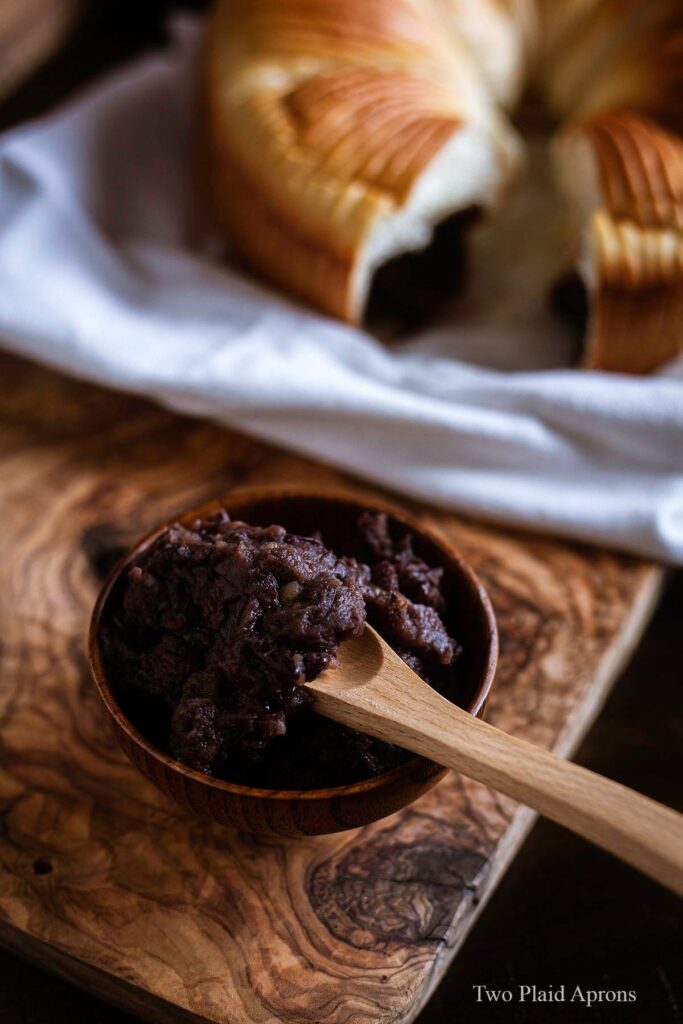
Homemade red bean paste filling
If you're a sucker for red bean paste anything like me, you have try making your own! The difference between homemade red bean paste and commercial ones will make you want to never go back to the super sweet packages. Not only can you adjust the sweetness of the bean paste to your preference, you'll really know what's in your food. We actually used the tsubuan (chunky red bean paste) from our Instant Pot sweet azuki bean paste recipe for our wool bread. It was AMAZING!
Making wool bread without a mixer (almost no knead!)
Sometimes, I don't have the luxury of a mixer to do all the hard work of dough kneading but have a lot of time to spare. Or sometimes, I just feel like taking it slow. Either situation, I always turn to my trusty (and favorite) dough making method, one without a mixer and almost no knead! So whatever the reason you're skipping out on the mixer today, try out this method for making this pillowy, soft wool bread:
- Sprinkle the active dry yeast onto the warm milk and give it a stir. Set it aside to let the yeast dissolve and activate.
- In a heatproof mixing bowl, combine the flour, sugar, and salt. With a pair of chopsticks or a fork, stir the flour mixture while drizzling in the boiling hot water. Let the hot dough cool for a few moments until warm to the touch, then add the milk and yeast mixture.
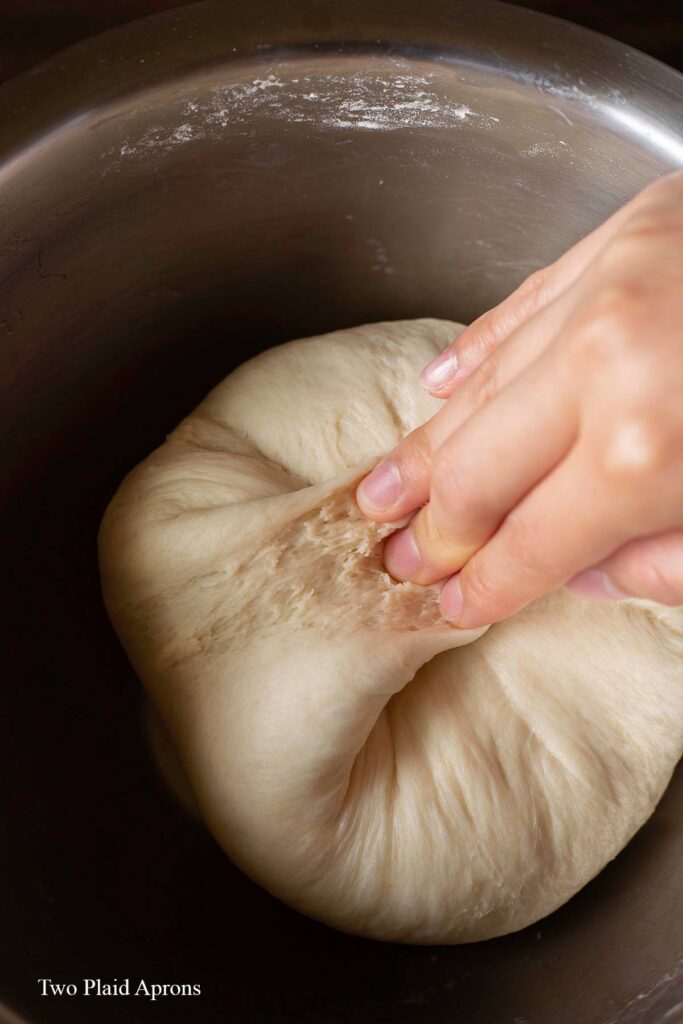
- Mix the dough with your hands until it comes together and no more dry flour is visible. Cover the dough and let it rest for about 30 minutes. After 30 minutes, add the softened butter and knead the butter into the dough until all absorbed. Round up the dough into a ball and let it proof for 45 minutes to 1 hour, or until doubled.
***If you have an extra 30 minutes, I highly suggest letting the dough rest again for 30 minutes after incorporating the butter, to allow more gluten development. Then you can knead the dough back into a back and let it proof for 45 minutes to 1 hour, or until doubled.

The dough after the initial knead. The dough after adding butter (second knead). Knead the dough by pulling the edge to the center for final proof. It doubled! Poke a finger through the dough. If it doesn't collapse, it passed the test!


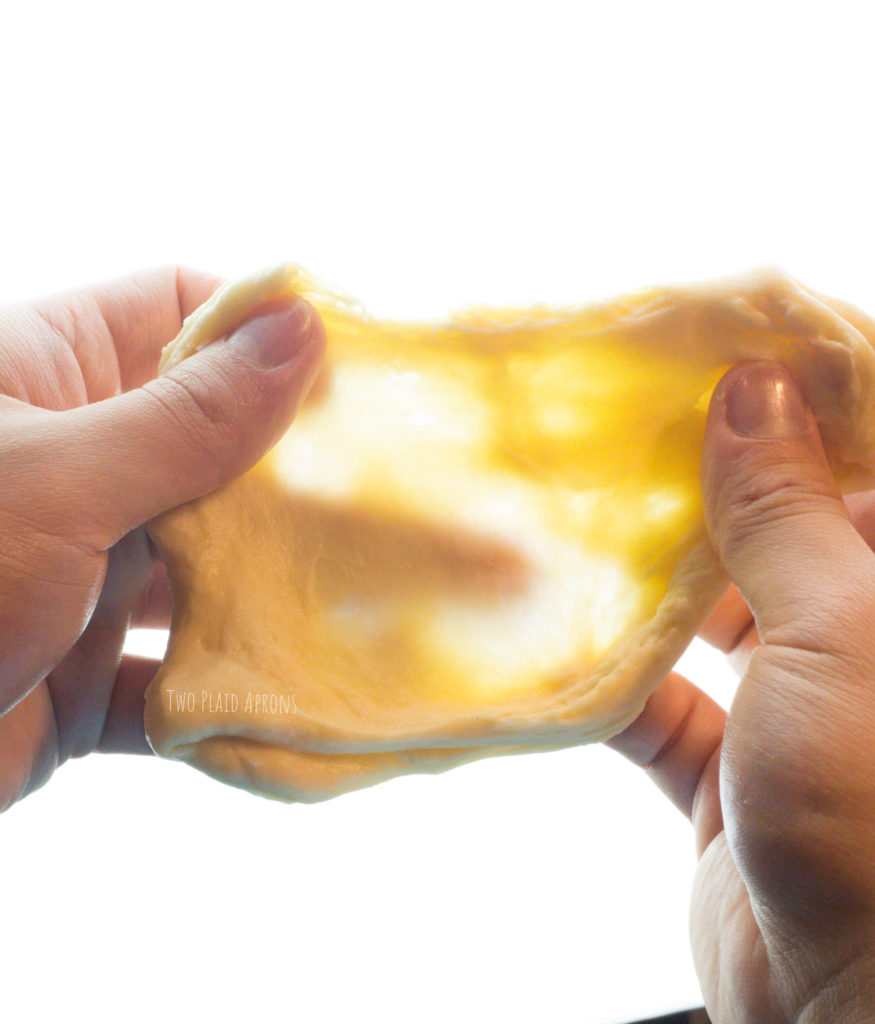
Window pane test
When making any bread, we alway recommend that you perform the window pane test. What is the window pane test? It's a way to determine if your dough has developed enough gluten, which upholds the integrity and determines the texture of your bread. To see if your dough passed the window pane test, break off a large pinch of your dough. Gently stretch your dough between your fingers until you can see silhouettes though the dough without the dough tearing. If your dough tears before you can see silhouettes through it, keep kneading the dough.
How to shape wool bread
Because the magic of wool roll breads lies heavily in the way it looks, here are the step by step guide on how wool breads should be shaped to achieve that pleasing "wool" look:
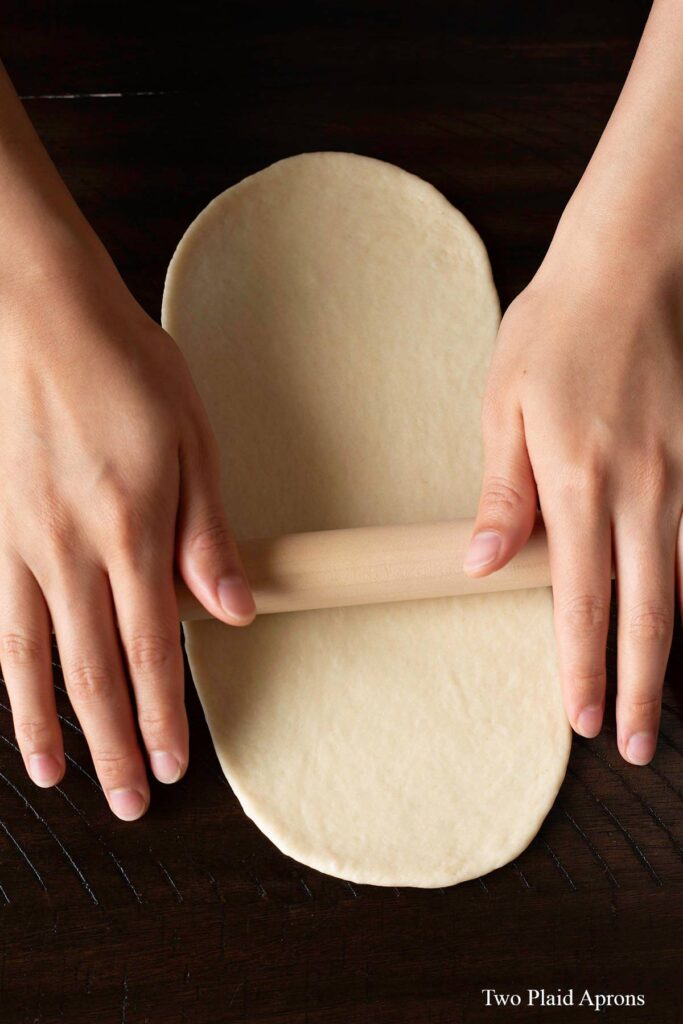
- With a rolling pin, flatten a dough ball into an oblong oval shape, about 8 to 10 inches long and 4 to 5 inches wide. The dough should be about ⅛ inch thick.
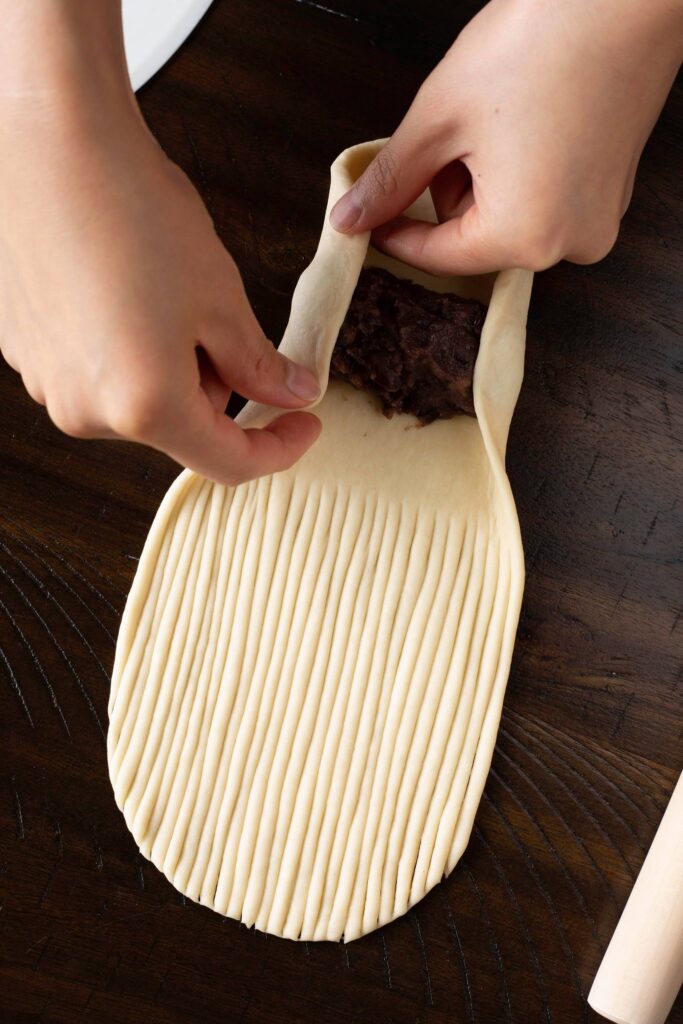
- Next, with the dough facing you vertically, make length-wise cuts from the middle of the dough to the top edge. Keep the cuts ⅛ inch from each other for the best "wool" effect.
- Fill the wool bread by topping about 2 to 3 Tablespoons of red bean paste on the dough that was not cut (the bottom half).
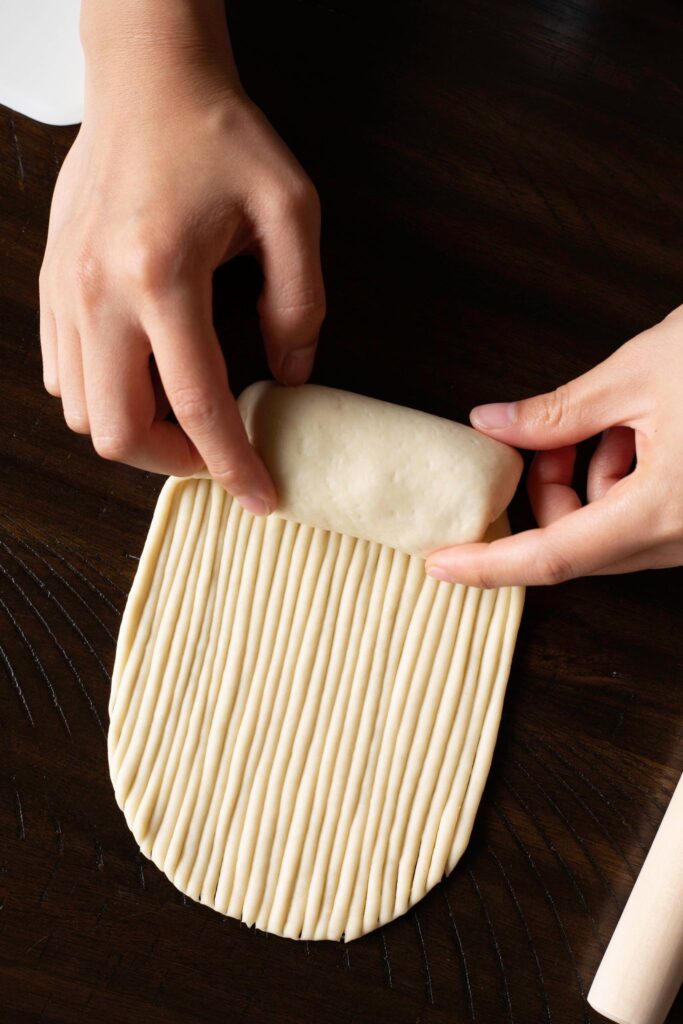
- Fold both sides of the uncut dough onto the red bean paste, then tuck and roll the dough like rolling a good burrito. Try to be gentle with the dough, especially where it's cut, to prevent the "wool" from being squished.
1. Roll the dough into an oblong shape. 2. Cut the dough into thin strips half way. 3. Fill the uncut side with red bean paste. 4. Fold the sides over the bean paste. 5. Fold the bottom dough over the bean paste. 6. Tuck and roll the dough. 7. Finished shaping. Arrange in a greased cake pan lined with parchment.


Use a deep cake pan for wool roll bread
We've tested the wool bread baked in a few different baking vessels and decided that we prefer a deep, round cake pan the most. Regular, 2 inch deep cake pans work fine, we just didn't care for the lip created when the dough proofed and rose in the oven. We also tried tube pans, and it was pretty good. But we much preferred the rustic, round look our 3 inch tall cake pan gave us. The bread was straight around the sides and has a soft roundness in the middle...like it's natural, lol. But honestly, any of the baking vessels work just fine, as long they can accommodate something equivalent to an 8 inch cake pan.
If you're looking for other bread or pastry recipes, you may like these:
- Black Sesame Mochi Muffins
- Snow Skin Mooncakes with Custard Filling
- Korean Sausage Bread
- Matcha Mochi Bread
Bake with love!
Mei ❤️
If you’ve made this recipe or any recipe from our blog, please tag us on Instagram @two_plaid_aprons! We would love to see your creations! It absolutely makes our day! 🥰

If you’ve made this recipe or any recipes from our blog, please tag us on Instagram using #twoplaidaprons! You can also tag us in your Instagram stories using @two_plaid_aprons. We would love to see your creations! It absolutely makes our day! 🥰
📖 Recipe
Wool Bread with Red Bean Paste
Ingredients
- ½ cup milk , warm (95-105°F; about 118mL)
- ½ teaspoon active dry yeast
- 2½ cup all-purpose flour , spooned & leveled (about 325g)
- 3 Tablespoon granulated sugar
- 1 teaspoon Kosher salt
- 6½ Tablespoon boiling hot water (about 95mL)
- 2 Tablespoon unsalted butter , softened
- 1 cup red bean paste , homemade or store bought (about 10-12 oz)
- 2 Tablespoon milk , or a beaten egg (for brushing)
Instructions
- Sprinkle the active dry yeast over the warm milk and give it a stir. Set it aside to let the yeast dissolve and activate.
- In the mixing bowl, add the flour, sugar, and salt. Give everything a good stir to combine. While stirring with the dough hook (or chopsticks or fork), drizzle the boiling hot water into the flour to partially cook the dough. Let the flour mixture cool for a couple minutes until it's warm to the touch.
- Once the flour has cooled and the yeast has dissolved, add the milk with dissolved yeast into the flour. Mix the dough on medium low speed with the dough hook attachment until the dough has roughly come together, about 2 to 3 minutes. Next, add the softened butter and knead on medium high speed until the dough is elastic, supple, and passes the window pane test*, about 10 to 15 minutes. Smooth the dough into a ball and cover the bowl with a plastic wrap or damp towel. Let the dough proof in a warm area for 45 minutes to 1 hour, or until the dough has doubled in size.*Window pane test is a way to determine if a dough has developed enough gluten. Refer to the post for a picture reference and more detail!*
- After the dough has doubled, punch it down and knead it back into its original size by folding the edges into the center. Transfer the dough onto a clean work surface and divide it into 5 even pieces. Roll each piece into a ball and let the dough balls rest for about 3-5 minutes to relax the gluten.
- Meanwhile, line the bottom of a deep 8 inch circle cake pan with parchment paper and grease the sides of the pan with butter. Set aside until needed.
- On a lightly floured surface, roll one of the dough into an oblong shape, about 8 to 10 inches long and 4 to 5 inches wide. It should be about ⅛ inch thick. With the dough facing you vertically, make length-wise cuts from the middle of the dough to the top edge, keeping each cut about ⅛ inch apart. You can use a bowl scraper, bench scraper, or knife.*Highly recommend referring to the post for picture references to this step! It'll be super helpful!*
- On the non-cut side of the dough (the bottom half), place about 2-3 Tablespoons of the red bean paste* in the center. Fold the sides and bottom of the dough onto the red bean paste, then tuck and roll the dough like you're rolling a burrito. Try to be gentle when you roll the dough, especially when you get to the cut portion to prevent the nice cuts from getting smushed. Repeat with remaining dough balls.*Depending on what kind of red bean paste you're using, you can use more or less. We really like using tsubuan (chunky red bean paste), which is a little looser than the classic anko (smooth red bean paste).*
- Arrange the shaped wool breads into the prepared cake pan. Cover the cake pan with a plastic wrap or damp towel and let it proof in a warm area for 45 minutes to 1 hour, or until the dough nearly doubles.
- Once the wool roll bread is almost doubled, preheat the oven to 350°F.
- Brush the tops of the wool roll bread with milk (or a beaten egg with a splash of milk) and bake the bread for about 25 to 30 minutes, or until the top is golden brown and the interior registers 190°F.
- Remove the bread from the oven and let it cool for about 5 minutes. Flip the bread out of the cake pan and let it cool until warm before enjoying.
Notes
- Because the magic of wool bread lies in the way it's shaped, we highly recommend referring to our post above for picture reference that'll guide you in shaping the dough.
- We filled our wool bread with red bean paste because it's one of our favorite fillings. Feel free to sub it for your favorite filling! But if you're a big fan of red bean pastes, do check out our homemade red bean paste recipe! It's much less sweet, tastes just as flavorful, if not better, and takes less than an hour to make.
- Also, if you're looking for a way to make wool bread without a mixer (and almost no kneading needed!), refer to the post above! It's my favorite way when I'm without a mixer or have time to take it slow.
Comments
No Comments